How To: My First Time Installing A Wig From Start To Finish
- Posted on 02 October, 2022
- Bob Wig
- By Anonymous
Hey y’all! I hope everyone enjoyed this Hair tutorial ….Turn on your post notifications, like, comment & subscribe.
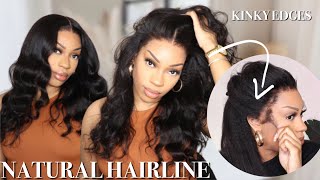
Hair details: 180% density HD body wave 13*6 lace frontal wig 22 inches
Video Hair Direct Link➤https://bit.ly/3UpUWFE
★westkiss official hair store➤https://bit.ly/3qW99fY
Join Our VIP Coupon FB Group Now(!!!$135 Discount Package)➤https://bit.ly/3obsYPb
Hot selling HD lace wigs➤https://bit.ly/3qW96AO
Affordable 37% Off Curly lace wig➤https://bit.ly/3R1wZ4r
Up to 43% off Lace Wigs➤https://bit.ly/3Lua1lx
Hot curly lace wigs➤https://bit.ly/3Uu0KxK
#westkisshdlacewig #westkisswig #westkisslacewig#WestKissHair Official Site Huge sale Big Discount
❤Follow West Kiss hair on social media
:Instagram @westkiss_hair_store: https://bit.ly/2OlKstu
YouTube @West Kiss Hair: https://bit.ly/2Ol5U1m
Wholesale WhatsApp: +86 13323741050
Follow me on my socials
* Instagram: https://instagram.com/me_heavenli?utm_...
* TikTok: https://vm.tiktok.com/TTPdMgf2s9/
* Twitter: https://twitter.com/me_heavenli?s=21
Email: [email protected]
*Intro beat by Mindz*
Shop my Amazon favorites!
http://www.amazon.com/shop/influencer-...
Hey y'all, I'm back with another heart tutorial if you're new, you're gon na love it here and if you're returning. What'S up as you can see by the title, this is a wig installment video. This is my first time installing a wig from start to finish, meaning I've, never gotten a fresh wig bleach. The knots pluck the wig and installed it myself. I'Ve only installed wigs that were already previously put on by stylist. As you can see, I did a half up half down with two space buns very cute. It wasn't that difficult. So, if you'd like to see how I achieved this look, keep on watching alone - hey y'all, I already know y'all gon na ask. So let me just tell y'all now this hers from West kiss. I received it in this cute: silk baggie with a few other goodies, so I got an edge brush and a wig cap. Well, actually, two wig caps! I got an elastic band. This is very much needed. I got a pair of lashes and I got this Bonnet. It'S a purple, reversible Bonnet, it's also black in the inside, as you can see, and it's really big like I'm feeling this and, of course the wig, which is a 22 inch. 13X6 HD lace, frontal wig. This wig is very full. It is 180 density. Okay. Now, let's get started, I did about seven braids to the back. These braids are a little messy because they're old, so I'm gon na get my got to be jail. You can also use the spray, but I like using the gel better on my edges, I'm going to put this gel on my edges and use my Edge toothbrush to brush it back. I do this because I like to lay my wig down very close to my actual hairline and to protect my edges, of course, so I'm going to blow dry it so that it can stay in place and repeat this process on the other side, foreign next I'll, Be using rubbing alcohol and a cotton ball to rub near my hairline, this will remove any dirt or oil and also it will dry up the skin to make the glue stick better. So I'm gon na grab my wig. I plucked it just a little bit and, as you can see, the knots are. Bleached is my first time bleaching, knots. Okay, go me so here I am kind of using my finger to part off the section of where I want to cut, and here I am cutting it off just a small little piece and then I'm going to repeat the process. On the other side, foreign, I'm going to cut off the lace and yes, I cut off the lace before I glued the wig down. It'S just easier to do it that way to me. So when cutting the lace I'll be outside the middle, then the left side. I like to get really close to the hairline, but I also like to leave just a little lace. Yes, once the lace is cut, I begin to pluck the wig some more to give it more of a natural look. Like I said before, this is my first time plucking a wig, so I don't even know if I'm really doing this right. I don't know if I'm using the right tweezers, I'm just trying my best foreign plucking, I'm going to brush the wig out. I didn't want to pluck too much because I don't want the hairline to look bald, just checking my hairline to see if I, like everything, I'm using concealer to color my lace and applying it with a makeup brush. So here I am putting the wig back on. As you can see, the lace is blending much better put in my hair in a ponytail to get ready to glue this thing down. So before I glue the wig down I like to Mark work, I need to put the glue because I don't like to put unnecessary glue in unnecessary places. So I'm using ghost Bond and I'm going to apply one layer. I don't usually apply two because I don't keep my wigs on for that long. But if you wear your wigs for a long time, do two, maybe three layers when I mark on my head. I do it lightly so that it can be easy to take off. It'S only there to guide me for the placement of the glue. I also like to apply my glue in sections as well one side, the middle and then the other side. Just taking my time with it once I apply the glue, I dry it down, I'm just using a eyelash case. You could use anything. I don't know why I didn't use my blow dryer. To be honest, once the glue is clear. That means it's tacky. So then, I carefully place the wig down. I use my fingers to kind of gently push the lace down a little bit because I see Eric and Tay using his finger. So I feel like that's the right way here. I am I'm just repeating this same process. In the middle of my head and on the left side, foreign, now that I got my wig down, I'm going to use the same makeup brush from before with the concealer on it just to help blend the lace more. So I'm going to use the edge brush that they sent me instead of my dirty old Edge brush, because this is a clean lace and I want to keep it clean. So I'm going to brush all the hairs back and get one of my elastic bands. This is actually more like a cotton elastic band, but you get it so to secure my wig, even more. I like to use, got to be spray on the lace. I made a mistake by spraying it that close to my hair, I actually should have sprayed it in my hand and kind of like dabbed it on there once I spray that I tie the elastic band on my lace, then use my blow dryer to dry down Foreign once that's dry, I put on the other elastic band just to really melt the lace. Moving on I'm now going to get started on the actual hair. I was very indecisive on how I wanted to style this wig, but I first had to start off by straightening the wig foreign foreign, I'm finally done straightening my hair. I didn't use any products while straightening my hair, now it's time to take these elastic bands off. Although my wig is laid, can you all comment down below what products I could use to help get rid of the light cast on my lace? It usually Blends in with my skin a little bit better like a day or two after wearing my elastic band, but I like to get rid of it immediately. So what could I use comment down below so now we're about to get started with my baby hers? I was debating on if I wanted to do baby hairs with this hairstyle, but of course I decided to do it so I'm first going to start off by sectioning off a piece from my Sideburn and up at the top. I do two swoops on each side. I'M gon na make sure I take my time. I don't want to leave too much out foreign to help it lay down better. Then I'm going to cut the baby hair shorter. You don't want to cut the baby hair too short, because then it's not going to swoop right, it's best to cut longer than preferred and then later on, cut it to your desired length. So I'm going to go in with my mini flat, irons and curl. My baby hairs going up foreign right after I'm done curling them. I like to swoop them to get an idea on how the baby hairs are going to look once I figure out how I want it. I use my got to be spray to lock it in. I don't use edge control on my wigs because it makes it very sticky - and I like for my baby hairs, to look very fluffy foreign now that I'm done with that, I'm going to repeat this process on the other side, foreign foreign. So my first thought was just to do a part down the middle with um big curls. Then I changed my mind. I wanted to do the half-up half down the space buns I felt like that was cuter plus. I also felt like the curls were cute with that style as well, so it all worked out foreign also after curling every piece I like to hold the hair, in my hand, to help lock in the curl so that it'll last longer and as you can see, I'M using the Bonnet because the curling iron was so hot and the hair was burning my hands. Now that I'm done, I combed out the curls and the curls came out really really cute. In my pan foreign, I sectioned off a piece of her in the front used my wax stick to kind of jelly down. I use my brush to get it nice and smooth, and I put it in a ponytail. This was not my final ponytail. I just did this placement to kind of get an idea of how and where I wanted my ponytails to be foreign now that I'm done with that, I'm going to repeat the process on the other side, foreign. So, as you can see, I kind of have a placement on where I want the ponytails to be so. I'M going back in with my wax stick to flatten her out more then using my Edge brush, because I wanted my ponytails to be really flat or as flat as I could possibly get them, and then I'm going in with my hot comb. So this is my final ponytail. I used two rubber bands to put the ponytail in the ponytail which made the ponytail tighter, if that makes sense and as you can see, I'm taking that first rubber band off because it is no longer needed now, I'm going to repeat the process. On the other side, foreign now moving on to the Buns, as you can see, the ponytail hair isn't that thick, because it isn't that much hurt in the ponytail. So I had to tease the ponytail and, as you can see, I'm twisting the hair creating the bun. I usually don't use bobby pins, but since this bun really didn't have any structure I had to so I am one button down. I have one more to go so here I am repeating the process. On the other side, I'm not gon na lie. This bun gave me a lot of trouble. I had to redo it several times, but of course, I eventually got it together, so that is it for my first wig installment video. Before I show you all the final look, I would like to thank you all for watching, don't forget to like comment and subscribe. Please leave some comments on what I could do better next time. Lastly, don't forget to check my description box for the details on this. Her from West kiss, I love it but yeah. That'S it see. Y'All in my next video bye y'all. I get what I want.

Comments
Life As Diamond Gurl: Omg you did so good! After watching this I’m going to try and install my first one as well.
chaaya jé: super cute, great job! im so scared to bleach knots on my own lol
Dee-Dee Michelle: This is so cute
Itss DreDa: Perfect
Kungfu Kenny:
Luxe Girl: Hey How tall are you?