Fluffy Layers & Curtain Bangs | Install This Auburn Wig W Me | West Kiss Hair
- Posted on 26 December, 2022
- Bob Wig
- By Anonymous
▬▬▬▬▬▬▬▬▬♛#westkiss♛▬▬▬▬▬▬▬▬
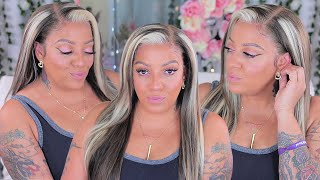
Hair details: 180% density burnt orange body wave 13*4 lace wig 24 inches
Video Hair Direct Link➤http://bit.ly/3PREzQi
★westkiss official hair store➤http://bit.ly/3vev8AR
$135 Coupon for Join Our VIP FB group➤https://bit.ly/3obsYPb
Hot selling HD lace wigs➤http://bit.ly/3HUbK3M
Affordable 37% Off Curly lace wig➤https://bit.ly/3Vro3Yd
Up to 43% off Lace Wigs➤http://bit.ly/3Wk7Oxu
Hot curly lace wigs➤http://bit.ly/3YPZKXc
#westkisshdlacewig #westkisswig #westkisslacewig
#WestKissHair Official Site Huge sale Big Discount
❤Follow West Kiss hair on social media :
Instagram @westkiss_hair_store: https://bit.ly/2OlKstu
YouTube @West Kiss Hair: https://bit.ly/2Ol5U1m
Wholesale WhatsApp: +86 13323741050
Title:Orange Girl! | Winterl Inspired Hair❄| Start to Finish | West Kiss Hair
Hi guys it's Zoe and welcome back to my Channel today, I'm going to be showing you guys how I installed this beautiful Ginger wig from West kiss hair. It'S like a rich dark, Auburn orange. I don't even know what this color is, but it's so flipping cute. I'M going to show you guys how I installed it as always and tell you my thoughts throughout the video um. I decided to go for this like bouncy blow dry. Look with like these curtain bangs. I'Ve always wanted to try and like achieve this, like like a Victoria Secret like big bouncy blowout, and I've never known how to do it properly and like how to like do the front bit properly. But I think I figured out the perfect technique, but yeah guys. If you want to see how I installed this wig make sure you keep on watching um, and I will see you in a second: are you ready so jumping right into the video? As I said at the start, this beautiful wig is from West kiss hair um. As always, it comes in a really cute little silk storage bag. So when you're done with your wig, you can put it inside of this bag. It came with a wig cap. It also came with some lashes, an edge brush which always comes in handy um. It came with a bonnet which is perfect. I actually needed a new one and it also came with a little melt band um, which you'll see me use later on. So the specs of this wig I've got a small cap, size, 180 density and it is 24 inches body. Wave um here is a little close-up of the color. As you can see, it's just this really rich auburn color and I literally couldn't wait to install it. Like the minute it came out of the packaging um, here's a little close-up of the lace as well. It comes with a lot of parting space. I was so shocked guys I didn't. I didn't believe this was a 13, but for like it looks like way more, but anyway I decided not to bleach the knots just because I don't know I just didn't feel the need to, but I kind of wish I did because bleaching and not sometimes not Only lightens them but also weakens the root of the head, which makes plucking 100 times easier um. So I did actually struggle plucking this a little bit um, because the hair was really tough to pull out. If that makes sense, if that's not something you're worried about, then don't worry about bleaching it because, as you can see like the color is still beautiful, and I don't really see any black knots here at all. This is what the hair looked like after I bleached it, and I also went ahead and straightened it on my mannequin head. I just like to install all my wigs like from scratch and just dead straight, so I can really manipulate and see what I'm working with moving on to the install here's a little close-up of the wig again so pretty. I started off by tinting the lace with an old Foundation of mine and I applied it to the lace with a dense, Kabuki brush, as always um, really getting that in there making sure that I really press all of that color into the lace. And this is what it looked like after I tinted the lace. I went ahead and put the wig on um. Someone asked me this in my last video. If I leave my wig caps on, I only put the wig cap on for the video guys literally because my corner is always Messy as hell, but I always like to take off my wig caps. I don't like using the bald cap method. I think it's pointless and it ruins your edges, but each to their own um. I literally just do this and make sure that I don't apply any lace glue to my actual hairline, so you want to place it slightly before your actual hairline and your edges will literally be fine guys, like it's just an unnecessary step for me, but anyways um. As you can see, I'm just hot combing, the hair, to make sure I tame any flyaways um before I clip the hair away from my face and start cutting out the lace. I always just clip these little side pieces where there's a little extra lace, um just to make gluing down, and you know installing it a lot easier. I'M gon na go ahead and grab my scissors and cut one two, three four, four little slits, three, four. Whatever you can see, and then I'm grabbing my better the Melt lace glue. As always, this is my favorite lace glue. I can't Rave about this enough today. I went for three layers of this glue because I wanted this to stay on, as I had some plans during the week um and as you can see, I'm just using literally the back of an eyebrow razor use. Anything you have just as long as it's a flat surface and I just applied it in a thin layer, waited for each layer to dry, completely clear and then press the lace down. I always press the lace down for around 10 seconds and grab my comb as well to help adhere the lace to my skin and the wig. I just feel like the comb also makes it look a lot more seamless, um. It just really makes sure that it presses all the product in I'm now going to go ahead and repeat these exact same steps to either side of my head, so two layers of glue and then pressing it down for 10 seconds and then grabbing my comb and Really working that lace glue into the hairline once I've pressed down all the glue, I'm Now quickly grabbing my got to be hairspray, and I use this just on the sides of my head because that's where my lace always starts lifting first. So I wanted this to have some extra security, so I apply a small amount of this, not too much because I've noticed this hairspray likes to turn white and ashy um. So I apply a really small amount and make sure that I dry it with my hair dryer again going in with the comb just to make sure I smooth all the products out and then grabbing my hot comb as well. I don't really know why, but I just feel like it melts the product and melts the hairline better um. You can skip this step. I don't even know if it does anything but yeah. I just went in with my hot comb and then grabbed my eyebrow brow. Razor and started cutting the lace off. I need to get a new one of these. Actually I've lost all my other ones, but these are literally the best one. I can't live without them and I cannot install my wig without them either. It literally changes the whole look of your hairline. I say this in every video, but seriously it gets and eyebrow razor guys and the lace. I also make sure I go in with my comb, the back of my comb and just press down any little patches where the glue is lifting a little bit or the laces lifting and just make sure that it's all adhered properly to my skin. I also go in with my Kabuki brush, which we used earlier to tint the lace and I'm just going to go ahead and just go over any little pieces where I feel like it's, not melting or like blending of my skin properly. Once this is done, I'm grabbing my West kiss melt band and wrapping it securely around my hairline. You want to let this sit for about 10 minutes. So, while that's sitting, I'm grabbing my scissors and I'm gon na start cutting the layers on this wig. I feel like the layers, really transformed how this came out and how the curls looked. So I'm literally just grabbing my scissors, I'm starting at the ends of the hair and just cleaning them up a little bit. I just wanted it to be a lot cleaner and now I'm sectioning my hair um, like sort of half and then starting with these Front Bottom sections and cutting diagonally and then parting, my hair. This is so hard to explain guys. I'M sorry, I'm really bad at explaining things, but essentially all I'm doing is sectioning my hair off I'm focusing on the front framing pieces of hair and cutting them diagonally the higher up on your hair. You go the shorter! You want these front pieces to be so, as you can see, I'm starting a bit higher here trimming the ends for the very top of my head. I wanted curtain bangs while longer and bangs. So, as you can see again, I'm starting higher than I did on the other bottom layers and cutting diagonally moving the hair and the scissors along as I'm cutting. You want to make sure that you apply very light pressure to the scissors as well, so that you don't make the hair look blunt or like choppy. So I'm just repeating this to the other side, and it should look something like this once the layers are cut. I'M going to take off my melt band, and this is what it looks like. I just wanted to show you guys what the hair looks like straight as well, so this is straight with no baby hairs. I was so tempted to leave it like this, because this is kind of cute guys. This is actually cute it just it's just giving Sleek like I'm in my redhead era. Like I don't know, I just love it, but because I'm Zoe, I always have to add some fluffy baby hairs and started parting them off um. I always start from about my mid eyebrow and then work my way down to the sideburns, and I didn't want these baby hairs to be too heavy because, with colored hair I like to keep my baby hairs really light and fluffy um almost not even noticeable. I'M essentially literally adding them just to blend in the hairline a little bit more with my um with the lace on my skin. So, as you can see, I cut the baby has to my desired length and then I'm grabbing my mini hair, straighteners and curling inwards towards my face on each section. Once I do this, I'm grabbing a light. Hold hairspray don't use anything heavy that I've got to be because this will create stiff, looking baby hairs. I like this one, it's literally just a random hairspray. I had lying around spray it on my Edge brush and start shaping up my baby hairs. How I like them to look as always. This is personal preference, and you can always play around and find out how you, like your baby, hairs to look and see what suits your face shape best but yeah. This is what the baby hairs look like when I was done with them once they're all done, I'm grabbing my melt band again and just setting the baby hairs. While I move on to creating some pin curls in the wig, because I wanted to go for a big Victoria Secret, blowout curl, so I'm grabbing my two inch barrel. I think I got this color from Amazon like literally three years ago. It was 15 pounds literally just type in a babyless two inch color and it should come up on your Amazon um, but essentially all I'm doing is grabbing big chunks and curling each section dropping it into my hand and then clipping it with these little random. Crocodile Clips I have um and clipping the hair essentially sets the curls and makes them last a billion times longer and creates a more voluminous look as well. So I'm just repeating this for my whole head once we get to the front for the curtain bangs. I'M now brushing all of them forward and curling inwards towards my face for the rest of my head. I called Wing away from my face, but for the front section you want to call going towards your face, so I clipped all of that up left it for about five minutes, so it had a chance to cool, and then I took all of these curls and Pins out - and this is what we got as you can see, it's going giving volume guys and I didn't want these curls to be like curls. I wanted it to look like. I went in with a round brush um, which is why I use such a big barrel wand and, as you can see in a second I'm going to be combing through this hair as well um just to make it look like less like this. Essentially, so I'm really fluffing the hair up off camera. I also tip my head upside down and really shook my head up. Um I played around with the curtain bangs a little bit more and curled them and cut them to my desired liking. I wanted them a tiny bit shorter, so they're already flicking um the way I wanted them to flick, and this is the final look guys. I hope you love it as much as I do. This haircut is just to some of my best work. If I do say so, myself um love it the cut the color everything is giving literally got so many compliments on this hair. I'M obsessed but yeah guys. If you enjoyed this video, make sure you like comment subscribe I'll leave all the links in the description. As always, and I will see you in my next video bye guys
Comments
Syriah: Gawj ❤️