Start To Finish Wig Tutorial | 10" Bob Wig |Ft. Poshlife Hair
Hey Loves,
Welcome back to my channel!
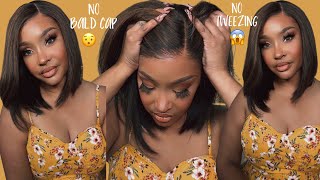
I don't usually wear short hair but let me tell you I'm loving this bob wig??? I wanted to show you guys how easy it is to install our Lace Wigs.
Thank you so much for visiting my channel and I hope you enjoy the video.
DON’T FORGET TO SUBSCRIBE!!!!
___________________________________________________
Hair Specs:
PoshLife Hair Boutique
Wig Brooke
Length: 10” Lace Frontal Straight Wig
Products Used:
She is Bomb Edge Control
Got2B Freeze Spray
#shortwig #HairTutorial #LaceWig
Want to purchase this hair click the link below
https://poshlifehair.com/collections/l...
_______________________________________________________
View my products by visiting us online or in-store
PoshLife Hair Boutique
2516 Dawson Rd #F
Albany Ga 31707
Store: 229-434-9417
What's App: +44 7448645753
SHOP POSH
Instagram: @PoshLifeHair
Facebook: PoshLife Hair Boutique
Twitter: @PoshLifeHair
_______________________________________________________
Follow me
Instagram: @IamLaviniaLisette
@PoshLifeHair
#LACEWIGTUTORIAL #BOBWIG #HAIRTUTORIAL
Hey guys welcome back to my channel. Thank you guys so much for tuning in my name is Lavinia Lisette and in today's video I'm gon na show you guys one of my BOB wigs for my wig line. I just want to show you guys a short clip of me installing this wig I've had a lot of questions about this wig, so I figured I would just do a short tutorial on how to install this short wig. So this is wig Brooke. She is a 10 inch lace, frontal wig made with our Brazilian straight hair. This is how she looks all I've done with this. Wig is just bump the ends of it straight out the pack, so I'm gon na install this wig. So you guys can see how this wig looks on if you're interested in purchasing you can head on over to my website and pick up wig Brooke. So if you're interested in seeing how this bob wig turns out, then stay tuned so guys. I already had my hair prepped, my hair is braided underneath and I did just you know, pull my edges up with some, but I use I used. She is bomb edge control. I actually love these products. Hope you guys can see that I love these products. I found out about this company at the Bronner brothers hair show a couple of years ago and I love their edge control and I also love their wax, which I'm sure you guys have probably seen me, use it and one of my videos. I'Ve used the wax and I like their growth, hair growth serum as well. So if you guys want to go check out, she is mom. They have some of the nice products and it's black on business, so go out and support. So all I'm gon na do now is go ahead and put my wig on. I have adjusted my strap already. I'M just gon na go ahead and put it on so usually I just go ahead and position my wick in place and then I just pulled the hair back and apply some pin just to get it out of my way and then sometimes I will even take A little bit of water and conditioner, I would spray all my fingers, and this would just take them baby hairs out the way I like to use these small scissors, they're very precise, and I just feel like it helps me out a great deal. I am NOT a hair stylist. I don't really know how to do here. I just do my own, so I learn a lot too from YouTube and that's why I like to do these tutorials because for people that purchase my products that don't know how to do hair, I like to show them what you can do on your own and Me being a unprofessional hairstylist, then it just gives people the confidence that they could do it themselves at home. So if you see me doing something, I don't know how to do hair. I just do my own okay. What I'm gon na do is I'm just going to make sure everything is out the way and I'm actually going to start in the middle but and get close to the hairline. I'M just gon na make some sections okay, so I'm gon na start from the right back here. I hope you guys can see this and, like I said before, I like to cut close to the hairline, but also in a jagged line. So it's not really straight and then I also try not to cut any of my baby hairs. Sometimes you can't avoid that, but you know I try not to cut any of the baby hairs. If I don't have to - and you see why I said, cutting in sections makes it easier. You don't have to worry about cutting all the way or continuing to go. If you do it by section by section, it just makes it so much more easier and then you can always go back and cut more lace if you'd, like you, didn't cut enough, so I wouldn't freak out when, when you're doing this, for the first time as You see, there's still a little bit of lace on there and and also disclaimer. The knots on this wig have not been bleached but, as I say in all my videos, all of the wigs that I sell in store all of the wigs come with bleach knots. Remember the goal is to be able to have a product where you have to do as little work as possible and that's what I try to do for all of my posh babes. So if you purchase this, will you just keep in mind that your nuts on the wig will already be pre bleached? For me, this is the most difficult part to cut, because you have a lot of excess lace, so you want to be able to get around the ear, but you don't want to rule too much so you're able to still cover you know your tabs, the tabs Still remains, you can cover right there, and I remember like when I first start and some of my wigs, I used to get scared of cut in like the legs, where the hair is, but it's totally fine. You need to cut through, like say, fences if I had a smaller head and my friends will need it just start right here you could cut all of that off. You can remove all of that and you're not gon na have a problem. You know. So don't be scared to cut more than just the front of the lace if you have to you, can see like here and the same on the side. So it's really simple. It'S really simple: to remove the lace so now that I've removed the lace. I do like to use my gas be glued just as bright just disregard the busted broken bottle. As you know, I like to use this a lot, so I'm just gon na apply some of this on around the perimeter and then I'm going to let my lace sit on the free spray until it dries got to be free spray. Will you spray it on my? It is freezing pole and you can really get everywhere, so I picked up this tip from youtuber Silvana. I can't think of her last name, but I will link her down below so you can check out all of her tutorials. So what I do is I take my Fabrice more for breeze right for breeze spray, guys I take my gut to the glued spray and I get a shot glass and I get one of my old makeup brushes and what I'll do is I'll, just spray it Into the bottle into the shot glass sit my little brush in it, and then I will start to go across my hairline. It'S just not as messy you won't have the freeze place, the free spray sliding all down your forehead and the ears and stuff. I just can't stand a so. I really do appreciate this method here. So I'll just do one little thin layer. I take my wit's off at night every night, so I really don't do like a really secure hold. If I do, that means I'm like gone somewhere like for the weekend or something but most nights most times. I don't apply a lot. I just take my wigs off at night and that's why, in a lot of my stories, you guys see me in this bonnet because I just don't wear them at nighttime it really. If I'm in the house, I don't really wear my ways so spray it on. I'M just let it dry a little bit and then what you want to do is pull the wig forward and start applying it into the lace I like to use a rat tail comb because it helps me just sit the lace onto the free spray. So that's what we're gon na do right now, so I'll use my fingertips just to place the lace down first, which is not really a good idea, because if you're using the gut to be glued Jill, then it could just be a hot sticky mess. So that's why it's best to use the comb and then you can also see where, if certain sections are not sticking down, you can go back in and then just just apply a little bit more free spray. Take your rat tail comb laid out lace right on top, so I'll just do this all around the hairline and then afterwards I'll get like a scarf. I don't have any of my posh life scarves here, but I would take a scarf and then just wrap it down. But if you're shoveling on the website, you can pick up one of our posh life here, scarf satin scarves, and then you can tie your hairline down much neater. Imagine that's need a way to do this. I can't deal with all this stuff sliding down my face and then it's freezing cold. Then it's. You know it's seeping onto my eyebrows, my eyebrows going rock-hard. I just can't deal and I actually like to use the gel the got to be glued gel in the yellow bottle. I like both of them actually like the black one, the one in the black bottle and the one in the yellow bottle. But the hold is better, but it is so much more messier right so much more, so you just keep doing that until you get the weight completely secure. Okay still feel pieces popping up, so I'm just gon na go back through, don't check sections now you can actually see it's been going down. Okay, so I'm just gon na move. All my pens remember, I said all I've done to this. Wig is just bump. The ends, so you can see it's a slight curl on here. This was straight out of the pack, but I will probably end up doing something to the front of this hair. No, I actually did go in and try to define my part of Harding's day. So I did do a few things so this way before putting it on so you could wear this in middle part, side part, whatever kind of part you wan na, wear, I'm actually gon na put this behind my here. I think hot curler just to go in and make sure everything is nice and straight and I'm just gon na do just a tighter curl right there there we go and there we have it quick and simple. This is the finished look of awake Brooke. As I said, this is a 10-inch, a lace, a frontal wig and, like I said you can part her anywhere. You want to part her. This is a thirteen by six parting space. You can actually have a deep part, which is pretty cool for those of you that like to have a deeper part, I don't necessarily mind, but I do like this. This wig is super easy to install lightweight the hair is flawless, as you see. Can you see stiff where, where so? I hope you guys enjoyed this short tutorial if you're interested in purchasing this wig, you can head on over to my website at Pasha life, hair, calm and check her out. Don'T follow my business page on Instagram, which is posh life hair and sign up for our VIP list, so you can benefit from all of the perks of being a VIP member which includes monthly discounts giveaways amongst our members. Only so the itch perks are joining our VIP members, so guys, thank you so much for watching my video. So you follow me on instagram at I am Lavinia Lizette and don't forget to subscribe to this channel. If you enjoyed this video. Thank you guys so much for tuning in, and I will see you all in the next one.

Comments
Simply Dej: Yessssss your set up alone is amazing, I enjoyed this video! You did a great job! New subbie here ❤️
Portia Luxy: You really look good with the Bob wig