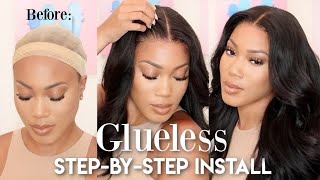
Luvme Bob Wig Review
Please remember to Like, Share, comment and Subscribe!!!
Hey y’all, welcome back to my channel so this is a sponsored hair review video from luvmehair...heh heh...hope y'all like this review.
Use my discount code for dollars off your purchases on LUVMEHAIR website
NESSA20
GORGEOUS SIDE PART SHORT CUT FRONTAL LACE WIG
https://shop.luvmehair.com/products/go...
Details on this wig:
8' Bob
150% density
Amazon Prime Wig | 8' Bob Wig Review
HOW TO INSTALL LACE WIG USING BOLD HOLD | BALD CAP METHOD
$25 BOXYCHARM MONTHLY SUBSCRIPTION:
B U S I N E S S I N Q U I R I E S
CONNECT WITH ME
SC:nessaslimzz
IG: nessaslimzz
FB: https://www.facebook.com/nessaslimz/
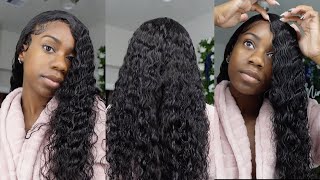
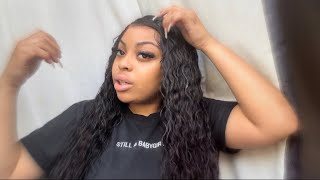
Hey y'all welcome back to my channel your girl, nessa here and today we have a wig review from love me hair. So let's just get into what's in the box, real quick! So, of course, the wig, a wig cap um this little power shirt, some little um wig essentials like a rat tail comb, some wax - and this is to contain our tame, your flyaways bobby pins, love me, hair, clip and, of course, a tweezer. So like guys, if you're on the go taking a vacation, then you need your wig essentials there you go. So thank you. Love me for that um. So this is what the wig is looking like. So it's eight inches long. So it's a bob wig. Of course frontal and it's a 150 percent density, uh, natural black and, of course, um. The lace is swiss and it's in medium brown, so guys this is a 13 by four uh lace, frontal bob wig and it's 18 inch. 18., it's eight inches long, so guys. I did go ahead and style the wig off camera all right now up and uh applying this wig, as you can see, there's some a little bit of something something there that i've never seen before never worked with before, but um we're gon na. Try to finish this week as best as we can all right guys, so the wig it's so that little thing right there that's the adjustable straps, however um it also has the um band that you know that we sew on our wigs to make it tighter or Fit better on her head, so i'm going to remove that because the way how it was sewn on it was just pressing on my ear and i just could not have it so anyway, i cut it off. Now i'm going to go ahead and cut off that extra piece piece of um lace from off of the wig, because i don't know how to work with that i mean it. Was it looked tacky when i tried to lay the wig down without removing that part of the wig, so we're going to take that off and we're going to you know, do some rework on this wig all right guys. So, as you can see in the securing it on the mannequin head as we go and try to you know make sure that this wig stays in our head. So i'm gon na cut off. I did say that before, but i'm gon na actually cut off the adjustable strap. That'S because the way how they were positioned, it was just weird and y'all - will see in just a little bit, so i'm going to go ahead and sew back on the band. So this is just to secure my wig on my head. Just in case you want to you know, wear this as a glueless. You know and all that good stuff, but i like how my wig is extra extra secure. So i'm definitely going to use some godzilla glue, which y'all will see later on down in this video, so we're just going to put those straps back on and, as you can see, i put them further up so that um it doesn't sit on my ear. The entire time when i have it on all right, if you want a detailed video on how to sew on your strap, to make your wig fit your head better, just comment down below, and i will do a video showing you guys how i do it all Right guys so right now we're just trying to make this wig fit. Okay, fit this tiny little head that i have all right guys so taking my time sewing on the band all right guys. So if you are interested in this wig uh, please check out the description box. There will be a discount code and it's also somewhere on the screen, which is nessa20. You can use my code for 20 off any items on the love me website. Alright, guys their link will be down below alright. Also, if you're new to my channel, please go ahead and um subscribe to your girl y'all. Well now we have fun like script. Subscribe go subscribe, quick on all right, so i'm going to go ahead and tape the lace because i did not do anything else to the wig other than just moving around the bands, the strap cutting off the extra lace there. All i did was just thin. The lace and it was ready to go all right guys so yeah, that's what we're doing. I just didn't feel like plucking it. It already came pre-plugged so um. I didn't have to do anything extra other than just put it on my head and just you know, work with it. So, as you can see, i always cut around my ear portion to make sure that the wig is. You know just right before i start laying it down, because it makes no sense to put it on and then after you start working on it, you realize that it's lean paul one said i have to just take half back and try all over again, so i'm Gon na find out anyway now i'm using the new got to be glue. High insta hold like i've, been waiting for this in the mail for so long now. I finally got it and i really like it it's was. It was so easy to work with like there were. I had residues on my forehead, which y'all will see in just a little bit, but it was so easy to. You know just wipe it off. So, as you can see, i'm just making sure that i press the lace down in that um gel for spray, whatever you want to call it, and i'm just going to speed up the drying process with just the blow dryer all right guys. So i'm going to proceed to tacking down the sides like guys. This is my quick and easy way of how i uh apply my wigs, like ghost bun bull hole like i, don't know y'all, but at night i just want to take my wig off. Okay. I just want to take my wig up and i just want to relax and i just want to be free and it's so easy when i do this method other than just doing the ball cap, and then i have to use the ghost spot or the ball Hole like no i'm not having it anywho, so i'm just going to you know, speed up the drying process once again and yeah all right guys we're going to go ahead and cut off the laces y'all know i do this every time. Every time i apply a new wig, um yeah same process, nothing change only difference is that i might. I might change the products that i use in the hair or products that i use to put the wig on, but like the way, how i apply my weight. Doesn'T change at all, and this can take you like 15 minutes. You know to put your wig on. That'S if you don't have to do all those stuff that i did before applying the wig all right. So we're just going to go ahead and we're going to cut as close to the airline of the wig as possible and just be careful not to cut yourself. Because it will happen all right, y'all see that how nice it look coming together. I mean you know: minus all the flakiness and ashiness there, but it looks the wig looks really good the lace. You know it melted into my skin and man. It was just looking flawless all right, so we're going to go ahead and make sure that we trim around the edges make sure that everything is cut properly. Now we're going to secure the edges, because when i was cutting the lace off it kind of lifted a little bit but want to make sure that everything is nice and secure by just retouching with the frizz spray. And then we're going to go ahead and tie it down and let it sit there for maybe like three minutes and there you go look at that all right. We'Re going to go ahead and clean up our forehead, because we do not want all that residue on our face, especially not under our makeup, because girl, it will show all right. So we're gon na go ahead and define that part like yeah and now we're going to tame those flyaways because y'all all right, i'm gon na tie everything together, make sure everything is nice and flat. All right. Now we're going to go ahead and lay some edges. You know i could have worn this without actually you know doing any baby hairs, but i felt like i wanted some baby hair. So first i'm going gon na start with the sideburn like. If you've been watching my videos um there. I have videos um with videos, so y'all can check them out. If you wan na, you know see another video, uh yeah i'll, have the link for those in the description box as well. So i'm just parting this the front part and i'm just parting little sections. Just to make the baby here um yeah, because i do not like the big ass giant size baby here i like when they're like subtle and, of course, i'm just using the gotch to be glue gel to lay them down. God all right we're going to go back in and clean off around our edges, make sure everything does look natural. You blend in you know and yeah. That'S basically it for this wig like y'all. If you like this wig, if you like this video, go ahead, give this video a thumb up, remember to go check out. Love me website. The link will be in the description box check them out. They have a sale right now, so yeah girl all right guys. Thank you for watching and i'll see you in the next one.

Comments
Claudia Miller - musick lover: I'm so proud of u girl
Growing with Xolani: Enjoyed watching this tutorial!
Kim Lee: This video has been really helpful keep up the good work
No comment: How long do you or can you keep a wig like this on? Like how long does the glue last? Do you remove it every night?
Deva Richards: Great job with that wig.. keep rocking.
desann johnson: Well done
Tracey Belindaa: Did u order this or they sent u for free
Nadalee Anderson: ❤❤❤❤❤
Light side of the Moon: Lawd the way the brok out ina patwah
Shanice Gaynor: like b4 watching