How To Make A Three Way Closure Wig | Beginner Friendly | Detaild Tutorial
Hello guys welcome back to my channel my name is Stella Simbi and in today's video I'm going to show you how to make a Three Way Closure Wig
Music: Another time
Musician: LiQWYD
Watch my other videos
How to make a 4×4 Three Way Closure | Hair Ventilation Pattern | Beginner friendly
How to make a Bob Braided wig | Flatiron method | Detaild tutorial
How to make a twist wig without closure | Beginner friendly | Detailed tutorial
How to make a closure using curly hair /How to achieve the curls back after ventilating
DO's and Don'ts on how to ventilate hair
DIY/ how to make a blunt cut 8×5 frontal wig
How to make a kids softdread wig |Detaild tutorial | Beginner friendly
How to make a crotchet headband wig using one pack of expression braids
How to diy crochet braids using ombre braiding extensions / Easy way to do crotchet braids
How to make a 19" afro wig
Please kindly SUBSCRIBE LIKE COMMENT and SHARE
#threewayclosurewig
Thank you for WATCHING GOODBYE
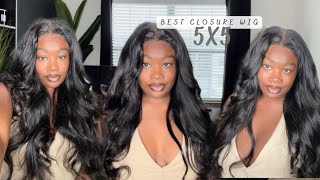
Hello guys welcome back to my channel. My name is tayla simbi and if you are new you're welcome and please can you subscribe and if you're already subscribed, but thank you so much for coming back. So in today's video i'm going to be showing you how to make this wig using a three-way closure that i made previously on my channel. So if you haven't watched that video, yet please go and check it out. It'S really detailed and uh you'll enjoy it. So i'll be using that closure today uh with these two bundles - and this is how it looks it's a three-way closure. So i just put a clip right here of how i made it. But if you want a detailed tutorial on this, one uh do go in the description and click the link in the description about this uh tutorial, so guys i'm not showing much on this one. I just put this little clip right here for you to get a better understanding of this closure, so you can check out the longer video on this one. So i'm using this wig cap - and i just placed it on my manicure and i'm going to sew the closure right around using a thread and then needle just like that, so from the other side, all the way to the other side, oh so guys after you're Done sewing and just remove your wig cap and cut the wig cap underneath our closure, we won't be needing it and then you can just put back uh your we kept on your mannequin and then we can start sewing our wig. We are using these uh two bundles and the bundles are divided into seven pieces. Yeah. It'S not uh. Just one long bundle, it's divided into pieces, so we're going to be sewing double weft uh. Throughout the entire week we won't be doing single and i'm not going to be doing the flip back method. I'M just going to be sewing from one side to the other, then cut from one side to the other then cut. If you want a flip back method, you can check out the videos that i'm going to be linking in the description you can check them out there. This one i'm not doing the flip back method, i'm just going to sew from side to side, cut side to side cut side to side card, so you can go check out my other videos if you want to see a flip back method, so i think i'm Just sewing the uh wefts right. There is double weft just so so so and tie in card right there, like that you, foreign foreign, hey, oh, oh foreign, so guys the last piece of hair that you sew on your wig, make sure that you join it with your closure just so it joining It joining the wic cap and the closure just saw it like that right round on the last piece of hair that you saw foreign uh, oh foreign, so we're done sewing, i'm just going to unravel these cornrows that i did on my closure to put the hair Out of the way why, while i was sewing so just this is the middle part, and i'm just going to open a side pattern here without moving your wig, that is the advantage of a three-way closure. You won't be moving your wig, you just open your side. Parting, your other side, your middle, any parting that you want without moving your closure, so i'm also going to be showing you uh wearing the wig. Well, how easy it is to just open your parting and go like that so right here, i'm just wearing the wig! There'S no need for glow or anything, and just where your wig can go yeah, it's just as simple as that. So this is the mid part right here and i will be showing you uh uh, the other side parting. So guys do. Let me know what you think about this about this week and please make sure you go and check out. The closure tutorial make sure, go and check it out guys, and this is the side parting yeah, just open it like that and i'll also be showing you the other side parting and guys. This is the other side parting, just open your hair, like that uh just open the parting and comb, your hair and you're good to go so guys do. Let me know in the comment section which parting you like which parting you prefer yeah. If you have any questions, any suggestions do say in the comment section guys and please kindly share comments subscribe like yeah. Thank you so much for watching guys, and this is how the back looks like yeah. Thank you. Thank you so much for watching and if you're new, please don't forget to subscribe and if you're already subscribed. But thank you thank you. So much for coming back. You are the best best best yeah, so guys i'll be seeing you in my next video make sure you turn on the notification bell next time when i post the video you'll be notified, so goodbye guys see you in my next video


Comments
MIRRIAM CHISALA: Nice work , What's the name of the hair ,is it 100% human hair
just winnie: You so beautiful