How To Dye Curly Wig Red Ft Isee Hair Company
Best hair for best u➤ ➤ISEE hair 85% discount
⏳Hair details: Mongolian Kinky Curly 220% 24inch 13x4 lace front natural color
★Direct Link➤ ➤https://s.click.aliexpress.com/e/_oCfJ...
●ISEE Official Store➤➤https://s.click.aliexpress.com/e/_oBJA...
●Best Straight Wig➤➤https://s.click.aliexpress.com/e/_olH4...
●Best Straight Bob Wig➤➤https://s.click.aliexpress.com/e/_opUg...
ISEEHAIRYouTuBe➤➤https://bit.ly/30MB9n4
IG➤➤https://bit.ly/33vYNGR&http://bit.ly/...
Twitter➤➤https://bit.ly/ICFCzV
WhatsApp ➤➤ +8618697372273
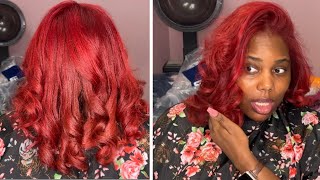
So today we're working with ic hair company. I thought originally that i was going to use all three of these colors on this wig. I actually did not end up using the cinnamon color you see here. I have my favorite, which is the bw2 always gets me through. So this is what comes in the box, so this is their mongolian 220 24 inch um kinky, curly hair. The hair is also a 13x4 frontal in a large cap. So it came with these lashes, which are actually cuter than the ones that i normally sent. Y'All know how i feel about how companies send baby girl lashes. I still won't be wearing those but they're cute, and it also came with this information card with all their socials on it and ciao. It came with a wig cap that was actually my color because i normally get scent like chocolate with caps and i'm sure my dark skin girls get sent super lightweight cap, so i feel like they just be playing a guessing game with the black influencers, so they Did get this time this time? This is the hair fresh out of the pack. The curls are super pretty and they fit like these. Look like my curl texture and that's what i wanted. So i am really pleased with the hair love it, because it's an actual kinky curly, like a lot of time, they'll be saying: oh kinky, curly and then it'd be like a deep wave, which i love the deep wave too. But i really was excited to try. Kinky curly, so i'm loving this texture. This is how the wig comes before any customizations. Now i do feel like maybe the wig was pre-plucked, because the hairline was actually pretty cute yeah. I like the hairline. This is the clips and combs that come on the inside. So it has four combs on the inside and then it has the adjustable straps, which is um super convenient. So now i'm going in with my powder bleach and 30 volume developer. I have 40 volume, but for some reason all the other girlies can get 40 to work and every time i use 40, i end up messing up the hair over processing. It just me and 40 have a really bad streak, so i didn't really. I can't remember how i measured that out. I think i put five scoops of the bleach and i just put developer until i feel like i need to stop and then you're going to get boiling hot water and you're going to pour that into your mixture, because i'm doing the water method today, because it's Just so much quicker and i just feel like it makes getting the product through the hair way easier. Now, i'm going to add the hair into the mixture, you just want to make sure that you saturate everything like everything needs to be super saturated um, make sure you're getting all in between the curls and in a minute, you're going to see me use a denman Brush to further work the product into the hair granny, i probably should have put a little more water in there, but that means i would have needed a little more bleach, a little more developer and look. I don't know how much that i had so. This is me just working it through with my fingers first and then, like i said previously, you're going to see me, take a denman brush and further work the product through this hair, because you want to make sure you're, hitting everything now usually with any type of Brushing you want to start at the ends and then work your way up into the roots, so because i am trying to get this product all through the hair. I'M doing the opposite, because i want to work the product down through the hair and through the ends of the hair. So all together, i don't know if it was the hair or the mixture or the timing that i left it because i left the hair in. I think 25 to 30 minutes both time that i bleached it, because i ended up having to bleach this hair twice, and this was the color i was able to get because child when i took. I could not get this hair to lift past this color right here i was like i need a little brassy brass and it just would not lift so now. I am bleaching the knots and you want to make sure that you don't uh that the bleach doesn't soak through the hair too much. That'S why i'm bleaching it like this. I cannot remember where i got this method from, but i saw a girl bleaching. Her knots like this, and it was a great way to make sure that it doesn't go through the um, go through the lace. So i was like you know what i'm jacking this. Yes, thank you ma'am. I can't remember who you were, but this was a game. Changer then you're going to want to go through and pull the hair up so that you're not bleaching. The actual hair you're just bleaching the knots, because sometimes when you leave it laying down it will bleach the actual hair through the lace. So, as i said before, i ended up only using the two paprika colors, because i couldn't get the hair as loud as i wanted it and i'm using the watercolor method for the dye as well. Um you're just going to pour boiling hot water and then you're going to add your hair dye into there. If i would have been able to get the hair lighter, i probably would have tried to use all three colors, because i wanted more of a ginger and you'll see at the end of this video. How that how the color came out, but i was going for a dark orange ginger, which is why i ended up not using the cinnamon color. So you're, going to the same thing as before. You'Re just going to make sure that you submerge all the hair into the water and the hair. The knots are still bleaching, as i'm doing this. That is intentional because it kind of acts as a barrier so that the lace in the front of your wig does not get stained or dyed. Now this method does not work. If you're doing any type of red dye, it will still dye that mug red. So if you don't even have a red dye, you need to do got to bleep got to be on your hairline or you need to do some type of vaseline or something like that on your hairline. But this was like an orangey, so it ended up working without staining my lace. So yeah, that's what's going on here and personally. What i like to do is, i will dye the hair one time and then go back in and dye it again versus putting both tubes of color in at one time and letting it sit. That'S just how i like to do it really. I don't feel like it makes a huge difference, but i just like to do it and again, even though i have that barrier that bleach acting as a berry, i'm still trying to be very careful with the hairline like this is me checking just to make sure That it's not getting stained, because this is not red, but i'm traumatized by how red will stain the crap out of your lace and ain't no coming back after lace is stained, so i'm still making sure that i'm very careful with the lace on this wig also Keep in mind, this is not a transparent lace. Wig now granted they say it's transparent, lace, wig, but the lace was more like a very light tan color so now enjoy my big baby ass head. Okay, that head is, i got a thing on me, so i am wiping my forehead off with a alcohol uh rag and then i'm going to put this wig cap on dang. I was going fast. Okay, then you're gon na cut behind your ear so that the runs will be behind instead of in front off the top you're gon na. Do the same thing. On the other side, my head, my head is big yo. Oh my gosh, i'm really exposing myself. Okay, exposing myself um and that's why i got this wig in a large cap because wigs never fit my hairline all the way from side to side and you'll see later in the video. Also honorable mention i started getting my hair braided by the africans, so i could get a flatter braid down, but i think i'm going to stop that because they are thinning my hair out, like the way they be tearing that comb through the ends of my hair. Like i already do not have naturally thick hair, i have very fine hair, and that is me tearing me up, but the ways we laid flat, but god damn. Oh i'm so sorry i said i was not gon na be cussing here. So this is my favorite lace glue. This is the la flair bond lace, glue. You can get this off amazon for ten dollars and it is for me the only glue that has worked um bolt hole do not be doing nothing for me. So this is me applying the glue and spreading it out and you want to make the layer semi-thin and i started doing instead of using got to be for my wig caps. I just lay my wig caps with the wig glue. So that's what i'm doing here now! This is the part that i'm talking about that's going to look strange to some of y'all, because you're always taught to stay in front of your hairline and not go into your hairline. Now me, i cannot get wigs to fit in front of my hairline from ear to ear. The sides always end up going into my hairline, so i'm putting the glue into my hairline where the wig is actually going to end up falling and when you remove it, you just you know, put oil on it. You'Ll, be fine, don't don't be going yanking, y'all hairline! That'S why your eyes should be coming out because y'all yanking. So this is what i look like a hot mess, but it's gon na come together. I'M going to use my white pencil to map out where i want my wig to fall or where i want to put the glue so that the wig will fall because baby i'm about to erase this forehead y'all, i'm about to erase erase erase this big. This big old forehead i'm about to get rid of it. So i'm mapping that out with my white pencil now a lot of people - i don't see do this, they just eye it out me personally, i cannot eye it out. I will mess it up, so i'm mapping, because i'm a very visual person and now again y'all. I know this is a hot mess. Okay, but this is me applying my glue. You want to make sure to stay behind those white lines behind behind behind and try to make your layers. And my thing this is it's in my band child. So this is my wig. I'Ve cut the lace so that i can put it on bit by bit and i'm placing it and then i'm just pushing it down into that glue. If you comment on how i'm doing the size of this wig, you are anti-black, not really. I just don't want to get dragged, because this is so messy. This is really how i'll be doing it. Y'All y'all are getting the real raw this hobby doing it. It is messy, but it comes together. Okay do not come for me. I am exposing myself. Oh, my god, for the name of a good tutorial baby. So then you're going to get your yours. Why was i about to say your strap, your elastic band and you're going to tie that down and let that sit for like 10, 15 minutes and you're going to tie it tight and when you're 10 to 15 minutes is up. You are going to razor that excess lace off you want to laser, because you don't want to scissor it, because if you scissor it, you have straight lines straight lines are easier to see and it makes it look a lot more wiggy. So this is me going in and razoring this wig once you're done, razoring you're going to spray your like the excess lace down. That'S still kind of setting up. You can spray with even lace glue that is coming up a little later in a second and you're. Going to let it sit for like another 10 to 15 minutes, and while that is oh okay, um and then when that comes up you're going to take whatever powder you like and you're, going to powder them edges. They still look a high mess, but i promise y'all they're going to come together. I would not steer y'all in the wrong direction. Okay, just stay with me. Just stay with me: you're going to powder them edges, okay powder powder, even back into the hairline. If you need to - and then this is the even lace spray that i was talking about - you're going to spray this and you're going to lay it down again, try not to get this in your hair! That'S why i'm pulling this up like those little hair pieces that i sprayed, because it will make your hair um, hard and white, so really focus on keeping this even spray on the lace. Only you do not want to get this in your hair because it's not hair spray. This is not got to be glued. This is actual lace like this is lace glue in spray form, so you don't want to get it in the hair. Then you're going to take a comb or popsicle stick whatever you've been using to push your lace down, we're going to use that to push this down after you have sprayed it, and you already know, what's coming y'all we're going to put our handy dandy, elastic band Back on our head again, let her sit again, so this is after it has been melted in some more okay. Y'All see that so we're just going to figure out where we want our edges to be at you're, going to pull them edges out or not edges. Baby hairs, let me talk about your edges, though girl. Don'T pull your edges out, pull where you want your baby hairs to fall, pull that out and separate it from the race. Do not pull your edges out and then be telling your mom when you watch the youtube tutorial, she said: pull your edges out now your mama mad at me pull your baby hairs out map out in baby hairs, and now that you got your little antennas, y'all Cut them off. Okay, they show like two antennas cut them off boom to whatever length you want and then i'm going to curl it so that when i go to lay it down, it'll be easier, because i want that that chastity autumn baby hair effect. That'S what i'm going for in the end. I can't remember if it actually looked like that, but it was cute though, but that's what i was going for and here's where you're going to take out your got to be and you're going to spray it on that baby, hair and then you're gon na go Through and start laying it to, however, you want it to lay um now i did not pluck these edges at all. I just let them pretty thick. Normally, i put them, but this time i purposely did not, because i wanted to try the thicker edges, look or heavier edges. I don't know i don't know what they call, but i just wanted some thicker edges this time. So i am trying to swoop that down - and i don't know if y'all notice, but the wig on i actually put one side way harder than the other. So it was lopsided, so this is a very raw tutorial. You'Re gon na see how i fixed that. So i'm gon na put this little piece of hair that i ended up. Cutting from the ear tab part i'm going to use that to fix the fact that this is lopsided, so i'm putting that glue in there just a little bit and then i'm going to put that tab um, where you just see me map it out at so. I can get the illusion that the hairline is straight across and one side is not sitting way higher than the other side, because i know on video. It might not look crazy, but in person when i first did it. I was like. Oh my gosh. Like this side is way harder than the other side so yeah, i should have pulled the other side um down more, but that's okay, because i'm mrs fixie okay, look at me fixing it! So! Yes, that's how we do that. So this is the final result of the hair came out really pretty. If you follow me on instagram, then you see me out and about with this hair i will try to insert some more pictures. Hope you all enjoyed and bye. You


Comments
kittykattastegood: Hey beautiful
Queen Vlogzz By Kali: Yay #cherrybombgang