Style & Cut Glueless Closure Bob Wig | Cheveextensions Hair
Get into the ROBEAUTEE Method of cutting and styling a bob all in one easy process!!! easy and beginner friendly
Everything I used listed below!
Products Used:
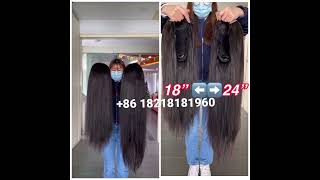
- 12inch or 14 inch bob cheveextensions.com
- razor comb
- lotta body mousse
- fantasia heat protector spray
- fantasia mousse spritz
-wrapp-it styling strips
-she is bomb wax
- hot comb
-flat iron
Hope you all enjoyed this! Leave a comment below and tell me what you think.**** AND BE NICE! LOL This is my first go at this. Make sure you subscribe so you can stay updated on new videos!
To Order This unit visit www.cheveextensions.com !
- Connect With Me on Social Media!-
@damn_rho
@robeautee
@cheveextensions
Snapchat & Twitter: @beautifull_ro
Facebook: Facebook.com/RoBeautee
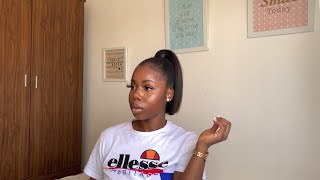
Hi guys welcome to my channel so today I'm going to show you guys how to do this, a simple Bob. You know Bob Lauren everyday. Look you like it any time any season and gloom is something right here. You could pop it on anytime. It'S a simple classy hairstyle, so to get started. I grab the hair, I separate the hair, sorry every two tracks and I say every two tracks because you want layers, that's what that's the key to a ball. Unless you want a blunt cut, then I was just saying I'll cut it one time even but I like layers, so I'm grabbing the hair every two tracks. If you have a full lace, wig just separate the hair and bigger sections, so you still have that. Layered. Look, you will need over the razor comb, for this look basically use the razor comb and, just you know, shut the hair at the bottom. You'Ll get a lot of flyaways, so once you're done just comb that out, I rather use the razor combed in the center because it makes it look layered like it's not so even it doesn't look like bulky at the bottom. It looked very nice when you flat iron it down, so I'm coming to file, ways out and then I'll take my scissor and I'll. Just you know, even it up so a continuous process throughout the whole week. Every two charts like I said and then now we're at the top of the wig. I continue digital adapter closure imagined you. I separate the closure at the top and I'm gon na do is just to get it a little bit just to make sure that looking for I'm going for a deep side parting, so I'm part of the hair close to the edge of the kosher. Not all the way, far to the right, but just a little close enough just so it could look like it'll, be on the side like when my temple is when I place the lid on my head and after that I just cut all the extra hair. That was like no hanky at the bottom, so right here, basically, you know I get you a lot of body mousse. If you don't have a lotta body, any other most people to the most is the key. So having your hair look like this, and I have that so pressed look on top, so I highly recommend you use mousse, I'm just separating it on top between the parting of the hair, that's there and I'm going to use wrapping paper so phone wrapping paper. Again. Three local producer black story and put it right there twice with two sheets, then after that, I'm going to place that under my dryer, so just wrap it up, and I use the clip to keep it steady, I'm going to use two sheets, just don't copy it. I cover the entire code here and after that, I'm going to place it under my dryer for let's say 15 minutes. If you don't have a dryer like this, it's okay, you can use a blow dryer as well. Just you'll have to blow-dry it for a good 10 minutes up to you. So there's the results after it's been sitting under the dryer. It'S like it's already, looking like it's molded. So, what's our flat iron, the hair and I still pressing with my hot comb and everything, it looks so good. This is the power of mousse y'all y'all have to use most at the top of the at the top of your wig. This is how everybody get that molded. Look that nice molded! Look! So again, I'm going to start. You know, flattering the hair. Every two tracks so always remember that every two tracks, and if you have a full lace, wig you just party in big sections. It'S the same thing, so I clip that up both sides and I'm going to use my Fantasia spritz and also my heat protector spray. I will show you right now what it is. I have forgotten of a gamble here: the heat protector and also Fantasia spritz like what's to fire an entire wig. It will start to have a little bump that goes in between your neck, all right over your shoulder, so all you have to do is just flatten. It straight so I'm finished right here and now I'm cutting all the little little pieces. I hate. I stick it out. We don't want those and look at it already nice. So now I'm gon na find my closure and before I do that, I get my wax. Stick just from she is ba black stick. I get my hot comb and before I put on the hair, I spray it with the heat protector spray. This right here can melt your lace, so be careful using that. What about your lace so make sure you know it's the not too hot, because my how come can't get up to 800 degrees. So what I'll do is I wan na stick on like a rag and basically, if it burns the rag, it's not ready for me to let you put it on the hair, yet I'll, let it sit and when I feel like it cool down, then I'll pass. It to the hair so right after you're done with this you're, going to flat iron that your closure, what I'll do is I'll fire in the closure first and then I'll cut Flatiron it all together on that side, so ones are the same method. On the opposite side, I'm going to use my wax think I want to part the hair use. My wax stick and then use my how come again just please watch so I continue to flatter in the hair, and so there was still pressed to my liking right after this. I want some fun lines. The party at this time. I will take a wax stick and just you know place it at the top between the parting on both sides, and then I will spray some of the Fantasia spritz heat protector spray, and then I would just go. Get my hug home ain't, no make it all. Crispy and nice and flat one last time. This is a final look and they're right as it is, it's all done. It'S all ready to go I'll, get the concealer of the skintone of my choice. The consumer. Has the mnsure forehead basically get the consumer of your choice and then just basically get a little brush and just park put the cousin in the party? That'S it and then after this you're done, you aren't done. You done made a bob. So there's the final look. This is the Bob of glueless Bob at that the name glueless is basically in the name. You can wear this without adhesive. This will provide people that don't like Google on their edges and stuff. This is a perfect way to rock it, and it's very sturdy. Just like a regular frontal or lace wig or whatever. Thank you guys for watching. I appreciate you stay blessed. I will have a new video almost are doing these videos every week, so I can, you know, help you guys. Thank you. Stay tuned, bye,

Comments
Anuli N: You're amazing. Such a great video. I'm glad I found you.
Toni Clanton: Hi are you still on social media via Facebook? Would love to have a unit made
Ghanaian Efya: You are a very good teacher ❤️wonder why u are not famous on YouTube yet
Just Travel: Is your closure 5x5 or 4x4?
Crishana: Wow!!!
Kadiatou Aliou Diallo: What your flat iron name please?