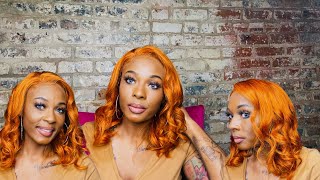
Wig Transformation| Fringe Bangs - Red Blunt Bob
Hey Ladies!
In this video I'm transforming an old 613 wig into this beautiful red fringe bangs bob!
Thank you all for watching! Don't forget to like, share, comment, and subscribe! Also make sure your post notifications are are on!
Wig Review: https://youtu.be/xs1MKiE4UJc
shop.wigsbuy.com
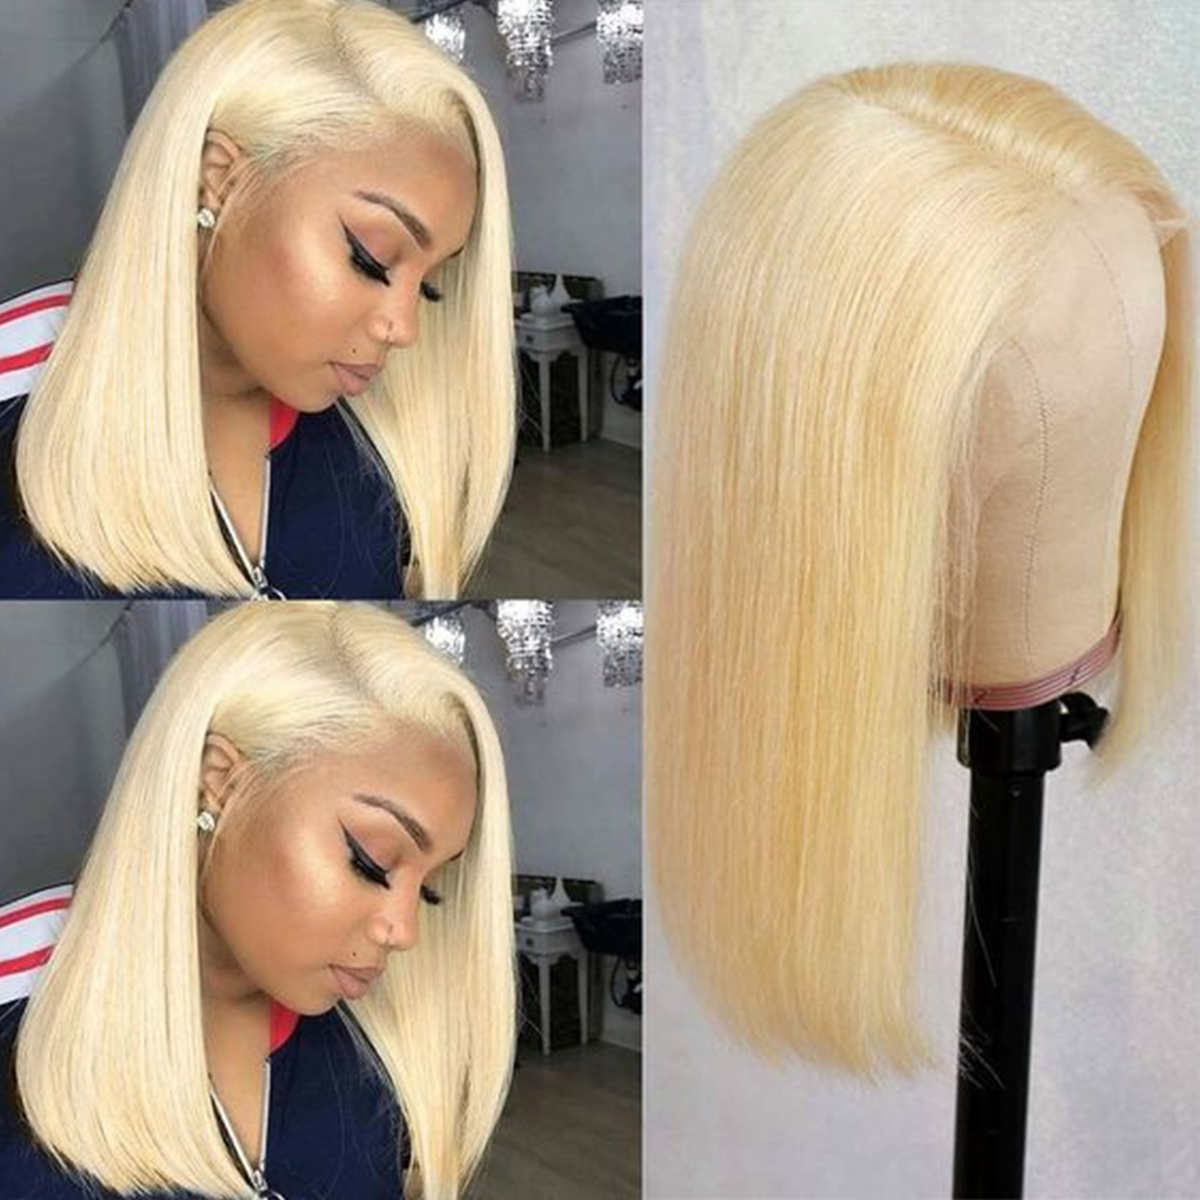
Ciara Blunt Cut Medium Straight Center Part
Hair Material: Human Hair
Length: 16 Inches
Hair Texture: Straight
Cap Construction: Lace Front Cap
Density: 120%
I am now offering “Snatched & Highly Favored” t-shirts & sweatshirts! Merchandise can be ordered via my Teespring page, https://teespring.com/stores/snatched-... . Thank you all in advance for your continued support! ♥️
Helpful Videos
How I Make My Wigs| https://youtu.be/1WrN3B7p1n0
How I Install My Wigs| https://youtu.be/pckRd488TU8
My Fav Edge Controls| https://youtu.be/S8q027j8RSY
**CONTACT ME**
For Business Inquiries
Email: [email protected]
For my random whereabouts & fun, Follow Me!
Beauty IG: @SnatchedBySharmel
Facebook: facebook.com/snatchedbysharmel
Snatched & Highly Favored "She is clothed with strength and dignity; she can laugh at the days to come."Proverbs 31:25
#fringebangs #bluntbob #lacefrontwig #redhair #beginnerfriendly #wigtransformation
Everybody, a charnel, welcome back to my channel today, I'm going to show you all how I transform this medium length blonde blunt bob into this very vibrant red fringe bank Bob. So, let's jump right into it. This week is from wigs by I reviewed this wig on my channel last year, so I will leave the link to that video and all the details about this way down below. I haven't really worn the wig since that review, so I wanted to change it up and do something fun. So I'm going to use these l'oreal high color and the color red i'm going to use this adore color in the color, intense red and then i'm going to use this blog, brilliant developer and number 25. So I'm just going to follow the instructions on the box. I did kind of switch it up, so this L'Oreal hi color is actually for dark hair. But, as you guys can see, my hair is already blonde. So I used a lower volume developer than what the package called for, because I didn't have to lift the hair and then I'm just mixing in whatever I have left of that and tint read from the adore color and I'm going to mix all of that together And I'm just going to apply it onto the wig, so the roots are already dark from when I originally customized this wig. So I'm going to keep the roots that dark color and I'm just going to start applying the red right after those dark roots. I will say this is not the best way to color wigs, because it's easier to miss certain spots. You should honestly put your wig on a wig stand and start. You know, lift the weft up and go west by webster color it. However, my wig stand is broken, so I'm just doing it this lazy way, but when you do it, this way make sure that you go in with the comb and comb through the wig and that you're still lifting the wefts up to make sure you get every Weft color, honestly a even simpler way to do this. Since we are working with a blonde 6 1-3 wig would be to do a watercolor. However, I didn't have enough of that adora color to actually do the water color method, and I was just using what I had at home and I had the the Laurie ohia color. So I just used that which required me to work a little harder, but it still came out red. It came out super vibrant, so yeah, I'm just going to finish, applying that color and then I'm going to show you guys how I styled it. So here's the wig after it's been colored. I did Flatiron it off-camera just to save some time. So I'm just going to apply that onto my head. I just have a regular wig cap on one and I'm just going to place the wig on and get it centered. How I want it so again, I'm doing fringe bangs and the easiest way is to start with the middle part, so that you know your wig is centered. So I'm going to start from that middle part and I'm going to create two triangles on each side. I'M measuring my triangles by like the middle portion or, like my arched part of the eyebrow. You don't want to take it out too far, because you don't want your bangs to be super wide and long. So again, I'm just creating two triangles on each side of that part and it the triangles, don't have to be perfect, but do try to make them as identical as possible so that you know your bangs are centered and evenly distributed until next. I'M just going to take my flat iron and just start to Flatiron all of that hair forward towards my face just to kind of get rid of that part, because you need the part kind of as a guide. But you don't want the part to remain in your head, so I'm just flat ironing and combing through to try to get rid of that part so that I can cut my bangs properly. So I'm just gon na smooth all of that hair down forward and I'm gon na slide my fingers down a little bit tap my nose before I began to cut and I am doing a point cut. So I'm not cutting straight across I'm cutting at a diagonal, and that is what gives us the fringe look without making it super blunt and super harsh. I do not recommend cutting straight across so take your time and you know: do the diagonal point cut also I'm starting my bangs super long so they're way longer than they need to be, but you want to start long because remember you cannot get back what you Cut off so yet start long, get your guy ready and then start gradually cutting them shorter. Oh I'll! Do that first cut! I'M just gon na take my flat, irons and bump them just so that I can kind of get the shape of the bangs before I go in and do my second cut and y'all. That part was something serious like it. I had such a hard time getting rid of that part. You can always go in with moose and fix it, but I didn't feel like doing it at the time cuz. I never have to read flat ironing and all that other stuff, so yeah here I am going in with my second round of cutting these fangs and I'm going a little bit higher this time and guys take your time with this. This is very tedious, but again I recommend going in and gradually working your way up because again, once it's gone, you can't get it back. So it's tedious, but taking your time is so much more worth it, and so now I'm just gon na let down the rest of my hair just to see how the bangs kind of work with the entire head and then make further adjustments. I kind of took my bangs a little too why? But it's okay, it's going in and cutting those ends, and then you can also kind of like pull some of those longer pieces forward and flatiron them over those ends. Where you know you might have took your bangs a little too wide, and I'm just also you know, smoothing the hair through and just fixing any areas that need to be cut or shortened, and I do prefer my fringe bangs kind of long. So the higher I got up, I was getting too scared that I was going to cut them too short, so what I ended up doing was just kind of sliding or pulling my wig back a little bit until I got the bank to hang at a length That I preferred so to avoid cutting too much. I just kind of pulled it back a little bit, as you see me doing right there and I got them to the perfect length and y'all that was it so yeah. I really like how this wig came out. It'S out of my comfort zone, but I still think it's very cute and very fun, so I hope you all enjoyed this video, don't forget to Like share comment and subscribe and turn on your post notifications and I'll see you beautiful. Ladies time. Let me know what you guys think about this color on me again, it's out of my comfort zone, but hey I'm trying new things so yeah see you guys next time, bye,


Comments
Tavia: You did a great job on this wig!
Mo Mellow: I love it , compliments your skin tone
JaneSmif: Cute!!!! ❤️❤️
Taquila Butler: Yes i love it
Amore Love: hella cute.
Ashley Rolle: