How To Install And Style A Short Bob Lace Wig For Beginners | Feat. Myfirstwig
_____________________________________________________________
Shop the same #LaceFrontwig:
https://www.myfirstwig.com/aries-india...
√ 100% Human Hair
√ BEGINNER FRIENDLY WIG
√ READY TO GO WIG
√ SUPER REALISTIC LOOK
√ SKIN MELT INVISIBLE LACE
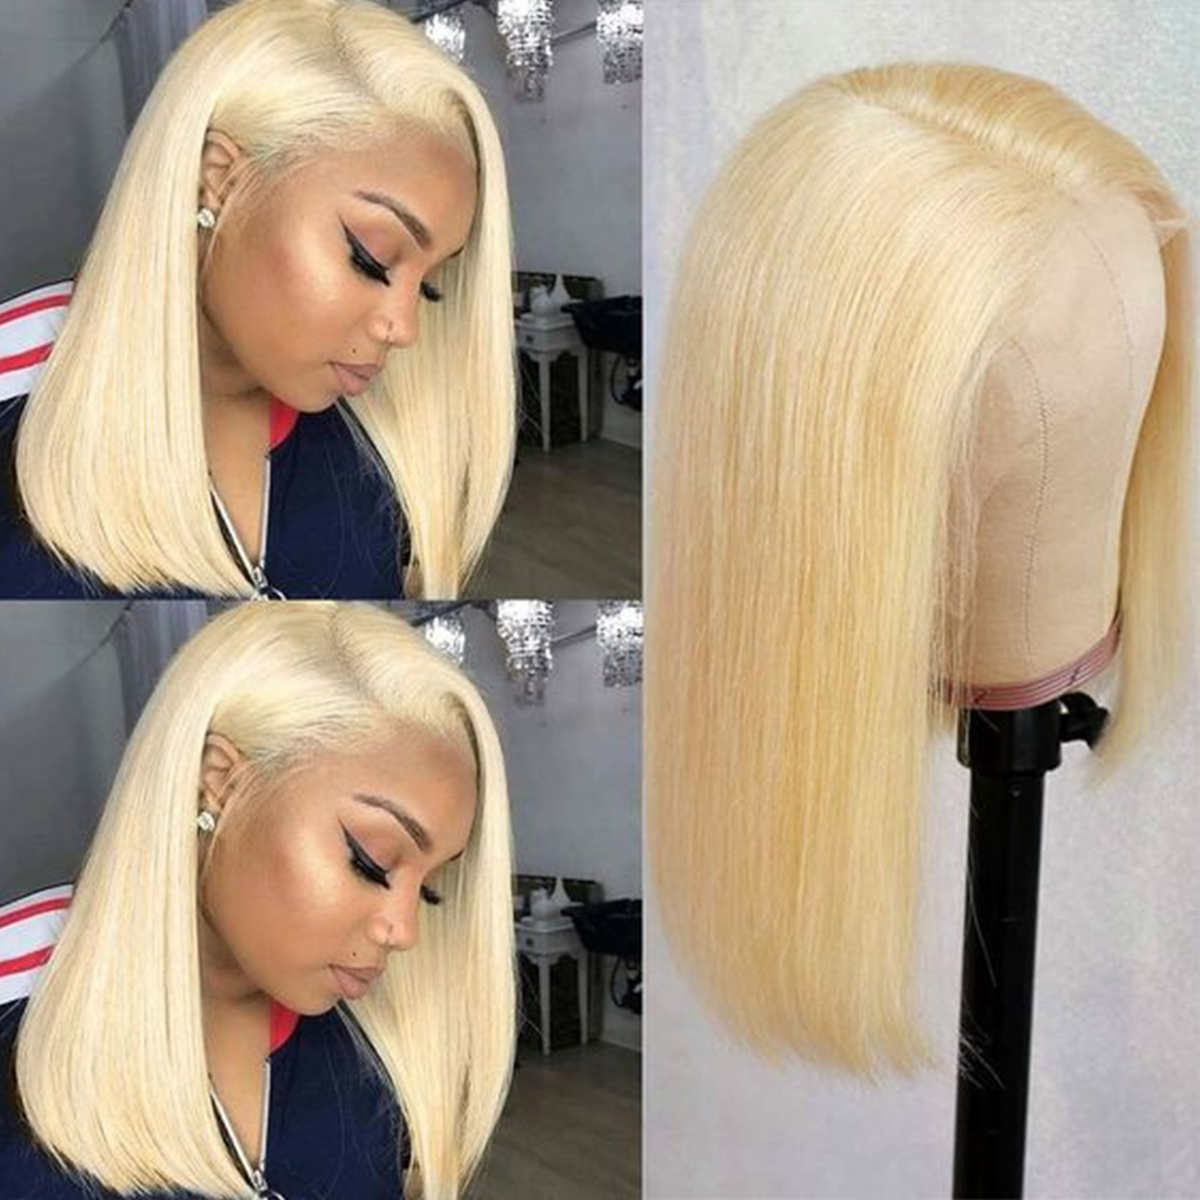
--- ARIES - INDIAN REMY HAIR BOB HAIRCUT LACE FRONT WIG - ARIES003
Hair Length - 10 Inch
Hair Texture - Silky
------
Shop more #LaceFrontwig: https://www.myfirstwig.com/indian-remy...
Deep conditioning hair mask: https://www.myfirstwig.com/myfirstwig-...
* Protective Styles & Pre-Customized Lace Wig For Wig Beginners *
Website Link: https://www.myfirstwig.com
Instagram: https://www.instagram.com/myfirstwig_c...
Facebook: https://www.facebook.com/myfirstwig
PRODUCTS MENTIONED:
Adhesive https://amzn.to/35A8nue
Blow Dryer https://amzn.to/3hU86tP
Electric Hot Comb https://amzn.to/3oJ5Erb
Wax Stick https://amzn.to/3wuYZnm
Mousse https://amzn.to/2SOHJem
Heat Protectant https://amzn.to/3bRfXEC
Concealer https://amzn.to/3bRqn6W
Powder https://amzn.to/3oJzvzJ
Brown Wig Caps https://amzn.to/3bOgC9O
Follow My Social Media:
IG: @AshleyBedeck
TickTock: @AshleyBedeck
BUSINESS EMAIL: [email protected]
Shop My Amazon Store: https://www.amazon.com/shop/influencer...
My P.O. Box
Ashley Bedeck
P.O. Box 571084
Tarzana, Ca 91357
*Some links provided are affiliate links*
♡ SMOOCHES ♡
Hey love bugs welcome back to the channel long time no see. I know it's been a little bit of a while took a little bit of an impromptu break, but i am back and will be cranking out content daily for the month of september. It'S officially virgo season, which is my season. I am a virgo september 18th is my special day, so i'll definitely be giving you guys content all month and redeeming myself, but i do apologize for the long break today. I am teaming up with my first wig and we're going to be bringing you this beautiful bob here stiff where not here. This one definitely has so much body and movement, and what i love about wigs from my first wig is that they come ready to go. So if you are a beginner or even intermediate or even at advanced, this is one of those wigs you can take out of the box and you can literally get it installed in, like three simple steps: you're gon na see with this one. It took me all of 15 minutes to install minus me talking so much, but i got it installed. It looks super natural and neat. We didn't need to bleach the knots we didn't tint, the lace we didn't have to cut everything and it is literally the perfect bone straight bob. It gives dora but make it fashion. So if you want to see how i got this, look, i'm going to give you guys a step-by-step install so keep on watching, okay, jumping right into the video. All i've done so far was literally just put this bad boy on and it fits super snug. I did opt for a size, one cap which i believe is the size or the smallest size, that they offer she's a silky straight texture, 10 inches in length, which fits really good on me as like a perfect bob length without having to cut anything off. I'M 5 3 4 reference, and i think this is going to be super perfect and very easy to install again. She fits nice and snug on the head, so it almost has a glueless fit and they did include the elastic band which is going to make it so that you can wear the wig and it'll lay flat and flush on your head, and you won't have to Worry about it moving or sliding back we're going to go with a glueless install, but we are going to have a little bit of a help. I'M going to be using my bed head adhesive, which again is a glueless install, because this is actually an extreme hold. Hairspray, but it's gon na help to kind of keep it down and in place and, more importantly, it's gon na help the wig to have a melted appearance, so you're gon na pretty much see how to finesse at home without having any experience at all. So, let's go ahead and jump right into it. Step one to me is gon na, be to cut off the excess lace and to bond her down. So let's go ahead and do that and then we'll go ahead and talk about it and see what we'll do for the next step and you'll notice that once i cut off the excess lace, the wig lays along my hairline pretty perfect. If the wig was too big, it would be bulky and it'll be sitting up and it just lays super flat and smooth: let's go ahead and cut off the other side and then we'll move on to bonding her down now. One thing i like about this wig is that you're able to take and pull the baby hair piece. That'S right here. You can leave it in front and turn it into sideburns, or you can kind of the way the wigs fit push it behind your ear and that's going to be make it super simple and easy to install that way. You don't have to worry about sideburns, so you do have a little bit of versatility option with that. I'M gon na push it back slightly and then i'm gon na add the adhesive we're gon na work really fast. So it's gon na drip because this is a liquid product, so we're gon na catch it with the rag and then we're gon na put the lace on top and then we're gon na blow dry it. If you're doing this at home, make sure that you blow dry on a cool setting, it's gon na help to make it not look sticky and cakey and white trust me just trust me now that we have her installed. One thing i noticed is that this one is going to fit super flawless, because i did have to push the wig behind my ears a little bit. I don't have to worry about really um bonding it down here, i'm going to train the hair to kind of cover right here, just like it looks easy and then, when i push it back i'll kind of like you'll see when i train it, but we really Want to focus on the center. This one does come with about six inches of parting space, so you'll be able to get the exact look. You'Re going for more parting always looks a lot more natural than if it's like two or three inches of parting per se. I believe standard is four. The six of course looks better, and the best way to me to train your parting to kind of lay a little bit flat and to get rid of flyaways is to use a wax stick or an edge tamer. This is one of my favorites i'll have it linked in the description box, and i just like to kind of push it up a little bit like a push pop now. Typically, i'm very generous with this. It just depends on the style i'm going for um. It can obviously look a little bit on the greasy side, so just be careful and use it at your own discretion, but this is what's going to give you the salon, melted flat, super really really nice look up top and i like to go in and just Brush it in very well to make it smooth and then i'm going to take the um electric hot comb and go in and just smooth it out really good. Okay, i lied, i said no baby hair, but i want it to look a little bit more clean along the front, so we're gon na do minimal baby hair. Now i want to make my sideburns here blend with the wigs we're going to use a little edge control here and then i'm going to just do the two sideburns one on each side right here, not sideburns, baby, hair right here, just two little swoops and you'll See it's going to look super subtle and you're going to have like business in the front center when it's like this, but you'll be able to have that party. You know flip it over look and just have a little bit of best of both worlds again, if you're not into baby hair. That'S fine just go ahead and skip this step before we go ahead and kind of clean up the ends and bump it really good. I'M going to use my got to be glued gel now, typically, i would use a edge control, but as we are transitioning into um our move, i'm trying to find like my filming setup and see if i want to film what part of the house i want To film in - and i don't quite have all of my supplies - unpack yet so bear with me - we're gon na work with what we have now again. This part right here, flips up a little bit. So if you wanted to look clean, you can just take your scissors and just clean it up a little bit by cutting it down. I honestly don't want to cut too much just because if i want to bring it back forward, i don't want to lose that option. People act like they know me, but you don't even know me. I'Ve been out here on my own. I'Ve been out. I'Ve been grinding - i don't know if you guys noticed, but now i've kind of trained the hair to go on top. So when you see it like this, it would look a lot better if you have edge control, but it kind of just blends. You know super subtle, and even here this is lace, but it looks like my edges. I'M gon na do the same thing on this side and that looks super good. Look at me. Look at me, look at me now. We want to set everything and make sure everything lays super, melted and just tie it. I think i just broke my heat protectant, no false alarm, or maybe i did broke the heat protectant, so we're gon na skip that step. I'M gon na be using my favorite flat iron and this one is from babyliss um it's a little bit on the pricier side. I would say, but i believe it goes up to like 485 465 and this one will easily still press my real natural hair, which is key. So, let's just go around the entire thing and just bump it and i'm just going to take random pieces and just go straight and kind of curve it twist it. When you get to the end for a little bit of bump. I think we all know how to do this, but you can also take if you have a hair, clip and section the hair. I don't have one so we're gon na get a little bit janky, but you'll see it'll come out super good and you see just subtly. I didn't even do like a super, still press and how smooth and sleek this side looks. It has a lot of movement and then on this side it's still super nice, but it's not as perfect, so we just kind of want to smooth it out so that both sides look super perfect information. What i'll do later is i go back with a handheld mirror against my vanity in the bathroom and make sure it's perfect. You can also do your straightening and curling on a mannequin head before you even put the wig on. That is a huge help to make sure that everything looks perfect on the sides, the front and the back. Now you guys see how super simple and easy this one was to install and it came out super simple and sleek literally the perfect cut. You don't have to customize anything. You don't have to bleach the knots you don't have to tint the lace. You don't have to cut the hair down because a lot of times with different companies you'll find that they'll give you a bob cut, but you'll have to cut it a little bit more to make it perfect, for you know your needs, and this one you don't Have to do any of that um, it has all the movement, you need. It'S not a stiff bob, although it keeps going into my lip gloss, don't wear with lip gloss when you wear bobs, but other than that. I think it looks super simple and perfect. The only thing missing is to just go ahead and touch up the hairline with a little bit of customization, i'm going to go in with my concealer as well as my contour powder kit. I'Ll have these linked in the description box. But i like to do this. Just to make sure that the parting pops a little bit more um and i'll, take the concealer and just do exactly what a concealer is supposed to do, which is to make it conceal to the color that you want. The sun is, and this step isn't necessary. Hopefully, you guys will see the difference, but it just makes the parting pop a little bit more. It makes the parting look a tad bit more neat, because this is such a nice lace. It'S almost that it was too nice, so you could kind of see my um cap underneath peeking through it's like right here now that i showed you, you won't be able to unsee it but yeah. It was peeking just a little bit and a concealer on your lace is going to do exactly what a concealer on your skin will do, which is cover the imperfections. So if you do have knots there or something like that, it'll temporarily cover it. Just for a little bit of finesse so that you can get away with wearing the wig without bleaching your knots, then i'm going to take the powder in the same brush. I get this one from target, but i'll leave it in the description box, and it has like the side that i use for parting on this side and then this side i like to use for the hairline and powder, and i like to just custom, find color. This is the darkest shade in the palette, typically i'll spot test with this one to see if it's too dark - and it's actually seems to be pretty perfect, because i don't want the hairline to be highlighted, like you would in the parting i wanted to blend with My complexion and that not necessarily stand out so i'm just going to go in and sporadically put it in places that may look a little too light, because sometimes when the lace looks a little light in places, it almost will look like the lace is lifting when Really it is bonded down it's just. The color is not meshing well, and i even take this along the side so that any angle when the wind blows everything looks super good. Now we are done with this bob and again stiff wear, i kind of pat it off a little bit of my um or blotted off a little bit of my lip gloss so that it would not stick to my face anymore and that's just one of those Things we all know when you wear a bob, it's gon na stick to your lip gloss, but yeah. I don't have any complaints about this one. She came out. Super beautiful again excuse my setup. I do have my kitchen as the background for now. Trust me i'll get it together soon again, this one did come from my first wig and as always, they have really nice superior packaging inside they always have goodies for you. So i don't think i showed this in the intro. I'Ll show it now. This is the nice sleeve or case um or bag that the wig comes in. It has a logo and bows i love to hold on to these, because it zips up that way. When i keep my wigs, if i decide to get rid of the box for space or to save space, i know that um. I can keep all of my my first wigs together, my first wigs wigs together and they all have the logo there, and then i showed you guys this little info card. This also came in there, so i'll be able to keep this in here. That way, i'll also always be able to look through um and see. Okay. This is a 10 inch bar blah blah blah blah and i'll know. You know this is the one that i am looking for. They also gave some brown or kind of like tan wig caps, and they also gave this little pouch here, which has their logo and bowls on both sides. Very nice attention to detail, and when you open it up, there are goodies included and go figure. They have clips in here. I wish i would have opened this in the beginning, because i needed some clips so that works out perfect and then they also give a rat tail comb again. They pay attention to detail and they have their logo and bows here. So i'll definitely be holding on to this as well. Let me see if i can pan around so you guys can see how beautiful the cut is and again, no matter how you're moving the wig is going to move. I doubt that we can solve it been trying for so long, and i just can't ignore again. If you want sideburns, you can bring the lace forward and you'll be able to do your beautiful sideburns there. Sometimes it's nice to just go ahead and tuck it back. It works as an easier install and just you know, sometimes a cleaner look. You don't want the instagram, you know sideburns going, you just want to look. You know nice and clean beautiful for every day. I highly recommend this one and, of course, i'll have her linked in the description box, as well as a list and links of everything that i use to complete. This look, even though it was very minimal. I am ashley b deck if you're tuning in for the first time go ahead and give me a thumbs up. I'M ashley, b deck, if you're tuning in for the first time, go ahead and give me a thumbs up and subscribe. If you are loving the content on this channel, i did take almost a month off and i apologize i was under the weather. We moved as you guys can see from the background. So there's been a lot going on stay tuned. I'M gon na be coming with some blogs and i'm gon na be doing some cooking in this beautiful kitchen. Hopefully i'll see if my husband can join me for some of the cooking videos, because his food is delicious contest giveaways, all that coming up in september, because it's virgo season officially in virgo season is my season, of course. So again make sure you subscribe turn on those postifications hit the bell. So you never miss a video from me again and as always i'll see you in the next one. Fine smooches can't get you off my mind.


Comments
Natnice: This looks so amazing on you, its
Certainly Cee Caldwell: So simple, So Cute not so time consuming which we need to get going on time. Love It!!!!!
Jackie Randolph: I really love how this wig looks on you beautiful and I am happy to be part of the tribe. This is my birthday month too. ❤
shanika Bradley: Love This on youuuuufinna order This right nowww
Nancy Williams: So cute pretty lady. Love it
Vena Hamilton: Love that wig. Where can I get it to purchase
Daniel Simpson: Have you tried deep pre-plucked hair line?
caressa Franklin: Love this on you you kinda look like Daysha from the Taylor girlz with this hair style
N. S: what did you think of this quality in Indian? is the hair good?
Asia Mone’t: Now this wig fits you to the T 9-19-94 #virgogang
rac Gillett: Cute!!!
Daniel Simpson: Which unit do you like the indian remy or Malaysian hair?
Beautybubble 21: Wig is layed period!!
Paige: Im a Virgo too!!
MJ Belle: Ok now I know who you look like Jacklyn Carr the gospel singer
Cynthia Greway: Me too Virgo
Lisa Johnson: Happy early birthday my daughter is on 17 September
LIBERTY GUERRIER: Yesss