Lace Front Wigs Red Bob | Eifini Hair Aliexpress | Red Hair Wig | 13X6 Lace Frontal Wig
- Posted on 04 June, 2020
- Bob Wig
- By Anonymous
US $49.71 39% Off | 613 Red Color 13x6 Short Lace Front Human Hair Wigs 150% Density Brazilian Remy Human Hair Straight Bob Wig Pre-Plucked Hairline
https://a.aliexpress.com/_dU6o1ZZ
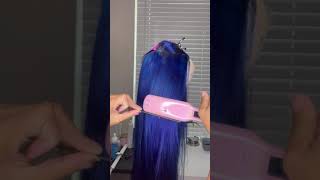
Hi you guys, my name is Christy and welcome to my channel because he's walking music. So today we are going to do this red ten inch lace, front wig, you guys! I am so excited to do this. I have done red hair for about two years and you know it just like it was doing crazy stuff to my personal hair. So the fact that I get to try this random wig out lace, front red wig. I am super super super excited. It is a 13 by 6 and I have a decent amount of parting space. I think in the plunking process of it I kind of show you guys where the wet start on the side, but as for the top, it goes pretty deep back and you guys this is what I have decided to do with it and you're interested in seeing What are they do I got this ago and what company I used? Please stay tuned. Okay, you guys so first things. First, this is if ethany hair, it is a 10 inch, bob red wig, I'm doing this video in the whole time-lapse situations. So you know it's! It'S a little choppy, but you can still see what's going on so first things. First, I'm pulling all of the baby hair away after I placed the wig on my mannequin head and I sprayed it down with water. So I'm gon na take my tweezers and I am just plucking homing out the excess hair while plucking and this process did take a little while, but not as long as I had anticipated it taking um. The knots were not so secured that it was a challenge or that it was time-consuming. I probably spent 20 to 30 minutes on this process and I didn't think that that was that long. Like time flew so I'm just going through and I'm trying to get this portion to look as natural as possible, even though I you know push the baby hair back, and Here I am doing the hairline - it's a gradual process. So if you start behind the baby hair, then you can create what I think to be the most realistic, Caroline possible and yeah you guys, as you can see it's looking pretty darn natural. It does have a slight widow's peak, which is kind of cool to me. So I'm just gon na wait and, as you see, the hairline is not that far back on the sides, but this is a thirteen by six front closure wig. So I just moved it up a little bit. I just used my hair wax and I put my hot comb on the stove and while I'm waiting for it to get hot, I'm gon na start curling. I also used a heat protectant in this portion as well, and I'm sorry about the light you guys. I was using day light and for the most part - and you know it started getting away from me but yeah I just put a general curl in and now you guys I am going in with my got to be spray, which i think is absolutely fantastic, and My edge control brush and what I'm doing here is I'm just pulling back these edges, so they can be as soft and as sleek as possible, and I do this about two to three times and I get my blow-dryer and rub it back as well, and that Really helps a lot and it got very smooth. My edges were laid, and now I'm just gon na put this cap when I'm not doing the full-on ball cap method in this process. I'M just putting it on to secure my hair and I'm getting my ELF foundation in cinnamon and my foundation brush, and I'm just gon na place that all over the edges of the cap in anywhere, where I believe partying space could be a factor. And now I'm placing the wig on, and I thought that this was a pretty darn good look here. You guys, I also have put some foundation on the cap as well. The inside of the cap, and now I'm just kind of looking and adjusting it and kind of figuring: okay how's it fitting how's it looking so now, I'm gon na just pull back these edges because we got ta get this lice off. Okay, look so later on. We can talk about what lace so yeah, I'm gon na use these clips and I'm just gon na pull this hair back, but I'm also pulling the edges down so that it's not too taut so that I won't have problems later and putting a little excess foundation On the outside, so I can make sure that it is as believe it as possible and I'm cutting two slits in the top, and this will actually make the lace a lot more manageable and a lot more. You know working worker or beginner-friendly, and I clip these back and forgotten that I did not cut the intercepts. So now, I'm gon na go in and cut these ear tabs off. You guys and I'm just gon na, go and guide around my ear and go until I have no more lace and that's essentially what I did so I get this side done and then I just check it and put its back in the clip and now I'm Gon na do the other side as well, and I'm just gon na hold this down while cutting and see about getting that your tab, undone, okay, so yeah, and now I'm gon na go back in with my god to be, and this applicator brush it's usually used For color application, but I'm using it to apply the got to be glue spray, and I seen this technique done by the tastemakers. She is so long. She makes little wiggling looks so freakin easy, and I saw her do this on the first video I saw of hers - and I was like I got ta subscribe just for that - oh my goodness, so you guys I'm taking the comb and I'm combing it into the Spray and I'm using my blow-dryer also to secure this really quickly and that's the one good thing about using the hairspray versus using the gel or anything like that is that you can go directly into securing it on your edges. And I really like that, because the blow-dryer will just set it and you're done and yeah, but you guys you have to be so very careful with this spray because actually see I just started. You know Boop spray here and not using the brush and later on. I ended up having issues with my foundation, so you know stick to what you know is gon na, be the cleanest, most neatest way to doing this, and, as you can see, I am trimming off this lace and the ear tabs started coming undone, but I'm not All that worried about, because I have not used my I've, not tied it down yet so I'm not terribly worried about that, but I'm taking this eyebrow razor, and that is what I'm using to the lace I felt like this was an easier process than using scissors, Because you want to get the lace a little jacket, you don't want straight lines because then it's not gon na look realistic and that's a problem. So I am just gon na go back in now, since I got all the lace off and I'm gon na spray. The brush and then just paint down these edges and press them in so that you know the lace is secured cuz. We want secured lace and yeah, and I'm not going to crazy into this. Just because you know the more of this pray you put down like it just it can get a little out of control, but I still like this, for you know your everyday on an off Lisa application. So now I'm gon na just separate out some portions for baby hair that I want to be in here because, as you can see, my hairline is very extended and I need to cover these little stragglers that like to make their way out. So I'm using a lot of body mousse and I'm just gon na put that right, one that baby hair right one, these edges - and you know I'm gon na get my brush and just kind of like sweeping some baby hair. Now I did notice that they tended to be a little long, but I figured I would just trim them down even more once it dried, because sometimes it's just easier to get. You know the length that you're looking for once it's dry like this side. I like that side, it did exactly what I wanted to do and it's covering up these little straggly hairs from my own hairline. So now I'm going to tie it down and blow-dry it a little bit and then do my makeup and I'll be back. So my makeup is done and now I'm gon na take the scarf off and yeah. So these edges are the baby. Hair is laid down, it is dry, but, as you can see, I'm gon na just go in and take this little razor comb and just trim them a little bit not too much, and I'm also gon na go in with my contour for my forehead and just Dab that in a little bit as well, because the godspeed glue spray, just kind of did not set right with my makeup and so that just made that look a little cray-cray. But now that all of that is fixed. I'M going to go through and call me through my and kana see. Did I want to put more curls in here and all of that good stuff, and I didn't want it to be super curly. I just wanted to make sure I had a little bump and now I'm gon na just trim and spray that down I'm gon na use the got ta be to secure those ear tabs and I'm also gon na just trim this little part down a little bit As well, I'm not gon na do like you know, a crazy scoop or anything I just kind of wanted it to be a little bit more manageable and a little bit more secure, so yeah there we go with that and I'm just gon na brush that down And hold it and blow-dry it just a little bit and you guys like. I think that this looks pretty darn good. Just for some got to be spray, and I didn't put any products on this hair. I also did not wash or pre wash the hair or anything like that, so this is definitely like straight out the box. I can see. I trim the bank a little bit so that the curls would layer and it's holding its curl, because I only did a little bump, and so I was excited about that, and this is me just trimming off a little bit of excess lace. That was just it did not want to cooperate so yeah and that I was satisfied and that is full of you guys, alright guys. So this is the completed. Look guys. I don't think it's too bad this week is super cute. It already came ready. I got it in a 10 inch, so you know it was already Bob ready, which is gon na, be awesome for the summer, because it's going to be hot and you guys, like it curled well, I feel like I'm still holding the girl, and so you know It'S not looking too bad. I really hope that you guys enjoyed this video and, OH just so. You guys know anybody's wondering I used to talk to be deep ally for my eyes, and you know it's just it's a classic. Okay! So yes, so you guys, I really hope that you enjoyed this video. Please do not forget to Like comment and subscribe and I'll see you soon.

Comments
You Have Time Podcast: I love this!! You are working your magic on these wigs!
Ester Frias: That color looks so beautiful on you!! I enjoyed watching this.
HDsignatures: This wig looks really beautiful on you babes! i really enjoyed watching this
Tay Rosé: This wig is giving me Rihanna vibes. The wig net technique that you showed is essentially perfect for beginners. Awesome video .
Mmabatho Olifant: That wig did not come to play I love it so much ❤️
Jessica VINCENT: Omg! Looks pretty on you!
Elizabeth Nagasha: I want to start trying out wigs and this really gives me an incite
Courtney Jinean: The color looks so good!!!
Lizzie the Gangster Hippie: ooo I love this color on you it’s so pretty
illblerdmatic: Sis killing it with versatility! Sis got hands with beauty and hair!!
Sanaya Diamonds 💎: That hair is beautiful
Ethan King: 12:42 awesome wig and nice makeup Chrisy
Joy Austine Oluwafunmilayo: Girl your wig is so BEAUTIFUL
ked so real: You were recommended by YouTube girl!!!❤
xo.cahtlinn: This color is so pretty one you, I’m scared to try colors like this
jass dhaliwal: Like 5 so beautiful and amazing video
Silver Linings Vlog: Wonderful channel i do love this i do enjoy thanks for sharing God bless
DIIX CSGO: So Nice. i hope this channel makes it Big one day! Oh, and happy hug your cat day! :O
Saanvi All-Round Telugu Channel: Very nice
Aqsa Iftikhar: Nice Sharing...❤ Stay Connected new frnd here ❣
R H ALL in ONE: Hi your channel subscrib nice video
Saanvi All-Round Telugu Channel: Iam a nw frnd
TortureTashii: Here first ☺️☺️☺️