Updated How To Melt A Frontal Wig | Cut A Bob With Scissors | Imaslayyobae Gummy Glue | Thatgirlkay
- Posted on 29 July, 2022
- Bob Wig
- By Anonymous
In today’s video you will learn another method on how to install a frontal wig using Imaslayyobae Gummy Glue Adhesive, along with learning how to cut a bob with shears vs using cutting clippers.
Stay tuned for next week’s NEW VIDEO
Heyy Beauties My Name Is Khaliyah But Yall Can Call Me Kayyy
If your interested in any Hair Dets, Beauty Tips, & Moree !? Subscribe Sisss
Products Used
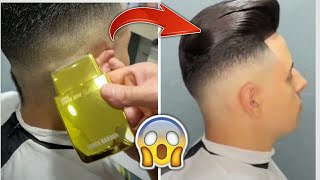
Imaslayyobae Gummy Glue
Meltdown Styling Gel
Clips/EdgeBrush
Shears
Bald Cap
Cotton Pad
Alcohol
EricaJ Hold Me Down Adhesive
Ruby Kisses Makeup
Foundation Brush
Razor
Babyliss Titanium Flat Iron
Isoplus Foaming
She Is Bomb Wax Stick
Sebastian Shaper
Hot Comb
Elastic Band
Lets Be Friendsss
Instagram: https://instagram.com/thattgirllkayy?i...=
Business Page’s
Hair Page: https://instagram.com/thatraretouch?ig...=
Spiritually Rare Page: https://instagram.com/sprituallyrare?i...=
For All Business Inquiries Please Contact @[email protected]
#how #to #asteriahair #nadulahair #gluelesswig #aliexpress #frontalwig #frontal #makeup #hair #weave #hairreview #beauty #wigtutorial #alipearlwigs #installs #bundles #hairtiktok #tiktok #trending #customize #bleach #developer #kiss #neon #peach #bath #wigs #meltdown #color #pluck #pink #brown #starttofinish #beautyfest #tutorial #heart #shaped #edges #ponytails #flatiron #style #hd #transparent #lace #blonde #613 #tone #wella #color #charms #ombré #dye #mscocohair #onemorehair #highlights #Ion #curling #iron #ICfantashia #Sebastianshaper #Bougie #Supply #Glue #Slay #Spray #Celiehair #imaslayyobaegummyglue
Oh, hey beauties! Welcome back to your girl channel. If you are new here, hey blue, my name is claire, but you can call me kay and here on my channel we talk about beauty tips uh. My hair is alice. I'M here to give you all the hair deep. So if you like what you're hearing go ahead, hit the subscribe button girl, cuz pizza, lit over here and if you return it - hey blue hat girl, how's yours going, but okay also, today we got our boosted lena and y'all. I'M not even gon na lie out. Today, this video is kind of just straight forward, but this is a new and updated method of the way i install my frontals okay, so yeah like i said this is going to be a new method y'all seen in my past videos, i would usually go ahead And cut the whole thing now guys i do it in three sections and i feel like this is better because while the glue is drying, i just feel like it's the perfect time to place the lace. You know when it's fresh versus you trying to apply the lace all around so also too, i am using a new glue that i'm a slayo bay glue. Okay, i love her glue. I feel like her glue it like it dries dry. If that makes any sense, you like, i feel like some of us know what i mean by that, like some glues like they dry and sometimes they can feel sticky after a while, i feel like her glue. It stays dry for a good amount of time. So this is the glue i'm using it's still kind of the same method that i was using in the past, but this time i am just doing it in three sections and i'm going in with you know the middle section first and then i go ahead and Do the two sides so like i saw first, i was just tracing out where i wanted to place. You know the middle section, then i went ahead and pushed back the wig, and now you can go in with our layers. Okay, so yes, i like to do about three to four layers. Uh most most of the time, i probably do three so yeah i mean basically like the the new method is pretty much the same. It'S just i just do it in three sections now and yes, my girl, we was having like a great like conversation all that throughout the video, so y'all gon na see mother was acting goofy out throughout the whole video. I love her so yeah and then here also too, i am showing y'all how i melt the lace in so i love to use that comb. I love to use the rat tail. I love to use it to press in the lace like you have to melt. It you can't just lay it down. You got ta method lace, so you will see here after i went ahead and placed the lace down there where's some spots i wanted to get and what i love to do is i love to squeeze the glue like you know, somewhere, where i can easily just Tap and go tap and go as you can see. You know very self-explanatory, basically, like i said, i'm literally just putting glue in any spots that are not laid, and then you know, after those layers dry of those sections. I then go ahead and melt down those sections. So guess that is that y'all will, just you know, see me: do this middle section and move on to the sides i'll be back soon. Y'All! That'S facts: okay, y'all! So i'm back so here i'm just showing y'all. How i'm just making sure that that ear tap is down? If anything, i want to make sure that y'all put extra glue around the ear tab, because i feel, like the ear tabs, sometimes are like one of the first parts of the lace to lift. So you know as long as you put a little bit of extra glue or you can even use you know, adhesive tape. You know to put around those ear tabs, so you know really make sure it stays down as long as possible, and here y'all will see. I'M just going in real lightly with the makeup. So when i go in and melt down the lace - and i take oh - it's like a straight light - scalp and that nose so yep, i'm going in with elastic beans and yeah, and so yeah don't forget to push in that lace with the elastic manual. I feel like this part is very essential and crucial. I mean honestly, you know the elastic band itself is no one need to do, but i just like to do this extra step because i just fly just it just melts it even more so, as you all can see by the pictures, a little intro video all That she wanted a middle part bopper honestly, i feel like we just came up with it after the appointment and it just it just came out so cute. So, yes, we decided to do a middle part. Bob, and here y'all will see. I just went ahead and parted her middle part. Um, usually i do have to repart it, but i'd like to do this. Just you know get a fresh start of everything just to get everything going in the flow, and you know if the part is really off center. That bad, i mean, like. I said: i'm gon na go over it again. So what i do is pretty much with any part. If i'm doing you know a side part anything like that, i'll always go ahead and part it off before you know, i start either sewing the wig or styling, or anything like that. I like to go in with my: she is by wax stick followed by the sebastian spray. If you've been watching my videos, you already know them - is my two fave products and followed by the hot comb just to get it real, nice and flat. So i love to create that tea part um. I know i can't see here, i'm probably just going to show y'all much better in another video but yeah. I just love to create that tea part, especially when it comes down to my middle part and yeah. So here y'all will see, i part off in the back, and i went ahead and sewed down that section and now we're going in in flat ironing um a tip that i can give y'all when it comes to flaring um. I was going to say, you know, make sure you have you a great flyer, but i just feel like you know, most of us just got them old school fly, irons that just still get the job done. So obviously you know whatever flying that you know gets real real high. I like 450 and above just make sure that the heat gets that high and you use a really good heat protectant. Like i said in my past videos, i love the icy fantasia heat protectant and i just you know i just follow that back with the with the flat iron. Like y'all already know, all products are listed down below, but i just love my bag lips, which is, i think, that's how you pronounce it. I love the babeless flat irons because they are titanium plates. I feel like titanium plates are better than ceramic plates. If i said that right too, but so yeah and i was taking off the elastic damn baby hairy, giving straight scalp nanos but okay also here y'all see, this is what i meant by sometimes you know the party is not going to be straight because you know That lasted me anyway, so i had to fix it up, had to redo it a little bit and i was looking a little clearer and don't worry. We can get that part even crispier, but you got ta wait to the end. Oh that way to me, but okay, also here i am going in and i am cleaning up that part with the tweezers um yeah. I don't know i i just feel like you can tell when the part needs to be plucked, i mean for the most part. I do plug everybody's parts, but i just do feel like some wig is just not needed, but for her wig i definitely it definitely needed to be plugged so y'all see it looks so much better, and here i am starting off the edges and y'all. I did do my edges differently than what i usually do them and i love them and she love them too. So, yes, so y'all just watched me create these edges that i never done before. I really did like them. I don't know they. Just i don't know, and they very much never truly gave very much sleek. It gave very much, but it needed to get so again. Like i said, y'all would just see me create these um yeah for the most part when it comes down to the edges. I just like to really create you know either small c's or big c. So like therefore right here by the ear tabs, i'm going to create a small c, and you know where you know she's so goofy bro over here right over there. You know right there around. Can i i'm obviously gon na make a bigger c, and then i like to go in with my shears and just go in with a jacket cut, not you know straight bluntly, and then you already know by the ear tabs cut down in a drag it cuts. So y'all are you know if you've been watching my past videos y'all, are you know how i get down with the edges? You curl them up with the rat tail comb here to help you or you know, use your fingers. If you know the rat tail comb not doing his job and then on the side i like to curl the edges to the back, for you know the sideburns yeah and then here she was telling all about my elastic dance without real. I love your lots of things. Thank you. That'S. I think. That'S really. Why my, why was so long? Why? Because you feel like they work yeah just a little bit. You don't know be having it on there for like two weeks or whatever yeah just two weeks. You know yeah, i like how they really like secure it and they're not uncomfortable like you know how some elastic bands are really uncomfortable like the ones i just buy, like a hair store or something like. I don't really like those ones, but yours they give me a different like i can leave that on overnight, so yeah y'all stay tuned for them, but okay back into the video, so here we just molding y'all already know i love to mow down with that meltdown. Gel shout out to my girls, jetta girl, if you're watching girl, thank you for building out to this gel cause. I just love it and i'm just so glad that they finally got them up here in the midwest, so yeah as y'all can see yeah. I just went ahead and muted the roots and followed by the foam and, like i said y'all, this was my first time trying to create these type of edges, so it kind of took me a minute to get the drift of it. But after a while i got it and it came out so cute, so y'all could just see and watch how i created this side and we're gon na move on to the rest of the i ain't styling. No doubt now. I don't care about it. Facts, foreign. I ain't got no doubt: that's okay, so i'll pray i'll enjoy download that little short segment whatever, and that was time to get into the cutting that that was fast, i'm sorry y'all, but anyways. I just love to make sure that the client is sitting up straight. You know make sure she is straight, don't move, you know not bending her head side to side up and down all that good stuff, and i just love to start my guide in the front now. So just make sure that you start the guide in the front and just make sure that you know when you cut each side make sure you know they are even obviously you can just work your way to the back um after i did this. I then went ahead and started to cut the bag after i made it my starting guides from the front um. I did used to start in the back, but now i like to start, you know my starting guide in the front because now, as you can see, it's just easier for me to just go right along that traveling guide right there, so yeah um a lot of People do cut with shears and you know say it's better. I guess it's better have have i done it before. No. Why? Because look at this cut like it was it was. It was perfect with the shears, so yeah y'all can definitely still get a bomb straight cut with just the shears and not have to use um clippers. So yes, y'all will just see for my bob's i like to put in that slight bump. It'S not too much. It literally gives you know what it needs to give. It gives the hair. You know slight volume period, this bobbin period, but yes, so basically i'm just going like over the top layer of the hair as well to give it that you know to give it that nice little slight bump. So then you know when she does comment or whatever you know it still has body, and it's just not. You know very like it came out so cute, and sometimes you know if you do want to tie your edges down with the elastic band. It can sometimes move the edges a little bit, but it's no problem. It'S no problem, and here y'all i think i lied. So i didn't get the black spray part. I apologize, so i promise y'all. The black spray method with the part is coming very soon. It is, i promise y'all it's coming very soon, but so yeah y'all, we are literally just adding those final touches. I love to spray um over top of the hair with the sebastian spray followed by the icy fantasia, because i feel like the sebastian spray it for one holds the black spray down, and it's just it just holds like the top of the hair in place, and Then i feel like the icy footage spray gives the hair and the edges itself some shine, so yeah yo, if you met it this far girl. Thank you for watching stay tuned for next week's no video and yeah hit that subscribe button for your girl right now. Thank you thanks.

Comments
Kamari: Bodied tf out this look I knew you was gonna body this and you bald cap is the mfkin truth whew yess ma’am May God continue to make your journey fruitful Ameen
Life Of Kay: