How To Fix Your Raggedy Wig! Fix Your Old Synthetic Wigs!
- Posted on 02 January, 2019
- Bob Wig
- By Anonymous
Follow Us on IG: @GetGlamFam
**ITEMS USED IN THIS TUTORIAL**
Canvas wig head: https://amzn.to/2T0pPAH
Tripod wig stand: https://amzn.to/2qGngHb
T-Pins: https://amzn.to/2FcaWZe
Wig Brush: https://amzn.to/2R4Kmqm
Feather razor: https://amzn.to/2VqUS9U
Flexi rods: https://amzn.to/2Vq0KAC
Steamer: https://amzn.to/2SvJBU9
Insulated bag: https://amzn.to/2LH7B49
I hope that you have found this tutorial to be helpful and informative! If you liked it and would like to see more videos, please subscribe!
Until next time GlamFam, take care, God bless, and STAY GLAM!
You know I love you boo,
Linwood
FTC Notice: Some of the links in this description box are affiliate links, which means that if you click them and make a purchase, we are able to earn a small commission. This doesn't affect our opinions on products, but it does help fund the channel so we can continue to make informative videos like these for you. As always, Thank you kindly for your continued support!
**All Background music in this video is creative commons and was provided by Youtube's Audio library for creators.
How to fix an old wig
How to soften a synthetic wig
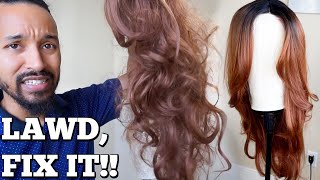
Remember that time, when you were trying to facilitate a happy relationship with their significant other and things got a little too hectic and next thing you know your weight got caught in a crossfire and now it's kind of a problem, you don't what your weight does and I'M here to help you with that problem today, I'm Lynn, wood - and this is the glam fam and I'm gon na - be showing you guys how to fix your old busted wigs, and you guys can see this one here has quite a bit going on underneath. So I'm gon na be actually showing you how to completely transform this wig into a different wig altogether, and it's gon na be using some pretty simple techniques, but it won't take you long at all. So, let's dive right in now. What you'll first want to do is go ahead and take this baby here, we're gon na unlatch, all of those little hooks and stuff on the inside, which is matted up in here. I'M coming this this week has seen better days, Lonnie, and I guess technically, if you're facilitating, happy funtime the day that you were, it was probably better. Nonetheless, we're just gon na go ahead and take this untangle all of that from the underneath comb there, because that needs to come loose. Look at this you're, crazy, okay, so we're just gon na! Take it and toss it right on to this mannequin head by the way, all the things that I'm using in the video today, I will try to find links for and I'll put them in the description box down below and if you haven't seen some of my Other week, videos where I felt more engage on different techniques, they'll be down there as well a playlist or something I'll see. If I can do this, I'm not organized youtuber, I'm just trucking along and faking it till. I make it okay, okay, so once you've got that wig on to the head, I'm gon na take some t pins just like this here and we're gon na go ahead and in that way in place, it's just gon na help to hold it secure. What we're going through some of the others that I'll try not to kill yourself while you work on the process the front honestly, it doesn't look super bad, but it all is moving pretty well as one piece it's kind of stiff and it's beginning to tangle. Quite a bit on these ends. Now I can tell you, as this week has been through several revamps already. It is several years old, so I'm gon na go ahead and change. We'Re gon na change up the length, and I think what would be really cute is to give this a more modern look where we're actually taking it more like a longer bug and doing some loose waves like this straight and things like that on there we'll see How we can work that out, so I'm gon na go ahead and begin by taking this hair to the back. Pin all of this excess up that I can and we're gon na begin by removing some of this matting. Now the difference in between today's video and some of my other videos is, I'm not going to be shampooing the wig. If you'd like to know how to do that - and I do have videos for that as well and if you watch any of the other week - videos you'll see it there once we've done that we're gon na go ahead and take a wig brush like this here And I'm gon na begin detangling the wig from the ends of the hair on to the wefts or the tracks or whatever you want to call the face of wig. So go ahead and begin down at the end brush right on out and you guys can see. It'S not super bad here where it's gon na be worse, is really right and in nape down here, where it's all kind of one piece. So that's pretty typical, especially if you sweat really heavily or if you wear a lot of sweaters high collared shirts things like that now I know some of you may be wondering. Why would I go through all this when I can just buy another wig? Well must be real Christmas. Just past then came New Year's. You know something: y'all got a little too toasty can't afford a new wig at the moment, and so I'm trying to help you maximize your budget, okay. So what we're gon na do is teach you how to soberly fix your wig, so you can save some cash and hopefully pay your light bill this month. Look at God! Alright, you guys so I now have this baby brushed it out and you guys can kind of see. I like the shape that it's taking in the front, but it's still pretty frizzy and the ends are still rather stiff. So what I want to do is remove some of this link back here and now we can get a nice full end on it and then from there we're going to reshape this baby altogether. So for those of you who are wanting it to look like you purchased an entirely new wig, this is the way to do it. If you wanted to keep all the length on your wig and just do restyling, I've got videos through it and yes for that person, who's asking you. I do have a video for curly hair as well. It'S all in the wig playlist, so you're welcome. Okay! Now, what I'm gon na do is I'm gon na go ahead and take an all-purpose comb like this baby here and a feather razor like this? I love these razors because, honestly, like they're, really safe, you don't have to worry about cutting yourself with them because they have this little guard right on the blade. So that way the blade have actually underneath, if you guys can see that it makes things much safer. So you're less likely to cut yourself with it there's stuff falling in the background, don't mind that my health so goodnight - this is a part. That'S pretty important this week is on a side part, so you want to make sure that first of all, this way is straight up and down. So I'm gon na go ahead and get it as straight as possible. There then from there. I want to make sure that it's pinned evenly where the ear tabs are along the sides, and that way I can ensure that the final cut is rather eat them. Okay, that's probably the most important part about this whole thing: yeah, I'm gon na go ahead and give it a turn, and let's see, I'm gon na probably be just looking at where the layers are. I want to take it to where those layers kind of begin. Here so I'm just gon na take sections of this hair and begin by taking my razor to that there and we're just gon na remove the link from that hair. Just like so all right so from there. I'M gon na turn it back around to the front, and I want to make sure the front is pretty even with each other. I'Ve got a couple of long strands in here, so I'm just gon na go ahead and remove those babies from there just like that, and you guys can see there's a little bit of layering through here. I want to go ahead and mimic that, on the other side of it, I'm just gon na bring it forward just a little bit, and I just want to remove a little bit of link from right in the front like so, and you guys can kind of See how that instantly give some life there, where those curls are already present in the hair, so the nice thing about this is: it removes some of that stiffness it with rt there and allows you to kind of focus on style. Quite a bit more. Let me raise you guys up and you guys can see how much better she's always looking. She looks loved, but it's still kind of stiff through here, where you can't easily run the fingers through, because that texture is kind of rough now. Just so you guys aren't wondering, because I know a lot of you probably are yes. This is a completely synthetic way. It is not a blend and it's not well. It'S a heat-safe fiber, but you can do this with any synthetic wig. So don't let people have you feeling, like you can't do it with even a super cheap one, so techniques I'm Shoni today, you can do it anyway, so I'm gon na go ahead and bring this baby right on back here and what we're gon na do is Section off and very loosely it doesn't have to be anything super neat. We'Re gon na pin a portion of this hair like so once. I'Ve done that I'm gon na take some flexi rods like this here and I'm going to take pretty good sized sections. We'Re gon na grab that wig brush again just to make sure everything is nice and smooth and then from there. I'M just gon na go ahead and take that here and wrap it right on around that baby there. So I'm gon na fold up at the top and then also fold at the bottom. Just like that all right, you know you want a more defined wave when you're finished. You can always do these smaller, but I'm showing you guys the easiest way to do this. So that way, it's not gon na take you all day to get it done. So just keep that in mind, as you are working the smaller the sections, the more defined of a wave you're gon na get out of that here. The other nice thing about using the flexi rods on this technique is it allows us and sustain more straight. So, if you're looking for that, beachy look that's in right now, it's nice because it does not clip those ends to where they are curl to actually leave some poking out, which some people, like some people, don't so, if you're into that beachy look, you can do That, if you don't like the beachy look, you can do like her mods or something like that in order to be able to get it in place. Just keep in mind the type of curl that you set it to is the way it's gon na turn out and basically just continue this all the way up through the week. No, I don't just top, especially. I want to make sure that I'm not putting any indentations in the top of the hair, because, whatever indentation is there will stay by the way that noise is my steamer. You guys will see exactly what I'm talking about in a minute. Once I have finished this process, you guys can see. This is literally what it looks like here. There'S not a ton of rollers in there. I want to say: there's - maybe 12 max, so I'm gon na go ahead and take it from there and we're gon na apply a steamer George. Now I have a cheap clothing steamer like this, that you can find on Amazon from Walmart Target literally anywhere. That sells. Irons typically have a steamer like this, and I'm just gon na lightly hit this hair with the steamer. Now this isn't gon na do a ton at this point, but it does kind of help to get all of the fibers heated up and that's definitely a good all right. So once I've gotten that part taken care of I'm gon na go ahead, I'm gon na grab an insulated thermal bag like this. Here, you can usually find these at your local grocery store. I got this one from a local grocery store h-e-b and I'm gon na go ahead and toss it right on over the top of this mannequin. So I just want to make sure it's wide open. I do turn the velcro side outwards, so this part doesn't catch on any of the hair. I'M just gon na go ahead and place it right over the head like this now. The reason why we're doing this is kind of it's gon na hold in the heat and the moisture from the steam, and that way we can go ahead and make sure everything and there's nicely incubated from there we're just going to take the steamer and place it Right on underneath and what this is going to do is gon na allow that steam to go up inside and basically change up the texture of those curls things like that now. This is the part that gives that wig impeccable shine a nice finish on those curls things like that. The last video that I did this end. Several people ended up asking me if it was a human hair wig. At the end, they just didn't believe it was synthetic. This is what makes it that wow factor when you're finished. So honestly, if you skip a lot of other steps, I've shown in other videos. I will tell you this part is the most important. This is what makes that wig really look brand new, but basically we're just gon na toss under there for just couple seconds and then it feels nice to warm up underneath there. So I'm just gon na let that sit for a couple of minutes. Then I'll take this bag off we'll let it sit for about five or ten minutes and then we're gon na take the rollers out all right, so I've let this sit for like two to three minutes and now I'm just gon na go ahead and take this Bag off I'm gon na, let it cool for maybe about ten minutes and then we'll come back and I'll show you guys how to finish this out. Let'S this, alright, you guys I went ahead and let her cool for just a couple minutes. I was gon na. Do ten, but I honestly want those waves to be a bit looser, so I was like you know it. Let me let it cool down some to where it has a chance to kind of deal what it wants to do, but not completely, because I do want these to be beach waves. So I'm gon na go ahead and test this when you're and see how it's looking and let's take that out and see. So you guys can kind of see, look how that curls, looking not too tight, not too loose. So I'm kind of like I'm still like in a straight end as well, so I'm gon na go ahead and take these babies down now. How are you guys so now that we've got that taken care of it's pretty much cool still slightly down? I'M just gon na go ahead and begin to separate and drag my fingers through some of this. Now this is just what's gon na give it some of that more lived-in texture. I want it to look very organic. You know what I'm saying is kind of messy. What you're, seeing with people styles now, just that more modern wave with the straight and things like that, so you guys can kind of see how this hair is looking here and that's honestly, what we're looking for! So I'm just going to go ahead and drag my fingers right on through the hair. Just so you guys can see no major steps here. No camera tricks, nothing like that. Look at those waves, you guys it's gorgeous right and who would've thought. This was basically a straight wig before with a little bit of bump in the ends, and now you can have a totally different look out of. It then gives you something different to be able to revive and revamp alright once this hair dries completely I'll go ahead and give it one more toss through and then I'll. Let you guys see the final look. Alright, you guys. So this week is completely drying out, and I want you to have to be able to see these waves and curls in this unit. You guys can see is a very lived in organic. Look that just kind of looks a bit more modern, like the waves that you're seeing that are really popular right now, without being too much or too up with them. Let me know what you guys think of this finished result and, of course, if you haven't already make sure to subscribe, and if you'd like to see more behind the scenes. Stuff check out our Instagram page, get glammed BAM and don't don't be afraid to check back bye, see how we're doing look at some of the other videos. We'Ve got cuz. I'Ve got tons of other tutorials just like this one. Until next time you guys take care. God bless take land and you know we love you Mike
Comments
GlamFam Hair & Beauty: What was YOUR favorite part of the video?? Follow Us on IG: @GetGlamFam **ITEMS USED IN THIS TUTORIAL** Canvas wig head: https://amzn.to/2T0pPAH Tripod wig stand: https://amzn.to/2qGngHb T-Pins: https://amzn.to/2FcaWZe Wig Brush: https://amzn.to/2R4Kmqm Feather razor: https://amzn.to/2VqUS9U Flexi rods: https://amzn.to/2Vq0KAC Steamer: https://amzn.to/2SvJBU9 Insulated bag: https://amzn.to/2LH7B49 I hope that you have found this tutorial to be helpful and informative! If you liked it and would like to see more videos, please subscribe! Until next time GlamFam, take care, God bless, and STAY GLAM! You know I love you boo, Linwood
sw33tnycandy: I don't even wear wigs but my friend does. I restored one of her wigs from a tutorial you put up. They are super helpful and informative. :)
Twila J's Spot: Thank you for all of these “re-style “ videos. I followed one of the other videos on a sad looking old wig and it came out awesome! I got more compliments on it after the re-jouz than when I first got it! Thank you! And , it has helped me understand that I should have been customizing them all along (duh, right)! Please keep the tips and tricks coming for wigs and just hair in general!
CharliGirl868: This is a 2fer—we get a wig tutorial and the Master Class of Petty 101. Totally here for both!!! Fix a busted wig, save budget, light bill paid!! CHECK!!✔️
Candice Trail: Yes I’m here for a new revamp wig video. I love your channel, you have definitely inspired me to perfect my craft the proper way. Happy New Year to you and your family.
Roxie1225: Wow! It looks like a completely different unit. Really liked the finish results. Yes you can always buy a new unit but for some people that may not be the option. A lot of people go through financial hardships and it’s videos like this that can be super helpful. The fact that you said that unit is several years old and looks that good shows that a synthetic wig can be revamped and there is no need to toss a unit just because it gets a few tangles.
Latrice Byrd: Yeah, I made it the same day. What a great makeover. She looks amazing. Thank you
Dorrell Mainer: Excellent tutorial! Thank you. I have 3 older than 2 yrs. That I can definitely revitalize with your help. The best part for me was how to make the loose beach waves. It came out so pretty for a synthetic wig. Trying to be glam-fab!
mzanomaly007: The wig remembers everything Also, your puff is LIFE Love the videos! Love the channel
Xen Coop: Happy New Year to you and the Glam Fam. Your wig transformations are always amazing. Thank you for giving us the hope that we don't have to purchase these 500 dollar pieces and still we can slay.
Susan Messenger: Thank you for this amazing video tutorial from Adelaide South Australia ! I am sitting here watching this video again as I am detangling a blonde synthetic wig....the soap is ready...and the steamer is waiting... I WAS dreading the job until i saw you do the process . Fantastic work !!
C. C. C.: This is wonderful!!! A little elbow greese on unit is the boom !:-). Saving money for the next wig and you have a lot of thrifty techniques ! I use all of them ,and it's so much fun ! Thanks boo
Clova Lehr: I will definitely be using your technique to revive my old wigs. Thanks Lynwood. Love your channel. Blessings
Michele Johnson: Your videos are straight up life!! I tried to restore a wig a while back and told my daughter that I was going to hook it up. When she saw the wig (after my so called hook up) she told me to just throw it out. Lol it was a hot mess, but I tried ♀️. So needles to say she sent me to you and all I can say is THANK YOU!! Now my used and older units are actually hooked up and looking much better.
Mychele Myhm: I have a few wigs but I’ve been scared to manipulate them like that, thinking I will mess it up. But you have given me courage to work it out& be fabulous. Thank you for sharing. Love the music too
Blessed And Equipped by God: Thank you for making these videos! Blessings to you and your family
Saleeta Nabors: Hey my brother! I’m ready to revamp a few synthetic wigs so I have been watching all your videos on this matter and they have been so very helpful and interesting. I always learn something new from your videos. I’m going to try them and let you know the results I receive. Thank you so much I greatly appreciate your channel.
Chezz Glam: Wow! Thank you so much. My goodness you have saved my life for the second time!! Thank you thank you! My wigs have come out looking better than when I first brought them!! Praise be!! Xx
Aja Patrick: needed this!! my birthday wig got caught in the crossfire lmao. thank you!!
Ariel Rose: Thank you! Lord what a perfect time to see this video! I've been trying to fix my long grey and black ombre wig today.
RyanKathrine: Your wig touch up videos are always so relaxing
sounique2003: I love the way you revamped the wig. I love to do mine differently after it starts looking ruff. That's a 2 in 1. Lol
Tammara Wiggins: Yessssss! This video make me pull all my old wigs out of the box I had them hiding in. Got me up at 6 in the morning brushing out wigs
cincysbest: Your revamped/refreshed wigs are always bomb asf Linwood! Looking forward to Glamfam 2019!
K. Gray-Jackson: Love this revamped wig video...omg I have quite a few that need revamping. Learned so much from this and your other videos on how to restore units..thanks so much very, very informative. Lol gonna pick up my HEB bag later today and try at least one...thanks again
Lukas Fralich: You should make more of these videos. I love them!
linda walker: I loved the finished look and how you revamped it
MsFeeFee1977: Love it! Makes me think twice about throwing old wigs away.
Janaia C.: As a full time student who can’t afford virgin hair wigs, you’re making my life sooooo easy . I already wanted to get into buying synthetic wigs but I was so afraid having to throw them away cause I know they’d get matted. I say thank you . Question tho, can the synthetic wigs be worn everyday? And when would it start matting up if you wear it everyday ?
Beverly B: Great video, I love the beach unkept look and I have a new synthetic that needs layers and that look.
pinkbubblegum143: I love this man. His sense of humor alone is enough for me to watch. His information is so helpful. I come here for all my hair emergencies and they are frequent in my world lol ❤
Jackie Hazel: Wow! ,that's looks like a whole different wig, it's beautiful! and soo cool how you revived it!, I'm not a wig wearer but this makes me want to be, thanks so much for sharing!
Charlotte Allen: Wow! I'm recycling all my wigs Thank You!
D J Ferguson: "Facilitating happy fun time" Lord thankful that you had Linwood bless us with this video technique. All evidence from New Years Eve on my wig will be gone as fast as he sheared off them ends! THANKS Linwood be blessed
Lilliandesu: I love the result. Thank you for all these videos
Terri Sargent: Whew I was about to trash a new years wig, but nope up at this hour following you and wwoooweee I have a new looking wig, I can't believe it. Happy New Year to my pockets.
iSeekPer5ection: I recently found your channel (teaching my 9 year old how to braid) and I’m absolutely mesmerized. We have locs, do you know much about them? Any thoughts on that? Thanks for the great content! (You can see my daughter’s locs on my channel). ❤️
Wonder Woman: Love your YouTube and you have the best personality. Beautiful family as well. I have two $200 wigs that I need to do this to! Great advice on the steamer! And HEB, I know what state you’re in, lol!
Stephanie T.: New subscriber here: I'm an avid wig wearer and you sir have just given several of my lovelies new life! THANK YOU!
Lakeisha: I like it! Cute work wig lol. I love these transformations
Queen Tracey: Coucou ! I was so happy that you answered my comment ! You are so talented and very busy but still care to answer your followers. Thank you for sharing your knowledge with us. I have been watching all your videos ! I love your family. Love from Paris.
Kristina Stewart: Broke after the holiday is SPOT ON. Thanks for the video as always and HAPPY NEW YEAR!!
SimplySchaun: The wig revamp was nice and all but your Golden Girls shirt stole the show. #SorryNotSorry Sidenote: I used the tips from one of your other videos to revamp an old wig recently and I decided to wear it for Christmas. Everyone was shook when I told them it was actually one of my old busted ones. Lol. Thanks, Linwood!
SEXYTT: I have recently came across some of your videos and I was hooked. I had to subscribe. I learn a lot from your videos, thank you so much. I'm going to start making my own wigs. Can you please make a video on how to bleach knots and plucking your wig. It would be greatly appreciated.
Donna: Thank you thank you thank you, the best best restoration, I literally have a bag of about 25 wigs I was going to toss. I am going to restyle and reuse, God bless you indeed for sharing these tips.
Melanie Oyadina Smith: Wow... I'm so new to hair stuff. But Imma bout to go through your playlist and fix allllll my mom's wigs... lord she is going to put a fight but I know she will love the results. Bless you
Angela Lopez: I love fixing wigs. From the knots to cuts to dye. That’s why I fix em instead of trash em. Plus I can use that money on a different unit. I’ve accumulated 20 wigs since 2019. I live and breath wigs….mostly because the loose hairs are all over the place; dancing with braiding hair and choking the dust bunnies lol. But I’m loving it, so glad I picked up a good habit. And thankful for the YouTube videos for tips and tricks.
Sylvia Gilchrist: Love the shine. Thank you for sharing.
Embrace the Moment: Just found you. I really liked how easy that was and would have never thought to use a clothes steamer as a styling tool. Had to subscribe.
sabrina adams: I love the way you fix the wigs but I also love the better when your wife models them
starlightaura 006: I just looooooooove how you do your tutorials.
Lena Cannon: Wow I would have never thought you could do that with a synthetic wig! He is so talented!
Georgette: Been watching you hours six in the morning and I'm on my couch watching u brushing my raggedy wig from the bottom up
Sincere Presence: Great to see detangling! Yes, Thank You as Always ☺!! The "a little too toasty!" Happy New Prosperous Year !
Misti Ervin: I love you For sharing all of this wonderful information! May you, your beautiful wife and children be blessed beyond measure in 2019 thank you for all of the information that you give to us
L B Hawkins: Bomb...you did that, love it. Blessings
S Devo: Yes baby yes! Love it! I am so trying this! Thanks!
Deshee04: You did the damn thing with this wig. Now I know what to do to bring some wigs back to life.
TREW HIT: Love it! Question though. How can you bump the ends of a synthetic wig?
Sandrah Bradley: Linwood thanks for thinking of us who want to revive our wigs kudos to you.
Lisa Warren: GlamFam...u just be spoiling us ladies with your great and creative tutorials... always watching....
Yvonne J: OK. it's official! Linwood is the SUPERMAN of Hair. It's just that simple!!! We need a T-Shirt with the same logo: Front Side: Linwood. Back Side: Superman of Hair! Yup, definitely official. I'm done. That's all I got.
monica fredrick: I love it! Good job!
Kekedoyoulove❤Me😘: So glad for videos like these. It helps me a lot..with my wigs..lol
Keisha Keys: You are amazing linwood. Slayed again. Happy 2019
Latisa Wooten: Happy New Year Linwood! Love the wig!! ❤️❤️
shasheka c: Beautiful. Thank you so much
Hervicca Maxineau: Love this i want to know how to dye a wig too.
Idy Afia: Thank you so much, do you need the steam on a new wig or only for revamps?
Olabisi Abiodun: Wao! Great job bro, I love every part of it, i learnt that it requires patient to do it step by step but not to rush for quick answer. Thanks so much, have a glorious, lifting and favoured new year in Jesus name Amen. Rgads to glamfam queen & the beautiful princesses❤
Constance A: I found you early this mawnin' and have been watching your videos for hours! Thanks for all of the info and laughs!
Renee Roberts: Hey Linwood... Happy New Year!!! Question.....What is Keratin cream? What is it used for? Is it for ALL hair types? What are some pros / cons of its use? Looks like a perm to me. Can you do a tutorial on shears? The different types and there uses? Thanks so much!
StayGold: Glam Fam I have a question can you also do this technique on wavy or loose wave wigs ?
Tan Mack: Copyright this technique. Thanks for sharing
L G: You are a genius with the bag & the steamer! That's unbelievable!!! Linwood you are a Master.
delores davis: you truly are a miracle worker with theae wigs...i have about 20 to 25 that needs life again...im gonna try and bring them babies back..God bless you and happy new year..love your vids
Pammyj: I love your videos would you consider making one on how to cut bangs on a synthetic wig?
R Oki: Happy New Year Glam Fam! This looks great!
Lisa Wilson: Can you let the curls sit overnight and get the same effect without using the steamer?
Chaquita Townsend: Great idea i have several wigs I'll be doing this method on
Tamaria Graves: love this video, is there one where you restore a straight wig?
georgiapeach310: Do I hear a side business? Glamfam’s wig restoration service?
Latonia Bradford: Really! not doing a wig shampoo Linwood????? Steamer, and bag, love it!!!! OMGoodness!!!!!!!! Linwood, you don't do hair, no sir, you do masterpeices!!!!!!!! Thank you for helping "your students ", by using simple techniques. Well Done Sir!
TandySings: Happy New Year.... can you think of showing how to thin a wig that has too much density. thanks
K M: Minus the steaming I’d like to try this with my real hair.
Nappy Scribe: Gorgeous!
Deann Jackson: Love it!!!
Dinah Ewing: Love it!!!
the recessionista: I love your wig restoration videos
Angela D: Wow you are so talented...looks like a new wig and it looks bouncy and healthy. Happy New Year to you and your beautiful family
Daphne Smith: Look at God!! Happy New Year. Thanks for a new revenue stream for the Twenty Nineteen..lol. You laid hands on that wig rejuvenation... Lazareth! You raised that wig from the dead. I pray many Blessings to you and family!
Nix Gotit: that came out great
Manda Rogers: Ugh I needed you in my life 2 years ago... I tossed the entire collection!
Ibelieve LLL: #beautiful as always!
Regina Gray: I wish I hadn’t thrown away my two sad sack synthetic wigs! I don’t wear them at the moment, but that money in the form of tangled stanky yaki went right into the trash!
Beverly B: Can you do a tutorial on wig making? Happy New Year.
Shaun Dorsey: I do the same heat treatment to my synthetic wigs with hot rollers & a steamer, twice now it has changed the colour of the wigs (both have been red wig's) I assumed that maybe its getting "too hot" or maybe because I didn't get all the product out when washing. Then when I go over it again with blow dryer brush it seems to get rid if the "grey" muted colours, any idea what it could be?
Tracey Jenkins: I swear to GOD you are a stone fool (runs home to pull out that wig I once loved that needs some TLC) ... thank you!!!!!
Toi DaScorpian: Linwood you are Super Amazing I save alot of money because of you I truly appreciate your talent
Rande Thorman: Somebody gotta little freaky in that wig with knots and mattes like that. Must have had too much New Year's Eve fun. I LOVE my feather razor, I wont use another. It turned out cute.