Completely Ruining & Fixing My Own Install So You Don'T Have To | Talkto Hair
- Posted on 04 July, 2021
- Bob Wig
- By Anonymous
completely ruining & fixing my own install so you dont have to | talkto hair
Direct hair link:https://amzn.to/3txbtcP
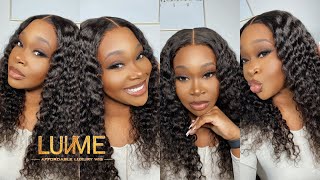
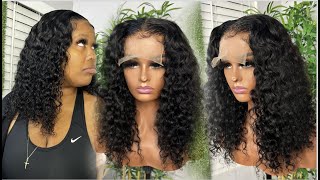
Hair Wearing:TalkTo Hair T Part Middle Part 13x4 Lace Front Water Wave Wig 20 Inch
New Arrival: TalkTo Hair Handband Bob Water Wave Wig https://amzn.to/3gml7eL
Cute Kinky Curly Bob Bang Wig https://amzn.to/2XmRL5I
Cheap U part Deep Wave Wig https://amzn.to/306a13U
Most Popular:Brazilian Straight Wig https://amzn.to/30z30I9
Follow "@talktohair7" on Instagram:https://www.instagram.com/talktohair7/...
Email:[email protected]
Direct hair link:https://amzn.to/3txbtcP
Hair Wearing:TalkTo Hair T Part Middle Part 13x4 Lace Front Water Wave Wig 20 Inch
New Arrival: TalkTo Hair Handband Bob Water Wave Wig https://amzn.to/3gml7eL
Cute Kinky Curly Bob Bang Wig https://amzn.to/2XmRL5I
Cheap U part Deep Wave Wig https://amzn.to/306a13U
Most Popular:Brazilian Straight Wig https://amzn.to/30z30I9
Follow "@talktohair7" on Instagram:https://www.instagram.com/talktohair7/...
Email:[email protected]
Thank you so much talkto hair for collaborating with me for today's video. This hair is BOMB and I believe it was very important for me to show that I could pretty much completely ruin & fix my own install so you dont have to with the right products
wig stand https://www.amazon.com/dp/B089D167FC?p...
wig head https://www.amazon.com/gp/product/B07D...
razor https://www.amazon.com/gp/product/B078...
elastic band https://www.amazon.com/gp/product/B077...
BW2 bleaching powder https://www.amazon.com/Clairol-Profess...==
40 volume developer https://www.amazon.com/Marianna-Super-...
Dye Brush https://www.amazon.com/Color-Brushes-M...=
Tweezer https://www.amazon.com/dp/B0823XZ5VZ/r...
lace tint https://www.imaslayyobae.com/products/...
temporary hair spray https://www.houseofbeautyworld.com/kit...
wax stick https://hairtobeauty.com/products/magi...
Brands interested in collaborating please email
____________________________________________
connect with me on social media!
Instagram: https://www.instagram.com/dajasnipes/
Twitter: https://twitter.com/thedajasnipes
things about me
age: 19
birthday: January 21
camera: EOS canon m50
editing software: iMovie
location: North Carolina
#tpartwig #talktohair #summerwig
Hey guys welcome or welcome back to my channel, so in today's video i'm going to be installing this beautiful hair sent to me by talk to hair. Thank you so much talk to you here for collaborating with me for this video, i'm so excited to show you how i installed this my struggles, so without further ado, let's just hop right into it. Okay, all so, first things. First, i put my wig on my wig head. All of the things items products i use in this video is going to be linked down below you'll know how i do, but i just put my t-pins in my wig, so that i can secure the wig and the wig won't slip off. While i'm trying to you know, put the bleach on it or anything like that, but i am going to go in with my b2 um powder and then 40 volume developer and then my die brush and my plastic knife plastic - don't be using your knives out here. Your real knives, anyways, i go with the mixture and i mix it together until i get the consistency of whipped cream. So a trick to do that is to just turn your utensil over, which is a knife that i'm using and if you kind of tap it and it doesn't come off, you know it's ready, so i'll go in with the got to be glued spray. I got this from case's, you already know she's a goat. I love watching her, but i'll go in and spray this, so that it leaves a barrier between the bleach and i just blow dry it so that it can be completely dry and ready to go. So next i take my mixture of my developer and my powder, and i just gently keyword gently place it on the knots, i'm a little more heavy-handed in the back, because those knots are harder to bleach rather than the front. Those knots are the easiest to bleach and you don't really need to go hard at all like, as you can see, i'm not even dipping, i'm more so just going over as if i'm painting so yeah. The description of this wig is the 13x4 tea part lace. Wig, i absolutely love this wig. I didn't have to do too much to the part i didn't have to pluck it to perfection. It was already done for me and on top of that it was pre-bleached, and i actually did not know that until i went back and read the description of this wig and saw that it was pre-bleached so you'll see later and actually right now that i'm taking It off and checking it like seven minutes into it, just sitting there and bleaching, and it's actually done so. I quickly check and remove because since no i'm not about to over bleach my nope, we don't have time for that. I don't know how to fix that. Yet so we take the wig to the bathroom and i use my shimmer lights. Purple shampoo just put that all over the lace and kind of rub it in some people. Let it sit. I sometimes do this. It only depends on how i'm filling, but i'm just rubbing it in and making sure that it gets deep into those knots so that you know it can cut the brassiness down. And after i take my shimmer lights, i go in with a conditioner. This is just a regular old, suave conditioner and i go in and just make sure that the curls are moisturizing popping because what's a curly wood without conditioning one trick that i i don't know who i got this from. But if your wig has a smell to it, pour some fabric softener on them pour some fabric softener on that wig, and i promise you it will take the smell right out. I literally don't know who i got this from, but this is a life changer like i for years i have tried everything in the book to try to get that smell out. Nothing has worked for me, but this so there's your little nugget, because yeah just help me so the easiest way to pluck is after bleaching those knots. Why? Because the knots are very much so sensitive in a way, and so, if you pull at them, they're going to come right out because of the fact that it just went through the bleaching process and that's a little bit harsh you pluck it i'll come right out, Says so go ahead and part i normally take a little bit in the front and pluck going towards the back of the wig and that's what i'm going to be doing and you can see my motion. I take the. I don't even know how to explain. Plucking there's a plethora of videos on plucking on youtube. I advise you to go, watch them um and don't be scared of a little hair. That'S gon na come out of the wig it's normal, especially when you're plucking and plucking and plucking, but you really just pluck and don't ever stay in one place, keep moving around and that's what you'll see me doing. You won't ever see me in one place. I may go back to that spot. I'M not gon na keep looking in that area, because why it's gon na create a blood spot, says you're going to have a bald spot. So now i just comb that hair back and pluck the hairline and i'm very aggressive, but it's all good. So once you get it to your liking, just look at it make sure that the hairline it doesn't have to be even of course, but just make sure that you know you're not out here. Looking crazy, okay, so try to pluck the sides alike: you're not always going to get the same sides they're not going to be twins they're more so going to be like sisters and that's cool, because why it's going to resemble a natural hairline. So after i finished plucking, i just go in with my hot comb um to make sure that everything is just back in its place before you install it. I highly recommend getting a hot comb um the wick would just be much flatter if you just get a hot comb and just comb it to your liking. To you know the way you see perfection um but yeah, i just hot comb it until i like it and then we'll move on to installing, which is an interesting part of this video. So i'm not gon na lie, like i kind of i definitely messed up when trying to install everything was perfect up until this point so right now, i'm just taking god to be - and i have my you know: wig cap one and i'm just blow drying that So that i can do the bald cap method, sis was not prepared for this okay, so i'm just blow drying it waiting for it to dry. You know the little the little regular what everybody else does. So, if you haven't go, follow me on instagram at deja. Snipes and on twitter at the deja snipes, follow me on tik tok, deja snipes, just connect with me on social media says now. This is where i messed up. Why are the edges outside of that wig cap? Don'T ever do this? Don'T ever do this make sure before you put on your wig cap, that you brush the edges back and put some got to be spray on it so that they can stay back. Look at me looking like what the heck, so i'm just continuing the process, because i think it's important for me to show that everyone messes up that everyone's perfect and i'm just as much of a beginner as y'all. So yeah. We just continue with the process and i'm really thinking in my head, like girl. How are you going to do this? Video and you'll be getting yourself but anyways, i'm putting foundation on my beauty, blender and just tapping that into the wig cap? Now i mean i don't know if it's the reaction with the spray, but it's not looking how i wanted it to look - and you know that's okay, but i'm just tapping it across my hairline and then in the middle but yeah. So now i'm taking my alcohol and i am taking a q-tip, which i would definitely recommend a washcloth which i do um after this, because i realized it wasn't working and i just go across my hairline, where all of these spray is still on my forehead and Then i try that wig on to see how it looks and it wasn't looking too bad, but i was just like you know. I mean this could have been better now, i'm just taking some clips and pulling my hair back so that nothing is in my way and i'm just trying to fix this hairline, which my new hairline what's supposed to be my new hairline. But it's not because you can still see my edges anyways, so i'm trying to fix this, which i'm glad i stuck through it and didn't just give up, because on a normal day i would have just been like you know what forget this. I'M not doing this, but because of you guys, i persisted and that's important now, i'm just taking the god to be gel, trying to put it across the wood cap. But you know it's not really working out and i don't really have much to say about that. Other than the fact that it's not really working out but anyways um, i am again trying to remove some of that glue. As you saw, it was a lot of excess glue, so i'm trying to get that off before i install and i'm taking the washcloth, because the q-tip wasn't doing too much for me, you know what that's okay cause i wan na. Let you know that i love it so much so now, i'm just tinting the lace. Now this lace tint is going to save your life if the lace is always too light for you get this lace. Tint, like this is the best investment i have ever made, and i feel like that's why this process was a struggle but ended up looking so nice, because i had all the products to fix it and i feel, like that's the most important part, when you're trying To install a wig as long as you have all the products, i feel like you're good, you can kind of figure it out, but look at the comparison of this lace. Look at the comparison like what so now, i'm spraying more got to be um, and i realized that that method wasn't working for me, so i just sprayed it on top of the lace which i don't know if you're supposed to do that. But i did it anyway, so i mean, if you won't copy me, just proceed at your own risk real. So now i'm taking my elastic band. I love this another product that is a must-have whenever you're installing a wig and i'm just tying it across the hairline. So that my lace can be seamless and snatched and they swear, even though the lace was very much so there it's cool, yeah sis was tired and i think at that moment i realized that if dub anyways, i'm taking the - i don't know what you call this, But you know what i'm doing: i'm taking some hairspray lace braid, it's not lace spray, but you know that makes the part like straight. I'M taking that and i kind of messed up so i'm taking the concealer and i'm going over it. And since this is the most neatest part, i've ever seen in my entire life, look at that. I'M telling you all of the products will allow you to have a nice install, regardless of how much you struggle with putting all the products together. Your outcome is still going to be bomb, you just have to use them all of them. So now i'm just filling the hair out, seeing how i like it just you know moving around, and this is how long it is. The hair is 20 inches by the way and yeah. This is what it's looking like after i take that elastic band off so now, i'm just trying to figure out how to not mess this up, and unfortunately i did. But now i'm taking my wax stick. You can really purchase any wax stick. I just got this from my local beauty supply store and once again everything is going to be in the description box below and i'm just making sure that the wig just looks really nice to my liking. Now i'm just putting some powder on that lace to make it even more seamless and natural and lace-wearish, and it's looking pretty good if i do say so, myself look look at this. Look at this yeah! Yes ma'am! I know that's right so now, i'm just trying to take out some baby hairs. Um. This part is definitely another part in this video, where i kind of messed up, but we're just gon na go with it. Baby hairs are something that i'm still trying to master um, not everyone can do baby hairs, and i i discovered that okay, i soon discovered that not everyone can do baby hairs. So now i'm just hot combing again the front so that i can have that seamless. Flawless, look, i feel, like that's very important, use your hot comb whenever you need it to the best of your ability and now cutting the lace. So i'm just taking my scissors and then i will take my razor and do the rest because of course we want the hairline to not be straight. We want it to be zigzag right right, so this is what it's looking like very much so laced there. But you know: that's: okay, because we're all beginners in this boat right, i'm just showing y'all what not to do so, i'm just taking that and cutting the lace, all the way off and very much so lace there. But i do think that is because my edges are in the way, no cap. I think it's because my edges were very much so in the way is very special. Very now, i'm just spraying some more lace tint to kind of conceal that waist. I think this really helped in trying to um just not use as much you know spray or, if you're, using glue as much glue. This will really help conceal that lace. I feel like that's very important. This is a bomb product to have i'm sorry, but you need this product if you're trying to slay that lace slide away, get this product, okay, cause i wan na. Let you know that i love it so much now again. Here'S where i mess up trying to do these baby hairs. I feel like this is where i struggled um, not the most, but this is definitely top five of where deja struggled in this video um and i'm so upset that the video cut off before i could finish them. But i'm glad you didn't see it anyways because it was a hot mess just being honest, but i'm trying that myth that everyone saw from tiktok girl. I don't know if i did this wrong. I don't know if you're supposed to curl up or curl down, but i curled up and i was looking dumb. Okay, i was looking quite quite crazy, but i did it anyways and of course, kudos to trying something new, but i ain't like that. But next time i'm gon na try curling it down and see how i like that, but yeah. I think i did it incorrectly, but i'm just using my edge brush and then the got to be gel in the black bottle to lay down these edges and chow. That looks a hot mess. If i do say some myself, like you, don't even got to tell me that look at hot mess it look a hot mess. I know i i very much don't know i'm aware so now, i'm just trying to fix them and pluck them out try to thin them out. It just wasn't looking right and it wasn't working for me. So i think i, like my edges to look a little natural instead of being laid down. I like them in their place without any gel or any mousse, or anything like that. I do like the look where they're laid down. Don'T get me wrong, but for doing it myself, you won't have to take what you take and i'm gon na have to it's. Gon na have to do what to do. Okay! Look at that. So it's looking better! I do say so myself, but the edges are still something that i need to work on, and you know what that's okay. So this concludes the video for today. Thank you guys so much for sticking through it. I know watching me struggle probably was secondhand embarrassment for you, but it's okay. We all mess up sometimes, and i feel like it was important for me to show that and show that i could still get the results that i wanted. So if you guys, like this video, don't forget to give it a thumbs up comment down below what i could have done better and subscribe i'll see you guys in the next one. Bye is


Comments
beauty hair: Honey,love your amazing video,well done.
Destin'ee D'ynazia: Hey girl! I love the message behind this video that people do mistakes, it's very encouraging. Love your channel and your videos! One thing you could've done better with the edges is watch the amount of hair you take out and if you like a more "this is how my baby hairs naturally are" look what you could do is use some moose lay it down with a elastic band or scarf and then when it dries you can comb it out in the same direction as it was laid down so it's not sticking to your skin. Also, don't be scared to stretch that cap forward in front of your hair line when you're doing the bald cap method. Also when laying your lace down to melt you can spray the got2b before you lay down, then the lace so you can vision where you want the wig to go. Hope this helps even though my instructions were a little all over the place lol.
Jenae Farrington: It came out so good! I love how you showed your struggles but persisted anyways. Loving the content
Nevaeh Owens: love this !! ❤️
CDK on the Mic: quality content
Kennice Emaya: Loveddd this video !
Kamryn Dior: