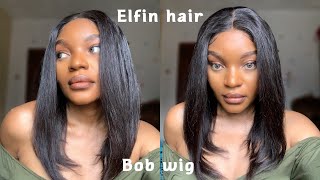
Diy Bob Wig With Different Bundle Length | Part 1
- Posted on 03 July, 2022
- Bob Wig
- By Anonymous
Hi guys, t
This is a 2 Part tutorial
PART 1 focuses how to maximise lengths when making a bob wig while PART 2 will focus on how to cut a bob wig for beginners. Enjoy
#bobwig #12" #8" #12inch #8inch #10inchesbobwig
Hi guys, my name is vianna. Welcome back to my channel if you're new you're welcome, if you're here before, welcome back oh gene, so guys today we are having a two-part video where i'll be making a bob wig. This part will be me showing you how to make a bob wig hand sewn with different lengths and the part two with me, showing how to cut a bob wig. This video is very beginner friendly, and this hair was given to me by my client. I have two bundles of eight inches. I have two bundles of 12 inches and i have an 18 inch, 2x6 closure so guys, if you're interested in this video, if you want to learn how to make your wigs yourself, then keep on watching. Okay guys. The first thing you want to do is to put your wig cap on your mannequin. You want to make sure that the lines are intact. That is the line on the wig cap should match the line on the mannequin, and also your closure should match the line on your wig cap. That way, it's just easier to manipulate and know what you're doing. If you want to put a pin right there. You stretch the back well, not stretch but place the back along that line on the wig cap and put your another pin there as well. Now guys it's important that your closure is as flat as possible. If your closure is not flat, please do not start sewing because you're just going to get a lumpy wig, and you don't want that now guys there are also different types of wig caps. I feel what people love by using is the dome cap. I'M not a fan of the mesh tone cut because i just feel it's very rigid compared to this that has elastic it has adjustable straps um. I feel that if you're going to use a dome cap, you should actually be taking the custom measurement of your client. However, you can actually just reconstruct it to be a one-size-fits-all all in all. This is my best type of wig caps to use. They are very flexible and they fit all head sizes. Now, when you're sure that your lace, closure lace, frontal is flat like this, then you can go ahead and start sewing. So what i like to do is to go two stitches from the front so that i can hook my thread. I'M going to show you guys how i hook my thread, so i just pass it through the tail knot like so and then drag it out. I'M going to adjust this where needed and then i'll start sewing directly from the front. So i'm going to be doing single, blanket stitching or single loop honestly guys. I don't know what this is called. I like to do single, looping, single blankets. For my closures. I don't like to double it because i'll actually be sewing a weft, very close to that same line and they're going to intertwine. So i don't want too much tread work going on there, so i'm just going to fast forward this for you guys so that we - i don't boy you guys at least doesn't get overly more tunnels so guys. What i like to do is to stop here. Go to the other style side start using another line on tray to sew exactly how i sewed. On the other side, this will just prevent one side from looking longer than the other and prevent your closure from looking uneven. So we're just gon na repeat the same process. Now, if you want to cut out this excess waste, you can, since it's not my hair, i don't feel the need to, and i also been feeling to ask the client if i should, because sometimes they don't know what to do and they actually won't. You know disturb the wig at all so leaving it is not bad so guys. This is the end of our stitching. What i like to do is to go one more time over the last uh stitch and then secure it by tying it three times so guys. This is what it looks like, as you can see, is flat flat flat. Everything looks nice. This week is going to sit on my client's head perfectly. The next thing i'm going to do is to do our spacing. That is draw our lines, for our bundle sewing. I like to do one inch spacing and then, when i get to the top, i do 0.5 inch spacing, so you just want to hook your tape there bring it all the way down i'll, be starting. Just at that point, because it's above big, i don't feel the need to start down. So at this point i'll start putting my 0.5 inch markers so guys i'll be drawing the line. Now, a thing you should look out for is the shape of your closure. The way i'm drawing these lines is not the same way. I would draw the lines if you were to be for a four by four closure or a five by five closure or a frontal. So this is actually two by six closure and i have to draw it this way, so it will match the nature of the closure. I mean with time when i start doing other weeks. You understand what i'm talking about now. As you can see, i did not extend the line below this reset one, because most times that part i'm touching right there, you know irritates some clients and i like to cut it off, because it helps your weak move from left to right, leaving it they're just Going to make it really rigid so most of the time i like to cut it off, that's why i actually take my wefts a little bit higher so guys as you notice, i'm not drawing my 0.5 lines. I don't draw them because i don't want to get confused because most times um, i might not start exactly where i want to start depending on how i'm seeing you know the week, you know grow or i'm build. So, as i said, these lines are just for yourself they're, not for aesthetics. You know you're not doing it, for it to look good, go over the lines as much as you can correct them as much as you want. The whole point is that, at the end of the day, your lines should be as straight as possible, and your weak should be looking neat and evenly distributed. That means your bundle should be looking evenly distributed guys so now. The next step is for you to know your inches placement. Now this is 8 inches. This is 12 inches. What you want to do is to place the 8 inches on the lowest point of the line, find where, on those lines, that, if you put these 12 inches below they'll, be equal, i'm so sorry guys. This was zoomed in. I didn't know that i didn't get this part, but i'll show you that the 12 inches is the same length below with the 8 inches. So again, this is what i'm saying you put this there and then put the 12 inches and move it along those lines to see where they will be equal below, and then you just mark that point. This is just for length maximization, because you don't want to take your 8 inches so far up and then, when by time you put your 12 inches, you have to make the bob really short for them to match. So i took the pin out because these wefts were very very, very, very, very hard and i just want a little bit of flexibility. So by the time i'm done securing that part of the week i'm going to put the pin right back. So whenever i'm starting. My lines i like to double double loop or double blanket, and then i like to go through the wefts one or two times, and then you know just depending on how secure i'm feeling you know is looking and then i just work with that. A great tip when you're hand sewing is that you want to hook your weft to a pin that weighs across a line, and it's you just you'll, be moving like a machine. So at this point, as i'm secure with that part of it, i will be going over the weft. I won't be going through the wefts, because it's pretty hard going to the left, because some webs can be really thick. I also want to mention that that actually did double the wefts. This is not single uh sewing, i doubled it and, as i progressed to the top, i will actually be singling it out so that it doesn't. It doesn't look bulky on top, so guys i'll just continue showing you this part fully and then i'll show you how i cut my weft when i'm done with the line before i speed things up, so i like to cut it before i do my last one Or two stitches - i don't cut it after my stitching always before and when i'm really close to the end. So i'm going to go over the weft like this. So instead of cutting your thread to go to the next line, i just like to move it. This way so guys, i'm going to repeat the same thing for the next line: secure the weft putting the needle through it in my bundles and then i just so guys. I'Ve come to the last line before we start our 12 inches. As you can see, that line extends to the front. I don't want that eight inches to fall on the face, so i'm going to be redirecting my lines, so i can get the best possible results. So i'm going to take my sharpie and then move that line down to meet the other one, i'm going to sew this and then i'm going to come right back. So this is what it's looking like and not the line in between. So we still have a full bundle left, so i have to go back in and so in between this one inch spacing so guys. This is what it's looking like. Everything is 0.5 inch spacing now. These things happen, because sometimes when these manufacturers make these bundles, they stretch the lengths a lot so some yeah, sometimes you have short wefts. Sometimes you have longer waves, so you just have to find a way to manipulate all of it. Together so guys, let's just start our 12 inches same process same procedure. Follow the lines follow the lines follow the lines you've seen how i start my treading you've seen how i've moved my treading along the line, and you have seen how i ended, but and how i cut my weft so guys. I just followed the line and i decided to leave the last part for you to see now, sometimes when you're a beginner when you're seeing these spaces in between the waves, you start getting scared. Oh, i don't want you to show. When i cover my bundles, i mean when i cover my closure. Trust me there's no way your hair, like the hair, has been very scanty for it to show in 0.5 in space. Spacing another thing. You should notice that when you get to the front, you actually want to single weft, don't double your work, so you don't want your weight to look like a box, so you always have to be very careful when you're spacing on top. Okay guys. This is what it looks like at the end of it. As you can see, the top is really flat, as you can see, that eight um, 12 inches and eight inches i'm meeting together below there are no spaces in between, as i'm moving the hair you're, not seeing any wefts, which is very important. So this way it looks like inside of the wig i've removed, the lace, see the spacing. We have to go back in so that you can see what 0.5 spacing looks like and what one is spacing looks like and you can see the one in space are looking big, but it wasn't showing at the back of it. So you have to trust the process so guys this is the video i hope you enjoyed it. I hope you learned something. I can't wait to see you in the party i'll be cutting it into a bob. Please be a beginner watch that video and i can't wait to see you bye.


Comments
Ankamah Millicent: Your videos are just what I’ve been looking for ❤️❤️
selema jaja: Hello Thanks for the video I have a question Why are you cutting the weft?
Nosipho Cebekhulu: How much of 6 inch, 8 inch and 10 inch bundles did you end up using