The Best Virgin Lace Front Bob Wig?? // Easy Install For Beginners // Halo Lady Hair
- Posted on 03 January, 2019
- Bob Wig
- By Anonymous
Our Family Vlog Channel: http://bit.ly/2pH1eCf
Heeeeeyyyyy y'all! Check out the specs of the hair below! Let me know if you like these videos! XOXOXOXO
Amazon Store: https://amzn.to/2Eht3eS (Over Night shipping)
COUPON CODE: HALOLADY to save 10%
Ali Express Store Link: https://www.aliexpress.com/store/group... ( Free Shipping)
Official Store Link: https://www.haloladyhair.com (Paypal)
IG: haloladyhair
FB: Halo Lady Hair Products
Snap Chat: Halo Lady
Whatsapp: +86 15902057138
**HELP ME CONTINUE TO MAKE THESE AMAZING VIDEOS BY SIMPLY LIKING AND SHARING WITH A FRIEND!!!!
**KEEP SCROLLING FOR MORE GOODIES!!!
**Did you watch my previous video??? Click HERE: https://youtu.be/42DNqLWF2rU
**Poshmark Link: https://poshmark.com/closet/yvetteyt
**Get Paid to Shop Online!!! Sign Up For EBates. It's TOTALLY FREE!!! They give you a FREE $10 GIFT CARD just for signing up! Use the link HERE: http://bit.ly/2b8NP2H
**Sign Up For Hautelook HERE: http://bit.ly/2aKKNw9
-I am not affiliated with HauteLook, I just really love the site!
**Join Boxycharm HERE: http://bit.ly/2pj8mYz
**Discount Codes:
-IIkon Lashes: http://www.iikonn.com/wp_iilashes/
Save 30% on your order using YVETTE30
-Sigma Brushes: https://bit.ly/2ApVLcD
Use Code: YVETTE for 10% off
**Business Inquires: [email protected]
**If you are still reading this, You're the real MVP! Comment 'PINEAPPLES' down below! It will be our secret!
**Most Asked About Videos:
-Planning 101: Basic Tips and Tricks:
-Funny AF Husband Does My VoiceOver TAG: https://youtu.be/HfXGeh5MaEU
-I Boiled My Synthetic Wig:
-I Hate My 4c Natural Hair:
*Connect With Me:
Instagram: yvetteluvsbeauty
Facebook: YvetteLuvsBeauty
My Fitness Pal: YvetteLuvsBeauty
Snapchat: YvetteB1
**Send Me A Letter!
YvetteLuvsBeauty
PO BOX 790
Painesville, OH 44077-9998
**Equipment I Use:
Camera: https://amzn.to/2qnvUcS
Lights: https://amzn.to/2qlu6Bj, https://amzn.to/2qmSH8J
I only recommend products or services that I use personally and stand behind! All opinions are my own.
Thanks for all of your love and support:)
#yvetteluvsbeauty #haloladyhair #amazonhair
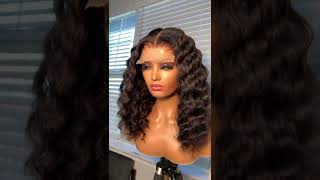
Hey guys see you back with another video and today's video is going to be me, showcasing this beautiful, beautiful hair. So if this is your first time watching, please do not hesitate. Click that subscribe button. If you are into makeup hair beauty fashion videos, I post all of those so make sure you click that subscribe button also make sure your notification bells are clicks. A lot of you have been telling me again that you have not been getting my notifications, so just make sure that your notification bells are clicked. It was already clicked click it and then click it again. Alright, you guys so I did get some new hair, and so I wanted to show you guys this hair I've gotten a lot of questions about my hair lately, specifically about frontals and if I wear frontals and if so, just how the hell do you make them Work you guys, let me tell you, I'm still trying to figure that out. Okay, but I thought I would make this video with us kind of doing it together and me showing you just my frontal routine. At the moment, it's probably gon na change, because I'm noticing every single time I do one I'm noticing the different mistakes that I'm making. This is only my third time doing a frontal, and this is how it turned out. I'M gon na give you the specs of the hair and then I'm going to shut up and let you watch the clips of me actually applying this wig, so I will make sure to have all of the information down below, but this hair is from halo. Lady hair, you can get it from Aliexpress or Amazon. You guys know I shop for everything on Amazon, so that is super convenient and it's also Amazon, Prime, so it'll come in two days. This hair came two days via DHL and it just came in a plastic bag like this. This is the 12 inch. Brazilian lace, straight bomb is what it's called and I didn't do any cutting to the hair or anything like that, and I think it looks absolutely amazing. I believe it's made to be a middle part, but I just kind of shifted it. A little bit made myself a side part, so this side is a little bit longer because I kind of move the hair like that and just shifted it on my head. But I like I like my dominant side of my Bob's to be a bit longer. So I'm really feeling this look right here. As I told you guys, this is only my start time doing a frontal, so I'm still making mistakes and trying to clean those up, but I think it came out pretty good. The hair is super soft. I mean really really soft. I'M really loving this hair. My only con about this wig so far is that it doesn't give you much space for parting, so in the frontal, usually I like it when you get three to four inches of parting space in this week you get about two. So if you guys can see that that's literally all of the parting space in this frontal, so that's not one of my favorite things about the wig. I do think you need more parting space, but, as you can see, I made it work. I don't think it looks too bad, but I would like it if there was more parting space, but other than that. I think this wig is beautiful and I would definitely recommend it, especially if you are a frontal beginner one, because it's very inexpensive this wig, if you look on Amazon right now, is $ 69.99, so super inexpensive and then it's just really easy to work with, like The lace was really easy to work with, and I just I enjoy it, I'm enjoying it. I think shorter lengths are really good for those like hair or wig beginners shorter lengths, just they let you make your mistakes and they're a lot more forgiving with shorter length. Hair, in my opinion, versus longer length hair, but go ahead and watch the clips on how I apply this wig and I'll be right back. Alright, you guys. So, let's get started as you can see. My hair is all braided to the back how these braids them for about two weeks so they're, fine, just have it braid it to the back. Your hair just needs to be contained. I'Ve also done this, where I took all of my hair when it wasn't braided and just took it into a very low ponytail like a low flat ponytail to the back that works too, but braids seems to give me the flattest look. So I like using braids, but I'm gon na, go ahead and start by just kind of gelling, my edges back a little bit so I'm gon na take this got to be ultra glued invincible, styling gel this stuff, I'm sure you guys have seen this. I'M gon na take it and I'm just going to kind of gel my edges back a little bit alright. So now that my edges are like laid down as best as they're gon na be I'm gon na take dropped it I'm gon na take a wig cap and this one is really close to my skin tone. So it's gon na look nice up under the wig. I'M just gon na take it and put it on my head like such alright. So, as you can see, I have the wig cap on my head and what I'm gon na do is take. Some of this got to be glued blasting free spray right here and I'm just gon na spray it all over the hairline, because we want to make sure the cap stays down. I am NOT an expert okay. This is just how I do it, how I've been learning to do it. This is only like my third time doing a front saw, so I just want to point that out, but we're just gon na wait until it dries. You can use a blow dryer or you can just wait it out all right. So here's the cap after all the excess lace, is cut off. Something that I'd like to do is go around the perimeter with a little alcohol just to clean my skin. Before we put the got to be glued on there, but as you can see, it lays down pretty well. The color is good for my skin tone and essentially it looks like a bald cap. So let's go ahead and clean up the forehead area. So next we're gon na customize this cap, even more by adding some face powder on it. So I'm just gon na take this BH Cosmetics, Studio Pro powder and I'm gon na add it to the cap. So you can really see what a difference that made on the cap. You guys can really definitely see the difference once you put that makeup on it just looks super flush, so let's go ahead and apply the wig. This is the wig that I'm using. I tried to do a little bit of customizing. The frontal don't think I did enough. I was afraid to have bald spots, so I may have to go back in and do some more like plucking of the frontal, but this is what I did it's okay. This is the first time I've ever really plucked a frontal and tried to thin it out. So this is what we came up with, so I'm gon na go ahead and just try it on the head. I have not taken off the access lace, yet, as you guys can see it's still there. I just want to see how this fits on the head and let me go ahead and adjust these straps first. This week does come with four combs and then also adjustable straps, so it should lay pretty snug on your head yeah. I don't think I've plucked enough, so I'm gon na have to go back in maybe and pluck some more, maybe while it's on my head but could definitely be thinned out a little more. The top is still like super thick, definitely thicker than I want it, but this is where we are so far and this week here it does not have a lot of parting space. It has like two inches of parting space, which it will be nice to have like three or four just to part the hair back but yeah. It stops like right here, like super super close to the front, so that is a negative about this. Wig would love it to have a have more parting space, but it is what it is okay. So what I'm doing here is I'm gon na get ready to go ahead and cut the lace off. So I'm just gon na take my scissors again and start cutting and I'm gon na go in like sections, so I don't screw anything up. I'M just gon na create cuts right here, so I'm going in sections and what I like to do is cut at like a zigzag motion. I don't want to cut it like stark straight across, so I'm just gon na, so something that I learned super quickly about cutting lace is that you cannot add lace back once you cut it, so be very careful and go slowly. If you have to cutting that lace like I could have probably cut it a lot faster, but it would have looked a lot worse. I'M sure - and I still think I might have cut a little bit too much but we're gon na work through. That still actually looks pretty darn good, like really flush to the skin. Alright, so I just finished my plucking and I'm sorry, you guys, I thought the camera was rolling when I put the wig back on, but it wasn't. But this is how it looks. I think it could still stand to use a little more, but this looks so much better and honestly, you guys, I really don't even have to glue this down. It looks really really good, but I am gon na glue it down because I don't want to fuss with it. So I'm just gon na pin the top of my hair back and wet the hair up here, just to keep all of the hair out the way, because we're gon na get ready to glue. So what I'm gon na do is pull just pull the lace back. A bit like this, just gon na pull the lace back, make sure it's all like straight see this side always lifts up for me, which I hate. I hate that button we're gon na keep going. I'M gon na go ahead and take my got to be glued again, and I also have this like little baby like popsicle. Stick that I got from Sally's and it just helps give an even thin layer onto my skin. So I'm gon na take some of the got to bead and I'm just gon na start applying it and, let's see we'll start to apply it in sections so and what I try to do also is push it forward so anywhere that the cat may be lifting A little bit the glue can sit on the cap and just kind of push it back down some and it does take a while to dry. So I'm gon na take my blow-dryer on cool and just try to speed up the process a little bit because we're gon na do this three times. Alright, let's go ahead and apply the wig try to keep the lace super flower just gon na take the end of this like metal rat tail comb and I'm gon na go in and just push down on the wig. I don't want to make the glue white with my fingers, so that's what I'm gon na do it this way. So, while the glue is drying, I'm just gon na take a scarf and go ahead and put it around the perimeter of my head so help everything lay down alright. So I took the scarf off and, as you can see here, I had glued down further than I wanted it to be, and now there's glue a little bit in the hair and then also on my forehead. So just make sure you're careful when you're putting your glue onto your head, that you have it in the right spots cuz. Clearly, I had it a little too far down, so I'm going to take some rubbing alcohol and just wipe away these glue marks, and hopefully it comes right off. I don't know but we'll see, but that's really intial guys, as you can see the wind that can give me too many issues. It was super easy. Well, I wouldn't say super easy to apply, but I think once I get the hang of things, it would just be a lot more easy to apply. My friends holes and a wig like this was such a great wig to practice with, just because it's not super thick and honestly it just. It was a dream to work with. It really really was. I think I did a pretty good job for it being one of my first times and yeah, that's really it so if you guys have any tips or tricks for me, let me know down below how you do your frontal. Maybe when I get better at it, I will do a video on me customizing the frontal, but here's kind of as much as I plucked it. I could have probably plucked it a lot more, but that's just I don't know that's about. As far as I went because I was scared to over pluck, but I'm sure I could have probably plucks it a lot more. So let me know if this video was helpful for you. If this answer a lot of the questions that you guys have had and if there's any other thing that you guys would like to know and like to see me try, definitely let me know down in the description box all in all, I would definitely recommend this Hair check out halo, lady hair it'll all be down below in the description box. Click the link, get you a new wig set and I'll see you guys in the next one love you bye.

Comments
pjfm du: love your smell, love your look, and you did a good job
Tywan Brown: I like it CC, and you did a good job
Coren’s Corner Boutique My Paparazzi Journey: Enjoyed watching. Thanks for sharing.❤️
Danielle Lee: It turned out nice!
ewkq gong: love it looks on you
pnoe rong: It is nice wig with you, love!
Cree A: Cute!!!!
azes ban: love love love awsome
dguf xuan: with full details!