Full Sewin No Closure Bob #15 / No Leave Out / Detailed Tutorial
- Posted on 12 June, 2020
- Bob Wig
- By Anonymous
HOW EASY CAN THIS BE ? WATCH ANSD FIND OUT........
DON'T FORGET TO LIKE, COMMENT And SUBSCRIBEhttps://www.youtube.com/channel/UCrPBQ... for more Videos
Love you guys, till next time, stay fabulous and stay blessed
xoxo
▬▬▬▬▬▬▬▬▬▬▬▬▬▬▬▬▬▬▬▬▬▬▬▬▬▬▬▬▬
.+.+.+.+.+.+.+.+.+.+.+.+.+.+.+.+.+.+.+.+.+.+.+.+.+
▬▬▬▬▬▬▬▬▬▬▬▬▬▬▬▬▬▬▬▬▬▬▬▬▬▬▬▬▬
.+.+.+.+.+.+.+.+.+.+.+.+.+.+.+.+.+.+.+.+.+.+.+.+.+
♡WHEN I AM NOT HERE, I AM HERE
☆ ----- Connect with me ----- ☆
☆彡My Instagram► BEAUTY_HAULJJ
▬▬▬▬▬▬▬▬▬▬▬▬▬▬▬▬▬▬▬▬▬▬▬▬▬▬▬▬▬
♡CHECK OUT MY OTHER VIDEOS♡:
SEWIN 101 / FULL SEWIN NO CLOSURE, NO FRONTAL NO LEAVE OUT
SEWIN NO CLOSURE NO FRONTAL / VERY DETAIL BRIDAL HAIRSTYLE / FT XPRESSION
FULL SEWIN BUNDLES / FRONTAL SEWIN / LUMIERE HAIR ALIEXPRESS
SEWIN NO CLOSURE NO FRONTAL PIXIE CUT HAIRSTYLE
How To Marley Twist / How To Make Bouncing Kinky / kinky twist 4 ft Xpression
HOW TO INWARD CORNROW / TIPS AND TRICKS GRIPPING THE ROOT / BEGINNER FRIENDLY
HOW TO CORNROW HAIR STRAIGHT/ SEWIN CORNROW / TIPS AND TRICKS GRIPPING THE ROOT / BEGINNERS FRIENDLY
*NO CLOSURE / NO FRONTAL / BRIADED WIG /
.▬▬▬▬▬▬▬▬▬▬▬▬▬▬▬▬▬▬▬▬▬▬▬▬▬▬▬▬▬
+.+.+.+.+.+.+.+.+.+.+.+.+.+.+.+.+.+.+.+.+.+.+.+.+
☆ ----- MY FILMING SETUP EQUIPMENT ----- ☆
CAMERA:
CANON 80D
African fashion
African women's wear
African lifestyle
Women's wear
Nigeria fashion.
For business and branding opportunity: [email protected]
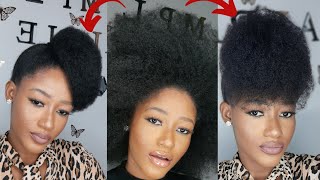
So, first we'll just parted the hair, because for this video or this tutorial, we're actually Doing the center patent. So I'm passing her hair before starting the control, and I'm doing it with this tail comb for Carlene, I'm adding little extension as I'm controlling. This is so that the Congo will be able to withstand the pressure of needle and trade Since the center party and she does not really have hair in front.. She doesn't really have edges, so we just start scrolling the hair from the very beginning of the edges. So exactly where her hair starts from the middle, then we just get to where it doesn't help. She doesn't have hair So continue, Coralie like that and then end the control very close to her ear. This so guides Me, while I'm installing or when I'm sewing in this will actually help cover off., That's a part after installing That's dream, where you're installing you get to find like a box braid or Cobra, where you can actually attach the width through, like always like. I always say that's very important to always wash your clients hair before you install any weave so wash the hair with shampoo and Conditioner, and there you can go ahead to dry, it with hand dryer before you start installing any weave. So that's after installation of the wheel to get to each your clients head. So as I'm curling, I'm adding Li two extension, Like I said before, and while controlling the hair, I'm just connecting all the tips to each other. So I will continue just and joining the tips of each other, each of the Congo to each other. After coral in this part of the head. We just go ahead to do the other part of her head using the same method or the same pattern, because Our front edges., She doesn't really have front edges or she doesn't really have hair Hi. Everyone welcome back again to the channel.. Thank you. So much for tuning in into today's video. Hope we're all doing great today Hope we're staying, say, bye home, Please, if you are new here, just go ahead to click the subscribe button to join the family, share the video to friends and family Relative as well. Give the video a big thumbs up, and I also like to see your comments in the comment section below. I advise you to watch this video from beginning to the end so that you don't get to miss any single step, because this video is Very detailed.. So I want you guys., Oh I advise you guys to watch the video for the kids today and You get to learn something from this video. Trust me. So recently I've been getting requests on bob hairstyle on how to install also in bob hair. So a lot of requests about instagram, page and also on my facebook. So a lot of requests about esta kahan do and also on my facebook Page, and so, if you are not already following me on my facebook or my instagram, please just go ahead to so. The handle is on the screen and You can also send me a message or DM of what's or the kind of video you want to see of this or this channel, Like you just send me a message guys Or you can also leave like a comment in The comment section below So I got the previous video a lot of requests or different hairstyles So be sure to see the hairstyles or the tutorials coming up very soon To where you want to start sewing in the wheels for sewing. I'M starting right from the very back of the head, Which is the normal way to start suing in all back hairstyle. I'M suing It's from the right side of my ear to the left side of that year. I Don't no reason why I'm starting from the very back of the head, just so that, so that's why she tried to flip it into Like a ponytail it to give like this flawless.. Look. It won't Bring out or show any part of the con room for this installation, because it's a bob hairstyle, I'm just cutting the wave when I get to the end of a particular line, We'll just use scissors to cut off the excess.. This is because of the causing nature of the hair, That's the tip of the hair And also when I'm done installing the hair. I can actually trim it off early to give me this bob pattern or bob look, but hey I'm using for today's tutorial is called wind bob, It's a special product in a pack. You get about six bundles in one pack, Three different lengths, so he gets like to eight inches to 10 inches and to twelve inches, So I'm starting from the shortest length to start swaying in which is the eight inches. So I will try to install all the eight inches. That'S two bundles who try to install all the eight inches, Go ahead to install the ten inches and also go ahead to study 20. Inches 12 inches is going to cover up the eight inches, while installing you just make sure that the coffee part of the hair or The coffee part of the tip of the hair is actually facing inside. Also, like I said before, that's one of the reason, while actually cutting of the SS and extension where I guess we particular at the end of the letter just Constituted of doing the turn of our method.. We just go ahead to cut it So yeah. When I get to the end of the particular life, we go ahead to use scissors, to cut off the essence and then place the nest of one or the nest or the essence or the next line, and then Continue to sew in from there. But before placing it I'll make sure that the coffee tip or the paths or the side where the coffee is Professor inside and as I'm installing, I'm actually installing double wave of the hair., Meaning that I'm not just only sewing in one wave, I'm sewing in two Waves, The reason is because I do want all the six bundles onto a head, so I actually want the hair to be very full because the sense of us has to I'm actually showing in the wheels in a u-shape for this style after sewing in the first Two waves at the back, the thought wave will just go ahead to show in straight to the front and caught the essence from there after using scissors to cut that particular SS will place the Remaining or the SS on the next line and then continue from there. Continuing in from there. Sorry, That's particular line. Does the next line will make it to the first line and remember that I'm not just sewing the hair, I'm carefully, showing it so in short, a way that The hair would actually form a bob or the tip of the hair? Actually, for me Bob after I completes the whole installation And, as I'm sewing a mind in the fact that this hairstyle is a middle or Center Francine, meaning that I will have to Make sure that all the quantity of hair I put on the left side is Going to be equivalent to all the quantity of hair I put on the right side, So what I actually mean is that any hair I take to do left side. I have to show it down right straight down to the right side. So, as I cause you know, the SS that's when you sew from one particular line to the other part of the line use scissors To just cut the essence of and after cutting the essence of you have to still secure the tip of the hair by using Needle and thread to just so that passed as the tip of that Spats you cut off., So you have to show it just to hide the seat. So you have to do so before you move over to the next line or before you move over to placing the next wave on the next line. So we just continue sewing in and doing the cutscene method. Onset gets very close to the closing Once the waves that getting close, pretty close to each other. We just saw in this wig list like so before, sewing in there. We glaze actually folded the wig lace into two. This is so that it will actually give this closure kind of look and also so that to protect her hair from the glue After installing or suing in the weaklings. We just go ahead to cut off the excess lace around the tread But yeah. This is what it should look like before you starts, or you move over to the next step now for the closing I'm using blue metal or bonding method in which I've actually done this like couple of times here on this channel So, like I said before, I'm Going to be leaving the link in the description box below A detailed one description box below in case, you get interested in checking it out just to get like a better clearer view and Apply the bonding glue on the web of the head of camera. Actually did that off camera so that this video will be too long And as I'm placing the hair, I'm actually placing., It's very close to each other. So I'm not giving any space so that there won't be any space in between the waves. Also that the closure would look neat, So we continue placing a white placing., I'm adding a little pressure so that it will stick better and also I'm spraying, the spray gel on once I place it and placing it in such a way that it doesn't exceed the Parts And so that it will cover the path, So I'm trying as much as possible to place it or the streets lines so that I can have like a neat.


Comments
Ntul Stella: This is exactly what I was looking for, thanks for sharing nice hair style...
Chide lovesyou: that's a good sew in. perfectly finished ❤
X-Pression® : The Pride of Your Hair: You styled X-Pression Ring Bob so beautifully, Well Jenny
Alheri Diadem Ebenezer: This is lovely, Nice hair style, I enjoyed watching
Joy David: Very beautiful hair style, great job sis .✌✌✌
obieze rita: Lovely...thanks very much dear. I was the one that requested for this hairstyle. God bless you!
jane wilson: GREAT JOB . THANKS FOR SHARING
Debi Ayuku: Thanks so much 4 this video, I really learnt alot from it. U have taught me alot n made me a good hairstylist. I Luv u so so much n God bless you.
Sarah Arthur-Fynn: very nice and simple. God bless u for sharing
Lilian Romanus: I love this I have learn many things from ur video thanks
ChereverBless: It's beautiful ♥️♥️♥️
Andrenne Davis: Flawless
Alayo Dolapo: Thanks ma'am... don't forget my request.... how to make permanent dread and stitch braids
D'essence hair and beauty: Finally,you granted my request..thanks
Marilyn Jones: Beautiful
Katherine: nice and beautiful style....very my sista...love from California,USA
Felix A. McNeill: Beautiful
Success Ogbebor: Nice hair style . Pls I want video of sewing parting with thread
Emeth: I love how easy this method is but I wasn't able to see or understand the name of the hair you were using. Will you give me the name of the hair, please?
Jenny Alex: Beautiful much love I gat for you jennie
Oguonu Omerebere: Tanks for dis great video , kind jenny
Jose Kyambadde: Massive
Rose June: good job
Della Dabner: This is very nice
Oguonu Omerebere: Very beautiful hairdo , u gat a cute model , baby please hw much is the weavon sold , thanks for sharing the video
Esaboertale Justina: Wow wow
Eunice Divine: Which hair did you use
NhànAmy: It pain or not ???
Pamella Jane: Is very beautiful but my dear sent for me that name of the glue
Anne's Journey: Are you based in London?
David Eliston: I look at it since Haiti