How To Make A Closure Wig | Beginner Friendly ( Very Detailed)| Nadula Hair
- Posted on 03 October, 2018
- Closure Wig
- By Anonymous
Subscribe! ⤵︎
https://www.youtube.com/christijae
--------------------------------------------------------------------
My Hair Link: https://goo.gl/HQ5y2e
Nadula hair Brazilian Body Wave 24 26 26 with 20inch closure
Nadula Brazilian Curly Hair: https://goo.gl/cddtvD
Nadula Malaysian Straight Hair: https://goo.gl/qfKkmv
Nadula Hair Autumn Sale( 17-21st September) 5$ OFF over 149, 8$ OFF over 189$
Nadula Official Website: https://goo.gl/DG6dPX
Nadula Brazilian curly hair: https://goo.gl/4oUW1S
Nadula Hair on Amazon: https://amzn.to/2rqyP57
SUBSCRIBE NADULA NOW: https://goo.gl/dy3Cxd
FOLLOW Nadula on INS: https://goo.gl/BQFo3i
Dome Cap: https://www.ebay.com/p/DREAM-World-Men...
Mannequin Head: https://www.amazon.com/Canvas-Block-Ma...
Mannequin Stand: https://www.amazon.com/Abody-Mannequin...
BUSINESS INQUIRES ONLY ⤵︎
Connect With Me ⤵︎
Instagram ⇢ https://www.instagram.com/christijae/
Snapchat ⇢ @christijae
--------------------------------------------------------------------
What To Watch Next ⤵︎
EASY BOLD EYEBROW TUTORIAL
--------------------------------------------------------------------
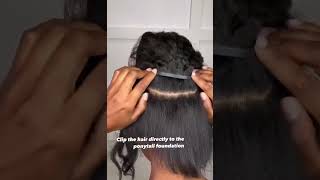
Hey guys welcome back to another video today, I'm gon na be showing you how to make a closure wig. Last time I showed you how to make a frontal way this time or doing the basics, which is a closure wig. So, of course, this hair is from the doula hair and I have their body wave hair. All the links will be down in the description box because I forgot what they are, but I'm starting off by bleaching the knots on the closure, which is very vital and very important. I used to not do this and think I could just like cover up with a little bit of concealer, but it looks a lot better when you bleach the knots on the closure, I'm just using my bw2 white powder bleach and a 40 volume developer. So now that you bleach the knots on your closure now it's time to pluck it, so this is something I really used to not know anything about when I was first starting off making wigs. This is something that never really existed. I thought you only had to pluck frontals, but it really helps if you plug your closures as well, so you can't really see how I'm plucking it, but I am doing it very sporadically and I'm skipping space in between. If you want any more detail, plucking tutorial make sure you go and check out my how to make a frontal way, because I am a lot more detailed in that video. So now I'm just T pinning the closure down to the dome cap got ta use. I'M gon na actually have to leave the dome cap that I use down in the description box, because I use a dome cap, not a sewing cap. It'S just something I personally like to use and I love the way that it fits on my head. I know a lot of professionals probably use like the sewing cap, but I've never been into that use. The dome caps so sewing down a closure is really really simple, because I just do the basic in and out in and out method for this there's nothing to it. Just like, if you're a beginner store, all you doing is just going in and out in and out you're not doing anything extra and then when I get to the end. Of course, I just knot it up and that's that for the closure super simple and easy. The hardest power about doing the closure is basically making sure that it stays still that's why it's really good to get some T pins to help you keep the closure in place. So here's the next step the placement of the track, so I used to get so confused about this. It was really one of the hardest parts for me making closure. Wigs is the placement. So this looks really really weird at this angle. How the dome cap is sitting, but this is where you're gon na want to place your first track. I know it looks weird and it's very awkward, but this is really what's going to keep your placement really nice and in line I used to have the tracks going all different, which ways when I first started off. But once I learned that you know you start right here, I got it all together, so start right here I mean I can't relate to tell you the exact point where you start, but just on the edges and you're gon na put it sort of at an Angle and then you're gon na start sewing. You can see it better than how I'm explaining it. So to me the sewing technique that I'm about to show you is really simple, but it might be a little more difficult for beginners, so I'm gon na zoom in for you guys, so you can see exactly how I am sewing down these tracks. So I am doing the blanket method of sewing and it's really simple once you get the hang of it, I was a little confused when I first started, but all you do is you take the thread through the first part of the track? I literally take it through the weft of the track and then I take my my thread in this case. I pulled it towards the left and I'm going to take the needle and I'm going to thread it in front of the thread. So it's really hard to explain, but you can definitely see I'm doing it. That'S why I than in for you guys, so you can see better than what I'm explaining so once you get to a point like this, where you almost have a circle in your wig. Just almost you're going to want to connect each end of the weft to the closure, so, instead of just going to end to end you're going to go from in the closure to end up closure. Here is another view of the blanket method that you guys can see it a little bit better and a little bit more detailed here. So when you get to the point where you do have a full circle in your wig you're going to want to start lining the tracks up and down just in straight lines - and you can see me doing that here and then in the next clip you're going To see how I close out the entire wig, one thing I forgot to mention is: how do you end sew on a track down? I usually just knot it at the end, and I know I've seen some people like do not send between the tracks and stuff, but I strictly do the blanket method throughout the track and then at the end, that's when I finally not be the whip. That'S what I'm done with that one left. I know that this might not be the most secure method of making a wig and sewing down tracks, but this is just how I do it and that's why I'm not a professional. So this is me closing out the wig, I'm just going to take the track straight up until I reach the end of the closure and that's going to be the last track once everything is filled up and there's no more spaces that you can see. So this is the best part of making a wig is cutting out that closure piece, because you know you are done so that is it for this video. My next video will be showing you how I style this wig and how I got these voluminous body waves of curls in this hair. So definitely stay tuned. For that, like I said this hair smooth a doula hair, all the information will be down in the description box, so definitely check that out if you're interested. Thank you so much for watching, and I will see you guys in my next video you


Comments
Zyana Jamaiyah: how long did you leave the bleach on the closure?
VaKiMbRiA TiMmErA: Okay so when you sewed it down you did it in front of the thread and not through it correct? If that makes sense!
Marla Forbes: How long did you leave the bleach on the closure? And did you use a neutralizing shampoo along with purple shampoo?
Heaven Hudgins: If I were to make a side part wig could I do the exact method and just shift the wig to the side or do I sew the wig on the side.?
Kersha Beaver: Nice job
Janet Shehuxo: Is that a 5x5 closure?
HerPlusTwo: How did you make the circle ?? I seen where you placed the wefts but not how you get the circle
Derbie D: Can you make a video on how you pluck your closures ❤️
Laura Monica: Lovely tutorial when u sew at the back. Do u sew through the band??
Tangela: Did you cut each track ?
Peach Please: Do you cut your bundles? Or double up?
Beauty by Bosslady: Did you cut the wefts?
Erin Brown: Do you put the longer track on the bottom ?
deniseloc1: what was the initial color of the lace.
Mia Amour: whats the name of the song you used in the background ?
Beauty by Bosslady: Or flip tracks