Raw Vietnamese Straight Hair 5X5 Closure | Sumru | Chaotic Hair Review + Wig Making Tips
- Posted on 04 July, 2021
- Closure Wig
- By Anonymous
So this video is ... kinda crazy, but thats how I like it! I left time stamps below if you need a quick breakdown. But either way, its Raw Hair Round two , but this time we're trying out vietnamese straight hair and a 5x5 thin lace closure . Sumru LTD hair really changed the game with this texture that is both silk straight but strong and gives me the texture I can appreciate.
Hair Overview/Review ends at 7:42
Vlog style wig making and hair prep 7:41 to 19:48
Wig Styling/Non detailed application 19:49- end
Company Website: https://www.sumru.co.uk/
My Direct Link: https://www.sumru.co.uk/?ref=AK15
Coupon Code: AK15
Real Name : Denasiha (den- ay-shu) | Age : 27
My Hair's Name: Adira (uh-deer-uh)
Big Chops: April 2012 & May 2014
Curl Type : 4A | Medium/High Porosity
Hair Thickness: Med/Fine | Low Density
Promotional Inquiries : [email protected]
Instagram - adira.kalon
Shop My Brand - Naturally Adira - www.naturallyadira.com
Instagram @naturallyadira
The Crown Care Collection is series of concentrated herbal growth oils. Created with natural ingredients & a heatless, 4-6 week infusion process.
My Promo Codes:
Sports Research Sweet Sweat - ADIRAKALON10
Moerie Beauty - ADIRAKALON
https://moerie.com/?ref=ADIRAKALON
Music by Commoninterest - Distance - https://thmatc.co/?l=D54E6250
#Sponsored #RawStraightHair #ProtectiveStyles
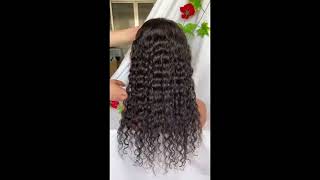
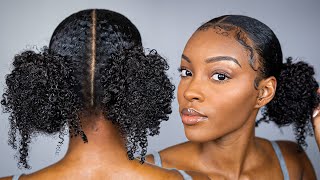
Raw hair is is where it's at in sumeru girl, the vietnamese straight. Thank you for enlightening me. That'S all i have to say no, i don't wan na collab unless i hit you up, hey guys, what's up and welcome back if you happen to be new, my name is denisia up under here, because this is not her. It'S adira and welcome to our channel. So today's video is very oh, come on. My camera has been trying me lately, stop with that. Stop with that. Today'S video is about this hair. Now don't click off, although this is a hair review, it is not going to be your typical hair review, because this video is a bit chaotic. You know why, because this video is very much me, so i decided that i'm going to stop trying to formalize all my videos and like fit this kind of box of how youtube videos are supposed to go, because that's not how my brain works and then i Start just being robotic, and i don't like it so you guys are gon na get the organized mess. That is me and my brain. So this video is that um. It took me about a week to get this wig done and installed number one, because i work a corporate job number two. I got sick and then number three. I really wanted to take my time because this hair was just worth it. Let me just tell you how this is going to be organized, so basically i'm going to sit right here, i'm going to give you the basic details and my initial thoughts on the hair and then the rest of the video is going to be a semi vlog Style kind of not a tutorial but kind of just like step by step of how i construct wigs for myself how i constructed this one kind of like some of my tips once again, not a tutorial, but some of my favorite tips that have helped me be Able to make my own wigs and then a little bit of install so there's a lot, but then there's also a little and yeah. First of all, oh yeah, oh yeah, so the details on the hair. It'S by a uk black woman, owned brand called sumeru. I'M gon na make sure that i'm pronouncing that correctly. If it's wrong, i'm gon na come back and add a little clip of me saying it right, but i believe it's sumuru and she first of all chica was so sweet. We had like conversations she was telling me about how she started her company, why she started it her struggle with finding like we connected okay - and i was really excited to do this video, which is why i put more love into creating this wig and styling it And it paid off so she sent over a five by five swiss lace, closure that is 16 inches and then three bundles that are 20 inches. And if you are not familiar, i am petite. I am 411 and 118 pounds, so this almost come. This basically comes to my belly button, i'm really small. So this is a lot of hair for me and i am going to end up layering it and cutting a little bit off. But this is just where the 20 inches ends on me and i feel like this might be a little bit longer than 20. To be honest because i feel like 20 normally is like about here, but i've been making that up anyway, the texture of the hair is raw because i'm on the wave - okay raw, south east asian, vietnamese straight hair. So this is vietnamese hair and it definitely was a different experience for me. I have never had any type of asian hair. Well, we ought to have the chinese hair, but i digress - although i don't have anything to compare this against. This is a whole different ball game. This is it's different, but i, like it um the biggest thing that i noticed straight out the box and when i was washing it and constructing the wig is number one. This hair feels strong, like i feel like. I could make a rope out of this hair and toss some up and drag it with my okay. I'M sorry that was ridiculously. This hair is strong, and on top of that, if you didn't see that when i grabbed this is half of my head - and i just want you to see how thick and dense this hair is - and i kind of noticed it when it when i unboxed it. But i didn't notice until i actually put it on the wig, the wefts. Don'T look super thick and i was kind of like huh, but it's because if the wefts were super thick with this hair attached to it, it would just. I think it would be too much, but i also don't like my hair, like super duper, duper full the amount of hair and the thickness of the hair and the size of the weft. I feel like are balanced perfectly. So that made me really happy and then the third thing is that this hair has some coarseness to it, which i wasn't expecting from a straight texture before i straightened it. It wasn't just like oh brush it through and it's super silky. I don't give this the title of silky. It has coarseness, it has like texture, even though it's straight it's v, it's very mind-blowing, but that's just because i'm a natural girl and i'm black. So that is the only point of reference that i have for like hair. So i am experiencing a completely new different new different, a completely new hair texture that i'm not used to, but is blowing my mind and i know it seems like i'm being dramatic, i'm not trying to guess this, but this is completely new to me, and this Is just how i feel about it for anyone who may not watch this all the way through, i did blow dry and flatter on this hair, and now it's super silky and i can like run my hair through it, my fingers through it, but i just oh My god, i wasn't expecting this, i don't know what i was expecting, but i mean you get used to virgin hair and again there's nothing wrong with virgin hair, but raw hair is completely different. There have been no chemical processes to it. It'S typically a single donor and it's it's real hair, okay um, i i have been transformed. I will save my money to buy hair, because raw hair is is where it's at in summary girl, the vietnamese straight. Thank you for enlightening me. That'S all! I have to say okay, so that is going to be my short intro for those of you that want to stick around i'm going to show you the hair in the different stages of me, creating the wig and give you a couple of tips and tricks. For me, making my wig and installing again not a tutorial, it's not going to be crazy, detailed with each step, but i just wanted to share with you guys my process. I paused because i was going to say her name, but i don't know if she wants me to put her name out there, but the brand is sumeru and i'm going to have all of the information linked down below, as well as a discount code. If you're interested just keep in mind, this is raw hair, it's not virgin hair. The price point is at a higher level because the quality is at a higher level, and it's going to last you a lot longer i'll, see you um in a couple of seconds. If you decide to stay, if not thank you so much for clicking on my video for the portion that you did see, don't forget to check and subscribe with yourself before you subscribe to me or anyone else, but if you're, good and you're good you can like And subscribe to my channel as well bye to the people that are leaving, let's go to the people that are staying, all good, hey guys, so just full disclaimer! I have a head cold. So all of this - and all of this is like - and i don't feel great, but i have a lot of stuff to do, and this video is one of them. I would get a head cold in one of my busiest weeks. I'Ve had in a long time, but i'm not complaining because i'm blessed to be busy anyway, i have a wig to put together. I showed you the hair. I only reason i wanted to do this little clip is because i wanted to show you that i bleached my knots anytime. I'Ve tried to bleach my knots in the past. I either bleach them and absolutely nothing happens. They'Re still black or i over bleach them. I get them on the hair and it's just this big catastrophe. This time i bleached my knots and i'm very proud, so i'm going to show y'all my bleach nuts, all right. I did a great job if you don't think that i did a great job. You'Re, probably a professional, and i don't care what you say um. I think that i did a really good job in comparison to how i normally do feel, but i just wanted to show you this before i get started. Building the wig, because nine times out of ten all of that is going to be a voiceover, but i'm proud of this. I hope you guys are proud of me and i'll see you in the next clips if you're not familiar by now, i am not a fan of voiceovers, but we're gon na make this work. So, basically, i'm just showing you that i do use the mesh dome caps and not the spandex ones. I, like that they're more breathable and my wigs don't take as long to dry when i wash them because i have a small head. I do have to fold it in the back, so i'm just marking this so that when i put it on my wig head, i know how to fold it again to make it fit. I'M using a white out. Pin yes, because my little marker was out of juice, but i just like to mark the back i like to mark around my ear so that i don't cause any irritation with the placement of my wefts and i like to mark where the middle of my forehead Is these are the places that just make it easier when i bring it to the wig head? So, as i mentioned, i fold my cap over so that it can fit my head a little bit better. This is a 22 inch wig head or whatever this thing is called um, but i do like my wigs to fit very snug, so i need that little extra tightening um. I am marking lines, but these are just guides so that my tracks aren't going all over the place. I don't go exactly by these lines. They just help a little bit. Another quick tip is that when i am prepping my closure to be sewn down, i like to braid the hair forward so that the lace is visible and easier to sew down. But when you're making that braid try not to go too tight because you don't want it to be kind of curling up, you just want the lace to be very flat against the wig head and it's just way easier to sew it down that way. Okay, so look. I know this is a wig video, but i'm gon na take a quick intermission to show you how i'm prepping my hair focus. Please focus focus. Thank you, quick intermission. I know that this is a wig video, but the whole point of wigs. For me is to take care of, what's naturally growing out of my head and now that i have some catching up to do as far as length. If you don't know what i'm talking about go watch, this video is even more important, so i have shampooed my hair this morning. I am currently conditioning deeply and i'm gon na rinse it out and stretch my hair without heat so that we can braid it up later. So we're gon na take a a couple of little breaks. I don't know i don't know, i don't know, i don't know we're gon na take a couple of little breaks here and there. So i can show you what i'm doing to my real hair to go up under this beautiful wig. So the first step is to wash your hair. Why are you not focused? The first step is to wash and deep condition your hair, and the second step is to stretch it so i'm in between steps i'll bring it back in a second okay. So we are now towel dried and i need to stretch my hair heatlessly. So to do that, i'm going to take a lightweight leave-in conditioner. You want a lightweight one, because we are simply stretching our hair and the heavier the product. Longer it's going to take to dry and i don't want it to take long to dry because i need to stretch so i can braid it up will moisturize when it comes time to braid it up. So i'm going to apply this and apply probably like four to six plaits. All over my whole head give me a second okay boom. So here are the flats, i'm feeling a lot better today i wasn't this morning, but i went back to sleep 30 seconds. That'S all i need here flats, i'm gon na. Let these sit all day. I'M gon na finish my wig and then we'll have another intermission when it's time to do the rest, okay, back to center. So now it's time to actually put the wig together and i got me a real comfy spot on the couch, because i wanted to take my time. I do not want to have to be sitting up uncomfortable trying to get this done. So i was watching my shows, i had everything in arms reach and it was time to make the wig. So i'm just showing you that i did pull the closure a little bit past the band and where it's going to sit on my head and again. This is not a tutorial, but i will show you a bit of how i like to sew. Typically it's about the same, regardless of if i'm sewing on a closure or sewing the bundles in the back. But i do go through the cap when i'm like through the entire band, when i'm doing the closure at the front, because i need it to be secure and i'm going to end up cutting the cap underneath the closure. So i make a couple of knots. I sew through that spot a few times before i move around the rest of the closure. I am showing you that it's going all the way through and all the way back through the elastic band through the lace to secure it helpful tips. For me, i like to tie a knot in the thread when i get to the corners it's a flat sew through the flat pieces and then a knot on the corners and another thing is to skip the elastic band throughout the wig. This is where the wig has the ability to stretch, so if you sew through or on top of that, your wig is kind of stuck where it is, and it can sometimes be too tight. So anytime, with my closure or my bundles, that i come across this line right here, i never ever ever sew on top of it. I just go beside it and i make a little knot so that it's secure so once i'm done, the closure is flat. It is secure, i'm showing you that i did put it on the side on purpose. I intend on wearing this mostly as a side part, so the closure is not centered on the cap, but that was on purpose um. After that, it's just the task of applying the bundles again, it's just a basic. So i'm sorry that i'm not here to teach you how to sew, but there are a million videos on youtube, because that is genuinely how i learned - and i just perfected it with trying more and more did you mind that it was madison, as i said, you're Wrong and so the wig is done, it may not be the neatest but she's flat and she's secure and the wig is going to last, and that is what's most important. The wig is done. This is how she looks not flat iron, not blow dry, just simply washed and put on a wig cap. Wait wait, wait. Am i not coming with you please i mean it's in the back, so you won't be able to tell, but that sucks, oh, my god. I was trying to cut this wow wow. Why are you still looking nosy, sir leave my wig alone baby? Thank you. So after that catastrophe i wash the hair and let it outside so that it can dry and i'm just showing you the hairline, as is i'm going to do a little bit of customization. But i wanted you definitely to be able to see how it looks straight out of the box. So, since we're waiting on the wig to dry, let's talk about how to take care of our natural hair up under the wig, so that we can reap the benefits of the protective style. So i left those braids in my hair for actually about a day and then once they were completely dry, i blow dried them now. This was still a heatless stretch because i used my blow dryer on cool, and this is how that looks so once i did that all over my entire head, it was stretched enough for me to braid it. I'Ve said it many times, i'm not a braider. So i need as much help as i can get and braiding my hair curly is not it, it just doesn't work very well. If you haven't seen me since i did my little haircut and trim, this is how the shape is. Looking, i'm very happy with it. I'M trying to get used to the fact that my hair is not nearly as long as it was before, but i'm excited to grow it out in this shape. Don'T i have to come back for a second because i'm about to take sir outside, so i had to put my hair in a ponytail, because i want to go out like this, but i'm like feeling my hair and i'm going back in my mind because it's Been a couple of days - and i was like what did i put in my hair - why does my hair feel so moisturizing, so soft and now that i'm thinking about it? The only thing i put in my hair was the pattern: beauty, leave-in conditioner and my crown care moisture rescue oil and i'm like i don't need to put anything else on my hair to braid it up and i'm kind of shocked because granite. I know my oil is like that girl, but the pattern beauty, leave-in conditioner. For some reason. I keep forgetting that it's really good, but while i'm using it, i don't feel any type of way. But then, after my hair dries i'm like wait. That'S the only thing on my hair okay, so i might be getting the jumbet of the pattern beauty, but we shall see, but here's the puff also side note unrelated for y'all. That said, i was being dramatic in my cutting my hair hair update video leave me alone. It'S my head. I can be dramatic if i want to all right, so we are getting to the point where it's about time to apply the wig, so i actually braided my hair myself, they're, not pretty but they're flat and that's all we need - and i just wanted you guys To get a pre-styled wig look or look at the wig is what i'm trying to say, and i basically wanted you to see the hairline before i did any customization off camera. I separated like the sections that i knew i wanted to pluck from, but it was very minimal and i was very pleased with that because it can be very time consuming, but before we move on, i just want you to see the hair in all of its Beautiful length and glory before i do anything to it plus i was tired and ready to be done for the day, but the next day i blow dried it with my revlon one step blow dryer blush, and then i followed up with the chi silk infusions and I ran through a couple of times with the flat iron what i will say that i was not prepared for once again. This hair is thick, so it took me a while to get through each section with the flat iron. Obviously it's straight hair, so it was very easy to do. It did give the hair this silkiness that i didn't feel before, but because the hair is so thick, you do have to really take your time if you want to go over each section. Also, one of the things that is like a mandatory step is to lay your closure before you even start styling, you need it to be as flat as possible, so use your flat iron. If you can use one of those roller rods or if you have this device here, this is the best it does get your lace super flat, i'm showing you one side versus the other, that's done that has not been done, and this makes a big difference in How natural your wig is going to look on your head? I do like to do that before i do the foam really. The only reason i do the foam is so that when i apply the wig to my head, there are no stray hairs in the way. Sticking to my hair spray, or my gel or whatever adhesive, i'm using to lay my lace, alright, friends, hi it's time to talk, um, don't be mad at me, but i'm not gon na go through like step by step. How i lay this wig down, because this video has been pretty long anyway and i'm just trying to get her done, but up until this point i used my moisturizer and gel to slick down my edges laid a scarf on them. Then i hair sprayed my edges. Put the cap on laid a spar, a scarf on it, just so that the cap kind of sticks to my head a little bit, but not anything crazy and i do have the brown cap, which is actually my first time using this, and it's pretty awesome. But here's my wig, i'm gon na put it on and i'm gon na attempt the whole um spray it and lay it before i cut the lace. I think i've only done this one time and it just did not go well, but spirit is telling me to do that. So that's what i'm gon na do um. I did also do like very, very light natural baby hairs here, because this is a closure and not a frontal, so yeah um. Where are my scissors, because i need to cut these sides off one second, we saw what happened the last time. I tried to cut something in front of the camera, so i'm gon na be easy. Cool i've been using this because alfred that's his name right, yep suggested it and i like it a lot better than the yellow bottle. Don'T drink yeah right, i'm gon na pull it tight enough to give me a headache, but i'm not gon na. Have it on that long! Okay! So i'm editing this video and i realized that yesterday, when i was finishing it, i didn't show you guys. The finished. Look i was so focused on making sure i got the intro at the end that i didn't show you like me, cutting the lace and laying my baby hairs and doing all those things, and then i was going somewhere. So sorry about that. So i put my wig back on today, just for y'all, i'm still trying to get right, the color of the lace so that it matches, but as far as like laying it and blending it, i think it looks really good. I also added in like i trimmed it just a bit and i added in some very very, very light layers um, so you can kind of like see that here and it just like tapers off a bit. So yes, this is the hair. Let me get some natural light for y'all, so y'all can see the hair. But yes, i know this. Video was chaotic. I know there's a lot of moving pieces and voiceovers and music and me talking and me doing my real hair and me working on the way. It was a lot, but it was for y'all and it was for me, so i hope that you enjoyed it i'll, see you guys next time, bye,

Comments
Melina Saintil: Love this video, it is so honest and organic, I LOVE THAT. I’m so glad you showed us the hair before you straightened so we could see if we like/prefer it in its natural state - compared to being straightened. Overall really great video and it was refreshing to see how much you really liked the hair / was pleasantly surprised, all in all really great video Thank you!
Sumru Styles: Thank you so much for the review, you did your thing! ❤️
Sheila A: What an incredible video!! You're so authentic and I love it and the hair is absolutely everything - yes SUMRU!! ✨
larabeautysage: The hair is laidT! And the packaging with the ribbon is a nice touch.
Lindsey Hamilton: I would recommend you research fast hair growth shampoo to double hair growth.
elizeebz: My fav luxury hair brand! Love how it looks on you!!!!
DJ Zetta TV: That hair is BOMB!
K. Johnson: First!!! Love your videos
ZERO TO MEXICO: How many bundles did you use?
Cas Nyx: Good job