*Detailed* How To Bleach Knots, Pluck, & Install 5X5 Closure Wig (No Baby Hairs) | Nadula Hair
- Posted on 30 March, 2022
- Closure Wig
- By Anonymous
#nadulahair #5x5closure #HDwig #nadulacurlyhair #curlywig #aliexpresswig #hairinstall #hairtutorial
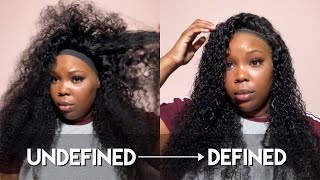
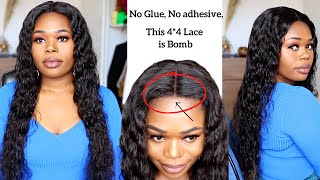
THIS IS BEGINNER FRIENDLY! I'M WEARING A 18IN 5X5 HD CLOSURE WIG.
LIKE, COMMENT, AND SUBSCRIBE :)
direct link to hair: https://www.aliexpress.com/item/328948...
nadula aliexpress store: https://nadula.aliexpress.com/store/11...
nadula official website: https://www.nadula.com
FOLLOW MY SOCIAL MEDIA
INSTAGRAM: https://www.instagram.com/lataviaperez...
TIKTOK: https://www.tiktok.com/@lataviaperez
BUSINESS INQUIRES: [email protected]
H d, h d, closure way: um, hey y'all, it's the tv perez and i'm back with another video in today's video. This will be a hair install for the doula's head. If you have not already checked on my unboxing video, i will leave it up here in the car, so you can check the unboxing. I will be also showing y'all how i bleach plucked it. How i did the install i'm going in dead, like comment subscribe to this content, and you really like this type of content, go ahead and stay tuned to watch over to the next part: hey y'all, i'm doing a quick little voice over just showing y'all. What i received inside my package, just in case you haven't, looked at my unboxing, which you should i opened up the box. I did receive my curly wig unit here. Look at her. It'S her. Also, there's a label here showing me that i ordered a hd curly wig and 18 inches of the link also placed a nice little cute goodie bag. In here i received the google's van that's going. I helped me, have a glueless install a wig cap. That'S here. They sent me some lashes in their goodie bag and also they gave me a little gift box with a nice little charm and necklace. Here'S the bw2, how we use it for this install even wonderlace spray bond 30v developer. I will be using you're going to need a mixing bowl, so i have a butter knife to help because the little other brushes i don't find useful. A piece of aluminum foil i'll, be using here you'll, be seeing me spraying down the lace just to help it. Not let the bleach like go through all the way you need to have gloves. I did not put gloves on so don't mind that this is kind of not professional, but hey. We just trying to get the job done so here you'll be seeing me pouring out the bleach little by little go ahead. Girl put our bleach. You got to be careful, so i put a little bit here i'll, be opening up the 30v developer you're not going to put a whole lot in there. You do little by little so see here, i'm putting a little bit and then i'm mixing it around to basically keep my consistency. How the way i want it to be. I know this is not enough, but hey a little by little, remember little by little. So here i'm pouring more into the bowl and i'm mixing away mix mix mix and yes, this is sped up, but you want to take your time to make sure the consistency could be. You know the way that you want it. It don't need to be watery because if you have a watery consistency, that means you overdid it. So i think at this moment i kind of realized. Like you know, this is not enough, so i'm pouring a little bit more and here we go up close, i'm stirring my hand away and see how the consistency is a little bit thick and i'm stirring it down some. So it can be a little bit better, but this is what i want. You know nothing dripping nothing too thick just right. You see, this is how it should be. Some people might prefer it to be a little bit more watered down, but i feel like i don't want it to be dripping down. I feel like this is a perfect consistency for me on my install here. You actually are seeing me apply the bleach onto the lace closure. I am going in the upwards motion because i want to do this. Real gentle, you know, get bleach where it needs to be, and you got to do this as gentle as you can, don't try to press the bleach into the closure. I believe i kind of did that a little bit as you will see further on how the bleach looked. I don't know if it was because of me, or it's just the bleach in general here, i'm like turning the closure around, because i realized like me spreading it at that angle was not good for me at all. So i just you know, flipped the wig kind of inside out, so i can apply it and i'm just going to let y'all watch me actually spread this onto the lace closure. You just got to do it as soft as you can and not go so harsh on it. So i wanted to pop back in just to let y'all know as y'all see. This is sped up, so it does look like i'm moving really fast. I find this bleach on, but hey now that you can see at this angle is perfect. It looks like i was pressing the bleach into the closure a little bit. I wasn't too sure it was late and i was like i'm just leaving with this bleach on here. I'M tired. I just want to get this done and it looks like, as probably as you will see when i actually wash out the hair, that it looks like it's a little bit over bleached and at from this bleach perspective when it comes down to bw2 in general, i've Heard other people complain kind of about this bleach. You know bleaching it kind of harsh with the real orange tint so as later on, you will see that and i think that's kind of what it was is the bleach. But then i also kind of put blame on myself because, as you can see, it looks like i'm putting the bleach into the unit, which is not supposed to be expected. Like i said when you're doing this, you want to be as gentle as you can, like. Really, really, gentle really really gentle. Remember that really really gentle now i'm out i'ma. Let y'all continue to watch so now i'm currently done applying the bleach onto the closure. As you will see, i am done and 17 minutes was the time frame. I actually left this bleach on so 17 minutes, plus the time that it took me to apply this on, so i'm going to give that an extra 10 so overall about 25 to 27 minutes no longer than that at all. Look at those bleach knots, so i am currently about to wash it out. I will be using this: go ahead and screenshot it shimmer light shampoo to help take that brassy color, that's going to be shown out so go ahead and take a screenshot. Now, i'm about to apply some warm water onto this closure, so i can watch the bleach out of this or whatnot. As you will see, i will start to receive this brassy orange color that i do not want. That is why i told y'all to screenshot that purple shimmer lights bottle, because that is very important. When you're bleaching, your knots very important, you will need that, so i am about to apply that on there. Look at that orange. I don't want so i'm going to apply the shimmer lights on here, yeah, i'm about to scrub or scrub scrub, wash it up. As you see this a little trick that i like to use, i like to pour a little bit of shimmer lights in here with some water mix it around, and this just helps me to get that real brassy orange tone that i had out just to help. It a little bit more. I am about to set me a timer for four minutes. You can leave it on here for four to five minutes. I chose four. I did wash the hair out with tresemme shampoo. You can screenshot and also the conditioner. My camera died. So you won't see the washing part now we're about to start plucking. As you see, i'm taking my water mist bottle, you can get one of these from sally's. Your local hair store. They range between 6.99 to 12.99 is the highest i've ever heard for them. So i'm actually spraying the water setting my hair back a little bit, so i can get ready to plug or whatnot i'm pulling out a little pinch over here. That would be considered a baby here if you were to do baby hairs and i'm just about to start plucking behind that hairline. I don't want to park directly on the hairline as of yet so i'm just pulling it out and actually about to set it. I sprayed one more time, i'm now combing and now i'm about to get the plug. This is the plug. I got from a local beauty supply. It ranges i think a dollar highest. I'Ve seen is five dollars. If you want a revlon one. So now i'm plucking, as you see, i'm opening and closing. So as i open our closes plug open closes, but it is sped up just a little bit but not too much so you really want to take your time when it comes down to plugging. I know some of y'all are wondering: why do i have something white underneath my wig? This is just something i personally do to help me see the knots a whole lot better. When you have something while you can actually see all your knots. So when you pluck you don't like over, pluck, you can kind of really just see what you are doing and as i'm plugging i am combing through. So i can really gradually see a better perspective of what i am doing. So i just want to peep and then just say that, because i know some of y'all are wondering: why do i have something white underneath there? That is why, now, as you see, i am prepping the hair back, so i can go ahead and plug the front of the hairline. I'M only doing a little bit because it already looks like it's pre plus so, like i told you open, close open, close plug plug plug i'm getting that done. I did do the other half off camera in the middle part. Now going in with my edge wax. Stick and i'm about to go ahead and press the hair lines back, so i can actually get a better view and see how it looks i'm about to prep it back set the hair. Don'T forget my heat protectant, because you know we got to have the heat protectant spray. Look at that look at that. Look at that. Do you see how the comb is pressing, the hairline and having it slick like look at the plucking i did like i didn't. Even go too serious, but look at that zoom in all in there now it's time for the install girl, please don't mind, but this cap that i got on my head, i'm about to go on my even lace, tinted spray and light warm brown color, i'm gon Na spray, her spray spray spray on the cap until it's already fully saturated with that color. Now i'm about to install the wig on my head, but i just wanted to come and show you all how it's already prepped and yeah it's a little bit of over bleaching, but we're going to fix that. So don't come for me! But yeah girl. Look at me slapping her on lady. We got ta rewind in slow motion. Look at her just look, just look! Look how she's slapping on my head and i haven't even cut the lace. I haven't done. Nothing like just look at her look at her sis. So as i'm going on, i'm putting the wig on she's on and she's fluffy or whatnot, and i'm gon na. Let y'all continue to watch because it's gon na get better and better as we get to the rest of the install. Now i'm about to go in with my olive oil super whole wig grip gel. If you haven't tried it, then you know let's get on to it. I just bought it. So this is my first time actually trying it on this install so we're gon na see how she do how she holds. I'M gon na take this rat tail comb in quotations and put the wig glue on there and spread it across my cap a little bit. This is the first layer i'm going to apply and yeah i'm applying another layer and blow dry, so i'm just going to let y'all sit back and watch and i'll come back in as we get further along. So now i'm getting ready to lay the lace down the glue is already tacky. You want your glue to be tacky, not dry or anything so girl, i'm pulling her up and well i'm pulling her down downward, but yeah i'm pulling her down and look at the lace like i'm blow drying her. She already looks late and i haven't even cut her, yet this lace is super hd, i'm really loving it. Look how i plucked the front like look at this already look at her at this point right here. You want to grab your elastic band edge, wrap, silk, wrap whatever you want to call it wrap your edges head up and we're going to blow dry her down. So she can stay down really you're about to see me struggle trying to put this band on, because i did not have my hair pulled back at all so girl. I was sitting here struggling and i was like man i really wish. I went and got me a rubber band or something to put my hair back because girl, your sis is struggling right now now, as you are about to see, i'm getting ready to take my cream of nature, argan oil mousse, my water mist spray and a detangling Brush to define my curls and detangle out this hair girl yeah i'm about to get through here, because right now, this ain't looking right and i'm about to get her straight real, quick. So now, since i'm getting ready to take off this elastic bands and yeah, we get ready to cut the lace, as you can see, she's already, given once i took the elastic band off, but hey the olive oil, wig grip style gel whatever you want to call It off a little bit of residue. Don'T worry, don't panic! I'M gon na show you later on how i got rid of her because we're not done yet. I know y'all saw the beginning of the video and you're always looking and having hope. Y'All still got that hope. Now still keep your hopes cuz. I'M about to fix this okay, i got some clips. Finally, i found a little two things of clips inside my drawer. I wasn't looking hard enough, so i'm putting my hair back finally got a little bit of help and yeah i'm about to take these scissors here and eyebrow razor and i'm about to get to cutting i'm about to take this little tabs. That'S on the side! You see a little thicker ties, one on the left and one on the right. You need to cut those off on your install when you have a closure, because that helps the size be laid down flat, because if you don't cut those those sides will tend to lift up. If you don't cut it, so i'm showing y'all here how i cut them off and yeah i'm about to get ready to cut the lace, i'm about to show y'all here how i'm about to fix that little area that was messed up right there after i took The elastic band on all you need is a little cotton ball, cotton, swab or you can use a cotton little pad and put some alcohol on it, and you know gently. Do it don't put too much? Because if you do put too much, your lace will eventually probably start lifting up, because you know you got to use aqua or something to pull the lace up. So i didn't want to go too harsh on it, so yeah. I use that just to get that off, pat pat pat and we'll see what she do for the rest of this in store. I'M just gon na put a little bit of mousse down just to make sure it's secured back down just because she's already given scalp right now, i don't have to go back and try to put any like even spray or anything like that. Just something light. I am about to put my elastic band back on due to me putting alcohol. I just want to make sure she's back down secured a little bit, so it's nothing wrong with that. You know you. Rather, your lace be laid than to be lifting up already during the middle of your install, so yeah, i'm just letting y'all know there is going to be some type of mistakes in the install. Everybody is not perfect, so i'm just showing y'all and y'all can learn from my mistake right in this area, my camera did die on me. I was in the process of showing y'all how i fixed that middle part of my over bleaching. I got this from dollar tree in the color very black, as you see now. Basically, my part is already fixed. You know i'm just about to show y'all, i'm about to go in with my edge wax stick and i'm about to wax my top part down and go in with the hot comb. You don't want to go too harsh in with the hot comb at all. You see how i'm using the back of my hot comb, just the prepper instead of using the actual comb. That'S how i want to do it. I went with the comb just a tad bit, but nothing too extravagant. So i'm just gon na. Let y'all see here because i'm getting ready to take off the band and you're. This is the best part. Okay, the best part is here to come, and now since we are ready to take off, the band are y'all ready to take off the band, because i'm ready to see what this lace is really giving. I'M just really nervous because i never dealt with the ac lids. I want to see how it's going to look on me y'all, so we're going to do a countdown. Let me let me get ready to take this van off in the back. Then we do our little count, i'm about to take it off. Alright, let's get a countdown in three two one. Oh my gosh y'all, oh my gosh. Let me fix my hair. The way i want to be but y'all look at the lace like where is right. Now like, where is the lace? Let me fix my hero because i don't like how it looks looking like that, but y'all she's late, you can't tell me she ain't late. You can't tell me she's not late right now. I give this wig a name. Let me know in the comments what we should name, this wig, because she's giving right now she's giving she's, giving oh, my goodness, y'all the hair's starting to dry up some from being wet. This lace is giving y'all can't tell me this lacing, giving you a hot comber up one more time since i took the band off. I got ta be careful with these hot cones, because these things be hot and maybe trying to get me on the level, though i don't even want to know, but that hot cone you're trying to get your good old sis. Let me know in the comments what you think did i do a good job? Do we need to rewind? Do we need to rewind? Do y'all want to up close and personal, because i always zoom in because that's what y'all don't be doing? Sometimes y'all don't be zooming in it looks good from afar, but when i come up close, i still be seeing everything let's get up close and personal, because this, where is the lace y'all? Let me know where the lace at, because we looking i'm looking you looking and we're trying to figure out the same thing right now, like where's the lace like dang. That thing is late rounds of applause tv made that lace late. This hair quality is really good. I am so amazed, like i said this video is unsponsored. I bought this unit. My own coins, my own money, and it's lit, i'm just really happy also y'all be asleep. On aliexpress now i bought from aliexpress back in high school. I don't know: what's going on now, since covey i'll, just let y'all know everything is going to be down in the description box on this exact unit that i have also i'll be adding their website. So you can check out anything else that you want to check out once again. This here is from the doula. It'S a 5x5 keyword, five by five hd hd hd closure, wig. Okay, this install is really giving it's giving mommy yana curliana bobby anna alla on your round of applause like yes like girl, if you are not inspired by this hair installing i don't know what's wrong because girl. This is giving everything if you are looking for a nice spring summer time here. This is the one for you. Let me know down in the comments. How y'all want to do y'all want to do it every two weeks or month to month up to three months on how this hair quality? If you are new - and you already made it this far and not hit that subscribe button, yet what are you doing? You need to go ahead and hit that subscribe. Button also hit that notification bell. So you don't miss anything else that i post the first one to be on my video comment and like as well, you are already part of the family thanks so much. I love you all guys so so much and i'm out this is it for the video and i'll catch y'all in the next install you


Comments
Amy Green: You definitely killed this install, you are so beautiful. I can’t wait to see you grow on here ♥️
Coral Evans: ❤️ Hermosa eleccion 4.FO/Elizeid de mejor 1 (elecciones ) 9.9/10 2 ( culturales ) 9.7/10 Son unos de los mejores conciertos , no-puede-ir-pero-de-tan-solo verlos desde pantalla,, se que estuvo Sorprendente .
Legend: ỖØM