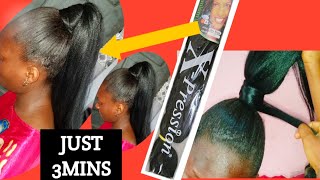
How To Turn Attachment Into Luxury Hair
- Posted on 06 September, 2022
- Closure Wig
- By Anonymous
In this video I turned attachment into frontal luxury hair
Hi guys so today i'll be teaching you how i made this fine wig with attachments yeah. So, first of all, you need your color to expression. Yes, this is expression, don't use any other product expression for this particular one. Then you you're going to soak it in hot water and conditioner. I used my magic conditioner, so you're going to soak it in hot sauce and conditioner, and then you sun dry. It then you're going to turn it into weave on. This is how to turn attachments into even after soaking it before you soak it make sure you cut it to the length you want. Colored m cutting two cutting three causing four, depending on how long you want it to be, then i'm going to you you're going to turn it into before. You see the way, i'm doing it. You pick small strand, you cross it over on the thread. You know, then it depends on how long the thread is. But if it's going to be like this length that you tie here like four or five, then you're going to sew your frontal on your wig cap and then you're going to line where you're going to sew your ribbons on now. This is the attachment that i turned into. Even you see how it's looking like normal weave on you understand. So this is how it's going to look like and then the next thing you're going to sew. It me i'm i'm using my chain to sew my own. You can actually sew your own with needle and thread it doesn't matter before i got this um sewing machine. I was using it on trade. You understand, so i just upgraded a little bit so you're going to sew it like this. According to the line you drew on your wig cap, don't forget to draw the line. Yes, don't forget very, very, very important. It will help you then okay, so this is how it's looking like you see how raw fan jagga jagadi is looking like. You know, because i just finished - sewing it and all that so the next. This is totally different from the normal process. We do that is ironing this this one we're not going to iron it. The next thing i'm going to do we're going to pour hot water and conditioner. You see that water and conditioner i used to soak the attachment. I boiled it again. Yes, so you have to pour it on the attachment, the one you have already fixed together with the frontal or closure or whatever you're going to use to do it so now you're going to pour the hot water and conditioner on the attachment, while pouring it you'll Be brushing it, you see it's sleeping now, you understand, you'll be brushing it you'll be pouring hot water, you'll be brushing it. You continue, so that's the process you consider doing it until everything is soaked and soft and flat. So the next thing you are going to pour your leave-in conditioner. This is my magic conditioner. You understand this is my magic conditioner conditioner. I already do more wonders so you're going to pour your magic, conditioner or living condition. Whatever conditioner you are using, you are going to rub it on it all through it. You brush it after rubbing it like it, it's going to make it softer. You feel me so that by the time you finish, coiling it and drying it. It becomes very soft and silky, like no, my hair, so after that, the next thing you are going to do. You need to coil it. Yes, this is another process you need to cut. You see how soft the attachment is already looking and feeling like it's actually very soft, just look at it. You know that it's soft. This is the work of my magic conditioner, so you are going to coil it with your rulers or your rolling, whatever you're going to use or, however you want to coil it, so you coil it and then you dry it so this hair, i was supposed to Wear it on sunday - and this was saturday evening, so i didn't see sun to dry. I had to use my hand dryer to dry, even though it didn't dry very well, but i removed the rollers and then i just dried it on the fan for it. So i'll just watch you see the process so so this is how it looked like after removing the rollers you understand. Now it's not completely dry, it's still wet, so i had to leave it till the next day. Now just watch the transformation of this wig. Just, oh my god, oh my god, just look at this wig look at the front towel like everything was made with attachment from the front out to the weave on to the butt everything was attachment. This is what your vendor will sell to you as luxury hair. The feeling they know this hair is so soft guys, like very, very soft, try it with the process. I just taught you like, with what you have seen in this video: just follow the same process and procedures and try it and take me later see. We must make this money, you understand like it's, given it's giving drop. Your comment in the comment section don't forget to subscribe, like comment and share. Yes, also follow me on tick. Tock. Follow me on instagram, my tick tock step skido. My second tick tock is just brain design, just breaks niger and then my instagram handle just breathes niger. Thank you. I love. You guys see you in my next tutorial.

Comments
ann amaka: I love your work it's nice thanks for sharing, you said we should try it but how do we get the magic conditioner???
Nmesomachi Nwoko: Thank you for the tutorial
Jennifer Agbakwuru: Please, do you also make the closure with attachment?
Racheal Abu: Wow This is amazing
durodola moyosola: omg I love this kudos Steph
Vee_khee: Pls do a video on how you make your frontal and how you sew it to your wig cap....please
Okereke Chinonso: This is so beautiful ❤❤
okiki kemisola: How many attachments did you use
Igoni juliet: Really giving
Okereke Chinonso: I followed you all the way from TikTok ❤
Simisola Simisola: How do we make the frontal
Fernand Tatar: ❤Only for fans over 18 year⤵️ Alles sehr schön. Aber zuerst zusammen die Nummern 10 und 1. Eine warmthhh.Online Brünette und eine andere Blondine. Es wäre unfair, wennw ich 4 wählen würde