$40 Closure| Beginners Middle Part Closure Installation
- Posted on 07 January, 2016
- Closure Wig
- By Anonymous
Hope you liked this easy tutorial on installing a lace closure! Btw, this close was only $40!! A STEAL. The link is below :)
Let me know if you have any questions!
Closure: http://www.amazon.com/gp/product/B00VV...
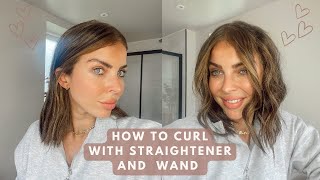
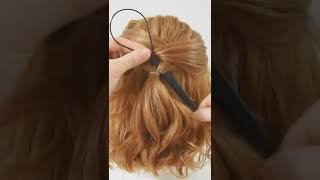
Hey guys, so I have been loving a middle part lately, it still works it out, and I'm going to show you how to easily put on a lace. Closure with the middle part is super simple. I'M just gon na start with my braid pattern. This is great for beginners, because I'm definitely not a professional, so I taught myself how to do this, and this is the easiest way that I found and the closure I'm using. I actually found it on amazon.com. It was only about 40 or 50 dollars. I would definitely link the link to the closure in the description box, but I thought it was a really great price compared to the ones that are you know over $ 100, so I'm really enjoying this closure, I'm just making sure there are no tangles in the Closure before I apply it and what I'm going to do is put it in a really quick ponytail, just a really loose kind of ponytail. So all the hair is out of the way when I am sewing it down. Okay, now I'm just going to adjust it to where I want it to sit one. My braid pattern and I want to align it so that it is nice and even if it's not perfectly even that's fine, because you'll soldal the hair around it and you won't notice. But I'm pinning one side down. You can use like bobby pins or a clip or whatever you have just to make sure that one side is secure, while you sew the other side, so I'm just using this clip here to pin it all down alright. So now I'm just going to start sewing this other side down, I'm going to take my thread and put it or my thread in my needle and I'm going to put it in the very tip of the closure. I'M going to pull it nice and tight because I don't want it to be loose on my head, so I'm going to pull it as tight as possible and to bring it down on my braid. Now everyone does theirs differently. I don't use like a cap or anything I haven't had any issues with my natural hair, but it's obviously depending on you. If you want to use a cap or whatever, if you have, you know thin edges or anything, but I have a really thick natural hair. So I don't have an issue with that, but I am just sewing it down. I'M going to put a few anchor knots in this first braid, just so it's nice and secure there and I'm going to proceed to sew it around the other side connecting it to the other braid. So here's where I'm going to stop and I'm just going to make a knot. So this side is nice in sewn down. So I'm going to cut the thread here and make a nice big knot so that it is secure on this side and yeah. Here'S how I make a knot? Okay, so now I'm just going to sew down the other side and I'm trying to get adjusted here, get a good angle, it's kind of weird with the camera. So I was just trying to get adjusted. I'M going to put that. First thread through the corner there and it keeps flipping in my face so now I'm just going to pull it as tight as possible. As you can see, you don't want it to be loose like I was saying so, pull this other side as tight as possible. It is a little uneven but, like I said it will be okay after you get all the other hair adjust it. So I'm just pulling it and reading it as I go. So I'm going to put a couple echo knots in that first braid and that first bridge is going to determine how tight your closure is on your head. So just make sure you have it nice and secure. So it looks nice and natural on the top. You, okay, so this side is nice and secure. I am just finishing up the back of the closure, I'm going to connect it to the other side and make sure the backs nice and secure, and I am going to do my final knot boom. So this is what it looks like right now, really crazy, but I am done throwing down both sides so now I'm just going to brush it down. I wanted to leave this in here. Just so, y'all can see that it's not all perfect. We first sew it down, so I'm just getting it all. You know taken care of it's nice and even with the part, even if it's not even you can always readjust the closure, because you can part it anywhere. So it's nice and tight and secure I'm just showing y'all both sides. Now there is obviously it's going to flap up just a little bit because you want to be able to like scratch under there might get really itchy, but it's nice and secure on my head. Okay, so I went ahead and sewed in the rest of the hair. Just so y'all can see me kind of lay the closure with the rest of the hair, I'm using this not by hair by mingling, and I absolutely love it. I'Ve been I've had this hair for almost a year and it's really great the best hair I've ever had hands down, and I got it for a really great price, but the closure isn't from there. The closures from Amazon, like I said so basically all I'm doing - is making sure that it's aligned with my regular part and looks nice and natural, and I did not tweeze this closure. I don't believe, and that's something that you can do if it doesn't look natural enough and you want to, you know, make sure that it blends in actually with your regular part, but I did not tweeze this one. This time you okay here, is where you're gon na apply your concealer or your eyeshadow, whatever you want to do, I like to use an eyeshadow, and I always like to put it on before bed, because I don't want it to look like powdery when I go Out during the day, so I put it on before bed put on my scarf and wrap up my hair and in the morning looks really nice and natural, but you want to make sure that you're using a color that is going to be close to your the Color of your scalp and the biggest thing is just to make sure it's blended where the closure starts and your natural hair line starts. So that's the biggest thing there and here is the completed. Look. I went ahead and straighten it. So y'all can see it straight and I have been rocking this closure for weeks. If you do have any questions, please let me know in the comment box below bye, guys.


Comments
Lexy Symone: This was so easy to follow !! I plan on sewing my first closure in a few days and you just don't understand how helpful this was lol !
AundreaOnTheDaily 16: I really like your video it was very helpful. I'm going to try this method
Chassidy Holmes: Thank you so much u really helped
ALMUA Beauty: Well done! I found your video really interesting,thank you for sharing with the community! I left you a like and subscribe,you deserve it! If you want to pass on my channel! Many thanks xx
Cowboys NATION: Love the video :) Did yu bleach the knots on this closure by any chance?
Deborah Neely: Yes this was very helpful..only wish they made closure so we didn't color the part. Where did you get the closure?
Kimberly Cleghorn: what eyeshadow do u use