Detailed 5X5 Hd Closure Wig| Tinashe Hair (Aliexpress) | Waytoofetchh
- Posted on 13 December, 2020
- Closure Wig
- By Anonymous
heyyy y’all, welcome bck to my channel
In this video I just showed you guys pretty much how I do my wigs, this video isn’t sponsored nor is it a review.
thanks for watching! xoxo
LIKE|CMMT|SUBSCRIBE
PRODUCTS USED: 1 1/4 curling iron
SHOP WITH ME: https://www.waytoofetchhcosmetics.com
CHECK OUT MY PREVIOUS VIDEOS:
Business 101: How To DIY Lipgloss & Product Labels Less Than $15:
Fall Cut Crease Tutorial:
Soft Glam + Everyday Makeup Look:
Simple Glam + Using New Products + Fixing Messed Up Contour: https://youtu.be/PxWH8eMo5xY
Natural Makeup With Eyeliner + Wearing Blush For The First Time: https://youtu.be/AgUUIDS_krU
|LETS BE FRIENDS|
IG: waytoofetchh | waytoofetchhcosmetics
TWITTER: waytoofetchh
Snapchat: trenisee
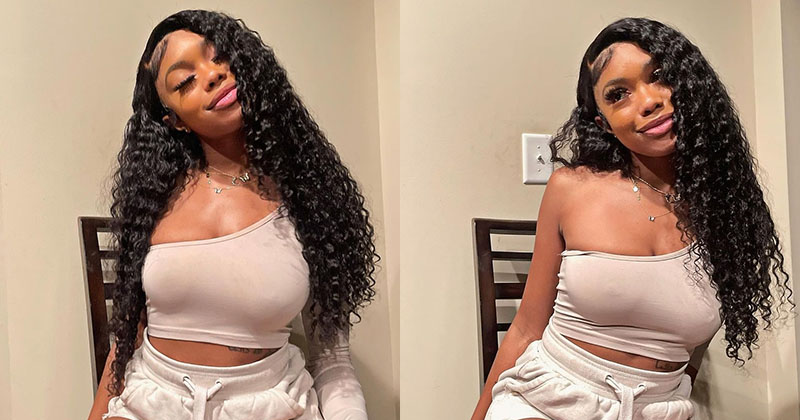
Hey y'all welcome back to my channel in this video. I am showing you guys how i did my 5x5 hd closure wig from tanasha's hair um. I am showing you guys how the hair looks right now. It did come with three pins, which i did later on. Um cut the pins out and here's what came with the hair came with a hair cap. It actually came with two and then it had a cute little bonnet, which i wasn't expecting um, and then it also came with a hair wrap which i did not use. I totally forgot that i had it and then these cute lashes here, which i will probably use in a review and here i'm showing you guys the stuff that i actually use in the bleach that i use in the um, the bowl that i use for it And i just took a plastic knife: you guys can use whatever works best for you and some got to be glued hairspray, and then here i'm just pouring in my bleach and then i'm going to go in with my developer 40 developer. I couldn't decide to use 30 or 40, and here i'm just mixing it in you. Don'T want it to be too watery um and you don't want it to be too pasty, so you kind of want it like in between. So now i'm going to take my got to be glued hairspray and i'm going to spray inside of the closure on the lace part, and that is just pretty much going to set the boundary between the actual hair and the lace. So it doesn't like stick through and then i'm going to comb some on the actual hair and comb it back so that those flyaways don't get inside of the bleach. Okay. So now i'm going to take my blow dryer and i'm pretty much going to blow dry until the got to be glued hairspray is dry and then i will go in with the bleach uh. Oh okay, y'all! So i haven't applied the bleach. I did let it sit for at least 25 to 30 minutes. You can let it sit longer depending on your skin complexion, but i didn't let it sit for that long, because i'm also going to turn it. So now i'm going to go in with my coconut water conditioner. I did not use shampoo to wash my hair and now i'm going with the adora in the color honey brown in a spray bottle. So what i did i just put a little bit of the honey brown inside of the spray bottle mixed it with hot water and shake it up, because that's what i'm going to use for my tent and then here, i'm just spraying inside of my closure. I pretty much drenched it down because i did not blow dry it. I just let it sit for at least 15 minutes or until it was like mostly dry, and here i'm just pretty much showing you guys how it turned out after i did the bleach and the tent that i used, and now i'm just gon na take some T-Pins and i'm going to pretty much put them on each side of the closure and then one on each side pretty much where the ears will be uh. Okay. So now what i'm doing? I'M about to start plucking and i'm just pretty much doing a very small, thin um part because you don't want to part too big and then i'm just pretty much taking my tweezers and i'm tweezing towards myself and i'm pretty much doing like a one. Two. Three pull type of method: um. You want to make sure that you're not doing it in the same space you kind of want to space it out. Take your comb and you pretty much want to comb that excess hair out and now i'm going to go in with a second part, and also you need to make that one thin as well or small. However, you want to put it um, and then you want to do the same method that you did the first time uh, and so i did go in with just one more layer. I didn't do too many um, just because it's a 5x5 closure and i wanted it to look as natural as possible, but i didn't want to over pluck it so so after my third layer of plucking the hair, i did comb it all back and i did Pluck a little bit in the front just because i still felt like the hairline was kind of full and now i'm pretty much just going to take my blow dryer and a brush and i'm just going to blow dry it out because it was still kind of Damp me so here i'm pretty much just making a middle part and i'm trying to make sure that it gets straight as possible. It was kind of hard to party in the middle just because i was trying to look at the camera and part. At the same time, so now i'm just going to take my bio stick - oil and i'm just going to put a little bit in my hand and pretty much massage it all over the hair. Before i flat iron it, and then i took my hot comb and i went over it just to make sure everything was as flat as possible. Now i'm pretty much just taking some duck clips just to hold the hair back while flat ironing it, and now i'm going to take some fruities um. It'S supposed to prevent the hair from being frizzy. I did feel like the ends of the hair was kind of frizzy, so i did put a little bit on my hand to put it at the end of the hair me uh, oh also, i did go ahead and flat on the other side. I just did one side just to show you guys, because i didn't want the video to be extremely long. Now, i'm going to go in with my curling iron. I couldn't decide if i wanted to do straight, hair or to actually curl it. So obviously i did decide to curl it, and this is um. I don't know what size curling iron this is, i will put in description box below, but what i did i pretty much curled it in. I just used my duck clips. Just to pin curl it eat is um foreign me also. I did already pretty much part where i'm going to be putting my baby hairs. So now i'm just going to take my razor comb, which you can get at your local beauty supply store and i'm just pretty much going to razor comb. The longer pieces of the hairs off - and here i'm pretty much trying to figure out how i want my baby hairs to go. This part is always pretty tedious, but i did use a little bit of the got to be blue gel just so that it can kind of stay in place a little bit so now. What i'm going to do is i'm going to take those duck clips off of the hair and then i'm going to pretty much use a wide teeth. Comb, a big teeth, comb, whatever you guys want to call it, and i'm just pretty much going to comb the curls out and now i'm going to go back in with my curling iron, because i did not like the way that the front curls came out. So now i'm just going to re-curl it and this time i'm pretty much curling away from my face so pretty much after i re-curled the front part of it. I did pretty much like the way that it came out. I am not a hairstylist, so i kind of just do whatever i feel works best for me, this is not a hair review um or anything like that. This is pretty much just how i really just do my hair, and i want to show you guys. So i actually went back in with my hot comb and i got to be glued hairspray and i did spray a little bit on the hair just so the little pieces that was kind of sticking up. I didn't want those to stick up. Obviously so here is the finished. Look right here. You guys thank you guys so much for watching

Comments
Saz: did you like the wig?
Destinee Green: Did you order it off AliExpress or the actual website?