Watch Me Make This Body Wave Wig
- Posted on 18 September, 2018
- Closure Wig
- By Anonymous
In todays video I will be showing you how I create our custom wigs from start to finish using virgin hair bundles and a lace closure in the texture "Body Wave."
Details:
All products were purchased from Clore Beauty Supply Store:
Note: Our wig caps are created in house and aren't currently available for purchase. If you attempt to do this yourself I recommend using a mesh cap, as dome caps can get jammed in your machine.
Bundles:
Janeiro Body Wave 12' 14' & 16' Inches: https://bit.ly/2QHMYqD
Lace Closure:
Bellatique Full Lace Closure: https://bit.ly/2NlYKJg
Please follow me on all platforms here: http://linktr.ee/tknhwigs
Visit my website here: http://naturallybld.com
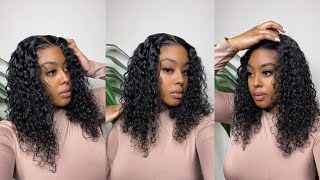
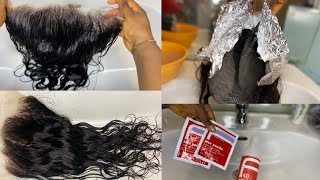
Hello, everybody and welcome to another video in this video. I will be showing you from start to finish how I create a custom body, wave wig, so stay tuned, so to get started. I will be creating the wig cap for the wig, so for all of our wigs, we create our caps from scratch and they come in sizes small to large. In this case, our client was a size large, so I'm just creating the the cap size for her and a lot of people don't realize that we do take custom orders on our website. So, in addition to the curly textures and the the general hair collection that we have, we do offer custom orders and custom orders are basically when the client supplies their own hair and we convert it into a wig. We do require a minimum of three bundles and a lace, closure or frontal attachment attachment is optional, but that's what we require to do it. So if you had any type of texture that you wanted us to create into a wig, we offer that service. So I'm just kind of finishing off the top of the wig. Now the wig cap, rather and as you can see, it's all done and made to perfection and here's the final result of what our wig caps look like. So now I will be attaching a lace closure, so this closure is from lure a beauty, supply store and it's a 4 by 4 lace, closure in the body wave texture and I believe it's in 12 inches the hair itself that we will be using for the Wig is from Gennaro, which you'll see soon, so I'm just kind of showing you how I sew on the lace closure, I'd like to use T pins. What you saw just there to help to keep it into position, and the key is to keep the lace closure. As flat as possible, because you don't want any bumps, it's very important that it's a smooth finish so that when you part it in any section of the lace closure, you don't see any imperfections or bulkiness. So I'm just sewing around the closure by hand. I like to do this step by hand and the rest of the wig by the machine just because it it gives me a more thorough result so that I can sew the lace and, through the fabric, as I choose and make sure not to go through the Elastic band because our wakes do come with an elastic band around the perimeter, so just go above the elastic band, it's very important, which is another reason why I don't sew what on the way on the machine. So now I will be using the brand Gennaro to do the bundles. They came in 12, inches 14 and 16 inches, and I start at the back and the key when making any wig on a machine is to make the results as smooth as possible. You don't want any bulkiness, especially when the hair is a loose texture like this one, because then you'll see bumps and imperfections. So I'm just wanted to check and I usually do a check throughout my the process of me, making the wig just to make sure it's. As smooth as I want, which it is so now, I just continue and I'm about 90 % finished. I just have the top part remaining and if there were any imperfections, I would make sure that I correct them as I go, because I don't like to leave them until the end. So now that the wig is finished, I'm gon na position it the way that I want it and get ready to cut the excess lace. So this is a service, that's optional, but I normally cut the lace for my clients so that it's ready to wear and the trick is to be as thorough as possible and just cutting it in a straight line as close to the hairline as possible. If you go too close, then you can remove some of the hair, so just be gentle when you're doing it and I'm gon na be using the T pins again to just secure the wig and get it ready for styling. So this is what the hair looks. Like right after it's been machine sewn and it's just the natural texture and there's a close up of the lace closure, I didn't customize the leash closure, because the client didn't request that service. But that is something that you can have a look at on our website. For further information, so now to start, I am doing loose curls and I'm not really doing my curls in any particular I like border, I just kind of freestyling it and just making the curls go in the direction that I want them to go so now. To finish it off, I'm just framing the front. The way that I want it so because this is a four by four lace and there isn't a defined part. You can part the hair on any part of the lace. So if the client decide she wanted a different part, she can always change it, but I just for the purpose of this video I just suction it in the middle and now I'm just separating the curls to just give it a more natural effect, and I like To shake them out just to give it some volume and movement - and this is the final result of these carefree, beautiful curls. The client did go with a shorter length um, but I did wanted to show you how it can be styled. There'S an up-close look of what it looks like with the lace, closure and here's the final result of what the wig ended up. Looking like on our client there's a close-up of the front, so you can see how natural-looking it is and there's a view of the side. Now wait before you go. I want to show you how you can order your very own custom wig on naturally BLD comm. So once you make it to the site, you click on the menu bar, which is on the top right. And then you open up the the shopping page, the shopping menu to the wigs page, and then you scroll, you scroll a bit down and then there's a custom. Wigs and you select what size you are. You can there's a indication of the sizes and measurements and you can choose based on that. Then you can select what type of what you want and what, if you want like clips or any accessories attached to it and then that's it. So thanks everyone for watching make sure that you visit our website at naturally BLD calm and don't forget to subscribe love you back.

Comments
Hewan: you make it look too easy but im so sure it isn't haha (ive tried) props to you hun!
Elements 248: Skilled