$9.99 Model Model Gardenia 20" Straight Hair Quick Weave Install W/Leave Out
- Posted on 27 December, 2022
- Closure Wig
- By Anonymous
Quick Weave Install Using $9.99 Model Model Gardenia Hair! Cheap and Easy Install!!!
Follow me on TikTok and Instagram @covidew!!
Products Used:
SalonPro 30sec. Super Hair Bond Glue-
https://www.amazon.com/Salon-Second-Bo...
Got2b Glued Blasting Spray-
https://www.amazon.com/Got2b-Glued-Bla...
Wig Cap-
https://www.amazon.com/Nylon-FANDAMEI-...
Model Model Gardenia 20” Straight Hair-
https://babshair.com/products/model-mo...
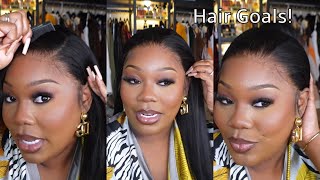
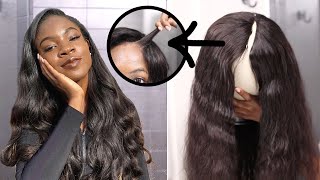
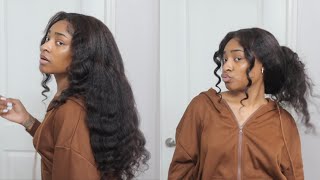
Foreign, if you are new here, please make sure you like share and subscribe, so you don't miss out on any of my new content. Today, let's get into my ponytail, it look a little rough right now, but it was very cute earlier. I seen this on Tick. Tock, this is a very quick style and it works, because I don't really have a lot of edges, so it kind of covers it. Well, besides, right there we're gon na ignore that. But again, this is a nice quick, simple style. If you need something to just run, errands like I did today, but the purpose of the video is to do a quick leave, so I went to the Hair Store. I seen this model model gardenia Master mix, which is just straight weave, 20 inches 1B. It was only 9.99, that's how the back looks. I bought three packs, not sure if I need all three, I'm just gon na do Straight middle part, so it's down simple, but the products I will be using Salon Pro 32nd super hair black glue. I also have the Roberts Diamond bun protective shield. Wig cap got sweet glue and that's pretty much it. We saw some scissors, so what I'm going to do is just go ahead and braid. My hair down it's gon na, be a simple braid down pattern. Leave some hair on in the middle and then I'll come back, so we can get started. So I'm back and I have my hair all braided, so I can apply the molding gel. I do go ahead and apply that directly onto my braids. I'M gon na put about two to three coats on top and then in between. You will see me. Spray got to be glue spray on top of the molding, and this is just there to help prevent it. Getting on my hair when I do apply the tracks with the glue, so this is to prevent damage to my hair and they do have the protective gel in like a clear and black. It really doesn't matter. I just had a clear already on hand along with a black bottle as well, so I'll be doing a mixture. But then you just see me spraying the got to be glue and then I'm going to go back in with some more to apply again and then I just want to make sure it's dry. So then I'll be going in with my blow dryer once I have applied all the glue to all the parts of my hair. Thank you now, as far as with the got to be glue spray on top of the cap, I'm just making sure once again to add an extra Shield of protection on my hair, and now I'm just gon na blow dry it to make sure it is all Dry before going in with the tracks, thank you, okay. So all the drawing is done. So next, I'm going to go in with my concealer just to outline where my hair ends. So that way, I know we're not to place the tracks once I start to glue them in you can use whatever you like marker, a liner pencil. Whatever is going to be light enough for you to be able to see where to cut the cap once you do get to the top of your hair, so I'm just using my Fenty Beauty concealer to kind of outline where my hair is before. I start going in with placing the tracks, so this is the hair straight out of the pack, it's kind of like a Yaki mixture, texture um, I feel like it should go with my hair. It should blend pretty well once I do flat iron my leave out, but what I'm going to do first is just kind of measure, each section of my hair. Before I cut it and then once I cut I'm going to just put one line of glue right over the track and then once the glue is on there I'll be placing it right in the area where I measured so to kind of see without seeing where To place the next track, I kind of use one of my fingers to kind of feel where that last track was so that way, I can place them very closely. I, like my hair, to look very full. I don't like when any of my weaves look thin. So I place my tracks very close together, so that way I'm able to glue more hair on to the cap. So I'm going to go ahead and place this one in the back of my head and of course, as I move up, the pieces will become larger. So I think I end up using majority of all three packs I'll say I had maybe one line left as far as with the last track. Um. So far the hair has been fine haven't had any issues you know with any Yaki synthetic type hair. You may have to brush it a little more but other than that is actually pretty good to wear. I think I'll probably get two to three weeks wear out of it um. I wouldn't recommend this for long periods because it is like, I said, the synthetic yaki type hair, so it's going to easily just get nappy where you have to brush it out. So this is just me, placing it or trying to see where the place the next one above it and, like I said I'll, just do the same thing, which is cut, add the glue to glue it right above the next track, all right. So I just wanted to stop to kind of let you see how the back was looking so far as far as with me placing the tracks, it does have a little shine to the hair, but I feel like it will blend still once I get my leave Out blend it in with it, so I'm going to continue to place the tracks until I make it to the top where the concealer is. Thank you, foreign foreign, all right, so I have finally finished adding all the tracks in now. What I'm going to do is just use the outline that I made to cut off the excess cap and I'll just be following that line, make sure you're being very careful in this area, because you don't want to cut your hair trying to get the cap off. So just go slowly as you need to and just make sure you kind of pull the cap up. So that way you know you're not cutting your hair and just kind of stay towards the part that you made. So I'm just going to cut all the way around with the sides. It'S the same thing, just pull it away from your hair or pull it up. So that way you can cut it without cutting any hair. So I'm going to do that on both sides. You can use a clip if needed, just to get the hair out the way to get off the excess cap. Now that all the cap has been cut off, I'm going to go ahead and just put some edge control on my edges before I start to flat iron, my leave out I'm using Edge entity and then just the edge brush to kind of swoop them a little Before I do my leave out, you can either do this before or after it really doesn't matter, but I just want to go ahead and get it out the way before I do the leave out portion of my hair. Thank you. Thank you. Now that my edges are completed I'll, just go ahead and take my braid to lose so that way I can get it straight in to match the hair. Now, during the straightening process, you will see just some smoke from the flat iron that I'm using I'm not really using a high degree. I think it was 290 that I was using. However, I also have a fan blowing in the background, so it was kind of looking like a lot of smoke when it wasn't um and then I'm also going to use some protectant on my hair. So that way I won't damage my curl pattern. Trying to do this look so I'm just gon na split it kind of make it even on both sides and then I'm just gon na go Section by section using my using my cheese: silk infusion oil, along with the chi Iron Guard, thermal protection spray. So that way, it'll protect my hair while using the flat iron and I have used the product before it works really. Well, I didn't have an issue with my hair, reverting back to the Natural State. Hopefully I don't have an issue after this time or this go around. I may do another video just to show you or give a review on if these products did protect my hair, since I will be having this in for about two to three weeks, I have used the cheap products before I didn't have any issues when I did Go to wash my hair, my hair did revert back to the 4C pattern. However, when I do do quick weaves, I really don't like to put a lot of heat on my hair, so I try my best not to continue to flat iron it every day. So I won't risk having any heat damage from having this style, so I will give an update on that. If I have an issue with reverting my hair back foreign. Thank you, I'm just gon na brush and kind of Comb it together. So I can blend. I feel like it looks really good, but y'all can leave a comment to. Let me know if you think it's really blending good with my hair. I think it looks really good to be 9.99. I don't think you can really tell, but this is the end of my video please like share and subscribe, so you don't miss out on any of my new ones and I'll catch you on the next one.
Comments
Jessica Shaw: Girl that hair can’t be $9.99. OMG it look so good and natural. It definitely blended with your hair well!! That’s for letting me know it will work with my type of hair!!!