Stop Using Glue! No Sprays Completely Glueless Wig Install Ft Westkiss Hair
- Posted on 23 June, 2022
- Closure Wig
- By Anonymous
Finally, a start to finish install. I'll be doing these moving forward. Let me know how y’all are liking these videos and what you’d like to see more of in the comment section down below! As always, thank you so much for watching xoxo
Connect With Me!
Instagram @lesshhab
TikTok @lesshhab
Products used in this video:
Flat iron : https://amzn.to/3QIxXn8
Hot comb: https://amzn.to/3tUrcFd
Heat protectant : https://amzn.to/3Ohfuwn
Mouse: https://amzn.to/3HZQ7ND
Spritz: https://amzn.to/3nddwkZ
Adjustable elastic bands: https://amzn.to/3HKfkLz
▬▬▬▬▬▬▬▬▬♛#westkiss♛▬▬▬▬▬▬▬▬
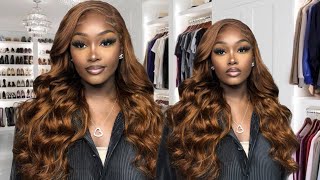
Hair details:180% density HD straight 5*5 lace frontal wig 22inch
Video Hair Direct Link➤https://bit.ly/39KdbTr
Hot selling HD lace wigs➤https://bit.ly/3MCoLhI
★westkiss official hair store➤https://bit.ly/3wyw709
Affordable 37% Off Curly lace wig➤https://bit.ly/3lsP7XF
Up to 43% off Lace Wigs➤https://bit.ly/3ly45vs
Hot curly lace wigs➤https://bit.ly/385m7lR
#westkisshdlacewig #westkisswig #westkisslacewig
#WestKissHair Official Site Huge sale Big Discount
Join Our VIP FB Group Now (Free Giveaway )➤https://bit.ly/3lzmAA8
❤Follow West Kiss hair on social media :
Instagram @westkiss_hair_store: https://bit.ly/2OlKstu
YouTube @West Kiss Hair: https://bit.ly/2Ol5U1m
Wholesale WhatsApp: +86 13323741050
Make sure to subscribe and like this video! Also add me on social media
Check out my Amazon storefront link if you’re interested in other wigs & products:
https://www.amazon.com/shop/influencer...
DISCLAIMER:
Some links may be affiliate links where I receive a small commission from you clicking on the link and purchasing anything I have listed. No purchase is necessary.
Shop my wig collection SHOPALESHAB
Website link : https://shopaleshab.com
Make sure to sign up for my email list to be the first to know about new arrivals and when I restock.
Instagram/TikTok : @shopaleshab
Email: [email protected] for sponsorships, collaborations, and business opportunities.
About Me:
From: Virginia
Age: 23
Camera: Canon g7x
Sign: Gemini
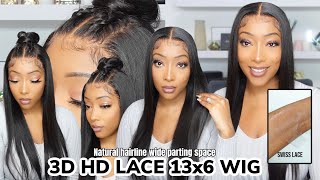
If you want to know how to get your closures completely glueless like this, where you can move it on and slip it off, keep on watching this video. What'S up y'all welcome back to my channel, i'm alicia if you're new! Today'S video is going to be on this hair from west kiss hair. This is a 5x5 hd lace, closure, 22 inches in the body wave texture. This is the construction of the unit. The closure, like i said, is 5x5 hd lace. I went ahead and plugged and bleached off camera from now going forward. These will be start to finish. Videos um, including that part, but right now this one doesn't show that i'm going to be showing y'all how to get this wig completely clueless. So that is what i'm showing you now this are. These are the elastic bands that i use. I ordered these from amazon. They are in my amazon storefront and i will link them in the description box down below. I find these really useful because you don't have to worry about sizing. I know one of the hardest parts of making your wig glue list is knowing what size to make your elastic band this one. You can adjust it as far as length as far as how tight you need it to be. If you want it looser, if your head is small, if your head is bigger, these adjustable straps are perfect. I use them for all of my wigs when i put them on my custom units on my website, so now we're going to get into how to actually make these wigs glueless. So the first thing you're going to want to do is to make sure you are getting your placement together, so where these are gon na, where the elastic band is going to go. Is it's gon na go right after where you've plucked that not necessarily the middle of the closure, but just a little bit down, maybe like an inch or so if we're doing measurements about an inch down away from where the actual hairline starts. So, where i'm pointing my finger at is where you're going to want to place this at and we're going to be sewing this down and the belt part where you're adjusting the elastic band is going to go on the outside. So you're going to be sewing this down backwards. Basically, so it will be right when it goes on so again, you're going to be placing your elastic band on one side right there and you're going to be sewing from the underside to the top. So i sew from the closure, through the closure, through where the threading, the stitching is where the closure and the wig actually connect and then onto my elastic band, and i continued that all the way across the elastic band and this angle isn't really a good angle. I didn't realize it when i was actually doing it, but i'm going to go on the other side side and show y'all as well. That side looks much better but, like i said, you're going to go from the bottom under and continue to stitch across the elastic band. Here, i'm showing y'all how to secure the elastic band you're going to want to take your thread and wrap it around your needle two to three times and then pull your needle through. This will create a knot and just kind of like lock it in place. I just showed y'all that so y'all would know what it looked like. I don't actually do that until the when i get to the ends of the elastic band, to keep my thread from coming up coming out. When i cut it so that little knot that i did, you can do it at the beginning and at the end of the elastic band, when you first start so now that that side is done, we're going to move on to the other side and you're going To take the other end that you have and you're going to flip it under right there, where the stitching is on the opposite side. So again, you're going to flip it under just like i did and you're going to sew from that side and you're going to sew from the bottom to the top. Just like you did on the opposite side, all right. So after you've done all that now you have a lewis wig and i'm just going to be putting my wig cap on no ball cap method. I really don't think it's necessary. To be honest, i haven't been doing it a lot lately, but it's not necessary for closure, wigs or glueless wigs, because most people who wear glueless wigs take them off every day. I'M still going to go in with makeup on my wig cap just to make it look natural on that parting space on that closure part. I also wanted to mention that this method is something that i only do for closures. I do not do this for frontal wigs, because i don't know if you can actually make a frontal, completely glueless and have it lay down flat. If you can, i don't know how to do it. I'M not going to sit up here and say that this method works both ways, because i don't know, but for my closures this works perfectly. So i have my adjustable strap set to my desired tightness and i went ahead and put my wig on. No, i'm not going to be putting the comb down in the back. I'M only doing the front combs because my adjustable strap is holding my wig down tight enough, where i don't need to do that. So here is the wig. Once i got it on, it's completely laid down and it's very secure not loose at all, but i am going in with my combs just to make it a little bit more secure. I know some people cut their combs out, but especially when i'm wearing a glueless wig i like to have my comb still in and i'm taking my makeup. I use level 15. I use level 12., i'm taking the darkest shade of 15 and going on my lace and just tinting that lace to my skin tone. This one is like my perfect complexion, so i always use this one for the lace and i'm just going to spread that all across once i've done that i'm going to go ahead and and just pull the wig down, i'm doing this solely just to gently. So it will melt perfectly considering we're not using any glue just to touch on his hair for a little bit. I really wanted to talk about his hair. I don't get too much into detail on my install videos when i'm talking about the actual quality of the hair, because i normally just am just wearing it when i'm installing the wig. So i don't have a whole lot to say, but i still have a whole lot to say about this wig. I feel like it's very important and don't come for me about my part. I know it's crooked. I'M gon na fix it later, but let's get to it. This hair is so freaking nice. I'Ve worked with west kiss before i believe with a curly wig, but this is my first time having their straight hair. This is some nice ass, hair y'all. I mean nice silky. This is not, i don't even color it jet black, but the hair looks so dark. It'S not light brown like the natural brown that it normally comes in. This is very dark, hair, very silky, very soft and very little tingling or shedding y'all. Like i, this is one of my top hairs now like when people ask me for recommendations, i'm definitely going to be saying wes kids from now on, because this hair was just so good when i went to go flat iron it as you all will see later On in the video it just got so silky straight with very, very little flyaways, and i this was just some good hair and the lace was bomb. This is hd lace and, as you all can see, i'm cutting the lace in a zigzag motion and you can't even see where the lace has stopped at on my forehead. Do y'all see that do y'all see that it's literally melted straight into my skin. This is really some top quality hair, and this is my personal opinion, guys, like also before i get into that this little piece right here, i'm cutting off. I hate this on wigs. I do this with all my closure. Wigs because the way they sit, the closure where they sit it at is too far back so there's always a track hanging in front of it. If y'all have this issue, this is how you fix it literally just cut it off um, but anyway, back to what i was saying um. This is all my opinions. I don't want to hear nobody in the comments saying. Oh, i don't like wes kids, and this is that's your opinion and that's fine stink, that's fine, you don't have to buy it, but i like it i'm going to continue to purchase it. I'M going to continue to spend my coin with them, because i like the hair, so this is what the wig looks like completely on with the elastic band melt. It literally can move it put it on. Take it off. Okay, i was feeling myself a little bit and there was no issues, i'm not actually securing the wig just putting mousse on it to lay it down and just kind of mold it. In a sense, it's not going to keep the wig stuck y'all at all by any means, but anyway this wig was affordable. To me, too, this was 22 inches and it was 330 dollars. I think that's a really good price, considering how good of the quality the hair was and the length it did not seem like it was actually 22 inches, i'm five one and a half, and it came all the way down to my waistline and y'all will see Later on the video i'm going to stand up, this was a really good week. This was really a really good wig and i'm not even about to over hype the company like that, if i don't feel that way, but for real, i was dreading doing this. Install not gon na lie just because i have a lot of installs to do, and i was just like, oh my god like another one, another one, but no for real, but i'm glad i did. It came out really really cute. This is about to be my go to errands wig, just gon na throw it right on. I did go ahead and and trim the ends on all of the wig. Just a straight blunt cut all the way around just to make it look neat and i went in and flat ironed it all products will be linked in my description box and on my amazon storefront. If y'all want to check out the wigs the wigs the products - but i also do have wigs linked on there and anything else, y'all are interested in some of the links are affiliate links, so i will receive a small commission from them. So, just please be in mind: okay, that flat iron i use is hot as crap, that's from amazon as well, but that flattering hottest crap. I had to turn it down because yeah girl was gon na burn the hair up, okay, and that was on 450. So i turned it down to 400 and continued to flat iron the rest of his head. So anyway, i'm gon na go ahead and shut up, because i've been talking a whole lot and let y'all watch the rest of this video. I hope you guys enjoyed this one um start to finish for real for real the next video i upload will be a complete start to finish bleaching plucking everything all included, sorry, that my amazon wig wednesday is not up on wednesday. This week, however, i was doing my best friend's install for that actual um amazon wig wednesday and, needless to say, we was the latest crap and yeah. That'S why it's not up so enjoy this video and it's place in y'all's. Video will be up tomorrow, for that, so do so do as i mentioned earlier in this video, this hair super long you're. Definitely getting your money's worth, if not more, because this does not look like a 22 inch, it's giving 24 for sure. But i love the way this turned out. It'S so natural, so cute, giving very much silk press, okay, very clean, bust down middle part. I enjoyed making this video for you guys, and i hope you all enjoyed it as well and i'll see you in my next video. As always,
Comments
tiffanyjackson521: I love West kiss hair their lace is amazing and the hair is ALWAYS LONGER 10/10 for me thank you for showing how to get a truly glue less install keep growing and glowing queen much love from Toledo Ohio
West Kiss Hair: I love your video! Thank you for sharing West Kiss Hair~
Malikah Green: Thanks so much for sharing! ♥️
Yama: very nice thank you i am learning!
Sheema Shae: I need