Start To Finish Closure Wig Install | Dark&Deluxewigs
- Posted on 03 February, 2023
- Closure Wig
- By Anonymous
Don’t forget to watch in higher quality (1080p)
***SHOP WIGS : https://darkanddeluxewigs.com
***VENDOR LIST : https://darkanddeluxewigs.com/products...
***AMAZON STOREFRONT : HTTPS://www.amazon.com/shop/1novianico...
Email for business inquires : [email protected]
Business IG : https://www.instagram.com/darkanddelux...
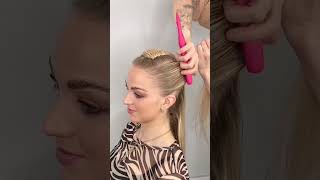
Hey y'all welcome to my channel. If you are new, welcome if you're, not new, then welcome back so today's video, I will be showing you all how I installed my wig from start to finish. So if you are interested in wanting to learn more about that, keep on watching this video and also don't forget to subscribe so first, we are going to start off by applying some makeup to my wig cap. This is the method I'm using because I plan on taking this wig off, so I'm not doing the fully bald cap method, as you guys may know about so once I do that, I'm going to put my wig on this wig, it's from my hair company. I will link it in the description box and I'm going to clean my forehead with some witch hazel and then once I did that I'm going to take my bold hold. I used to bold hold active because your girl be a little sweaty at the gym and, as you can see, I'm only going to apply it um directly onto the front of the cap and I'm only making the glue the same width as the closure. So this closure is a 5x5, so my glue is not going to go all the way across my forehead, because I don't need it all the way across my forehead. So, depending on your closure, size or frontal sides that will determine how far you take your glue down to the sides, and so I'm going to apply three layers and making sure to blow dry each layer before I apply the new layer don't go now. I got my last layer on and I'm going to apply my wig making sure that you apply your wig to the end of the glue. So the goal is to not have any glue in front of your wig headline, because that'll create a big mess so make sure that the wig is covering all the glue and I'm going to use my comb to press into it a little bit not too much. But just a little bit to make sure that the wig is kind of like into the glue, if that makes sense, just to make sure everything is melted, and then I'm going to take my guy to be glue spray. This is just for extra security and I'm going to spray their hairline again and then I'm going to apply my wrap and then I just let this sit for about five minutes. Once I let that sit, I just blow dried it real, quick before I took it off with cool air, you don't want to do heat, and then I started cutting my lace being sure to cut in a zigzag motion and then we're going to apply some makeup To that hairline to blend in the edges of the lace, so now, once I did that I'm going to now cut some quick layers into my hair, because I did plan on curling it. I just applied some bio Silk Oil. You can apply whatever products. You feel you need to apply to your wig and then I'm going to go in with my wax. Stick I'll put this in the description box as well, because you need a wax stick. If you wear wigs, you need a wax stick and I'm going to just use my wax stick and my hot comb to get the wig flat going section by section. That is the key on getting your wig black and you can see. I didn't have baby hairs at first because I was trying to determine if I wanted baby hairs or not, but I went in and just added some but now looking back at it. I kind of wish I did because it was kind of giving without the baby hairs y'all, but it's okay um. So once I did that I did my baby hairs, making sure that you pluck your baby hairs because we don't like nothing baby hairs. Okay, so make sure that you are plucking your baby hairs and I'm just going to use some of the got to be glue in the black tube to lay my baby ears down not too much because you don't want them like harsh and y'all. Look at the baby hairs. What is that? That is exactly why I said I wish I didn't: do the baby hairs, but it's okay, because the baby hairs was definitely giving me a hard time, but that's okay, because we kind of we kind of winged it. So I went in with some layers like I said earlier, because I was curling, my hair. If you are curling your hair, please be sure to cut layers in it. It'Ll just give it a more flowy. Look a more flowy full look to curl my hair. I am using the babyless pro titanium curlers. I believe these are the 1 4 inch. I forgot um and uh. This is also the spray that I'm using the Sebastian Shaper Plus this is the extra hold and I'm just going to go in and curl my hair. I will make a full detailed video on how I curl my hair. If you are interested in that, just give this video a thumbs up, and I will do that for y'all. So y'all can learn how to curl your hair at home, but I'm just going to run through this and curl my hair and I'll be back when I'm done and you yeah bring up the last piece of my hair and it came together so well y'all. I forgot to mention that I also dyed this hair jet black. So if you want to see how I dye this hair jet black without staying my lace, I will put that video link in the description box as well. But this is how my hair turned out. Super cute super curly super full. The part is parting. Okay. I hope you guys enjoyed this tutorial and please don't forget to subscribe to my channel as well and give this video a big thumbs up. If you would like to see more videos like this, and I will see y'all in my next video - I'm crazy

Comments
Omo baby: Looks sooo good! I received my unit. Love it! Thank you!
ritababy12: Right on time boo