5X5 Deep Wave Closure Wig Install | Easy 5X5 Closure Wig Install Beginner Friendly (Wigmy Hair)
- Posted on 22 January, 2022
- Closure Wig
- By Anonymous
#5x5Closurewiginstall #EasyDeepwavewiginstall
Step by Step Beginner Friendly 5x5 Closure Wig Install
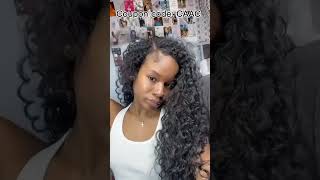
In this video I will be installing this 24' Deep wave 5X5 Closure Wig from Wigmy. I purchased the hair for $135 from Aliexpress. Shipping was pretty fast and the customer service was good.
Youtube Copyright Free Music: Satisfaction Guaranteed and Irie by Quincas Moreira.
Products used:
John Frieda Frizz Ease Serum
Mielle Organics Pomegranate & Honey Curling Custard and Design Essentials Coconut & Monoi Deep Moisture Milk Soufflé.
Design Essentials Almond and Avocado Shampoo and Conditioner to wash hair.
Lets Stay Connected:
Instagram: https://www.instagram.com/mercydesign...
Etsy Shop: Etsy Shop: https://www.etsy.com/shop/MercyDesign...
For Business Inquiries: sherry [email protected]
Hello guys welcome to my channel in this video, i'm i'm gon na be trying this wig that i got from wig my and it's their deep um wave texture and i got it in 24 inches and a 5x5 closure. Okay. So it comes in this package and then you can open it and it also in this button back here, nice, i'm just gon na take it out. I'M gon na um just look at it. Okay, so it comes with a spray bottle. You get a headband, a head, wrap and um. You also get um a cap, but i already have my cap because i tried to purchase the darker cap that i get from from my local beauty supply store, and this is a bit too light, and then you have this right wrap here, which is nice. So you could probably use it to hold down your edges when you do a styling, your hair, okay, but i will be washing this first. I will leave all the information in the description box as well. Just in case you um, you want to just double check the information, so they also send this little pamphlet here. So i guess it shows you all their different styles of wigs that they offer and i paid for this i paid for this. Actually i will leave. I paid 100 and i will leave the information in the description box below because i don't want to give you the wrong information. But i think after their um they were, they were having a sale, and i think i paid like 134 dollars but just uh to make sure i'm gon na leave all the information in the description box below and i did get the 180 density because i didn't Want it to be too thin or too thick, okay and um, it's in the 24 inches, i'm just going to take it out from it comes in this bag after i've taken out from the satin bag. It'S well packaged guys, so it comes in in this and then it's in this as well. Okay, i think something is left back in the bag. Let me see what this is okay, so it's a little key ring. That'S cute! That'S cute! Okay! So i'm just gon na i'm gon na be watching this first, i'm not gon na just um um wear it. I'M gon na be washing it and i'll show you the i'm, not gon na really show you um when i'm washing it. I will show you the shampoo and conditioner that i will be using it's um. It'S um, it's not new, but i just found it and it's been working for my hair. It'S making my hair really moisturized, so i've decided i've tried it on my wig also, and i love what makes my um curly wig feel. So i'm gon na try it on this wig as well. So i will show you that - and this is your five by five closure see, so it gives you a nice um. It'S wide enough to give you that frontal look. Okay, so um it comes with a band attached, which i don't think i you really need it, but that's nice that and it has the adjustable straps in the back here. Okay and i will be bleach, i'm gon na bleach the the knot. Look like it's bleached somewhat, but i'm gon na bleach and not some more okay. So this is a 24 inches. So let me show you: that's a 24 inches, i'm just gon na pop it on my head, so you can see, but i'm gon na wash it before. I style it and wear it. Okay and i'm not really gon na wear it like this. So i didn't fix, pull my cap all the way to the front, but this is what this is based, basically um the length, and once i wash it, it's gon na get more body to it. Of course. Okay, so i'm gon na go ahead and wash okay guys. So this is the shampoo and the conditioner that we'll be using by design essentials and it's their almond and avocado. And let me tell you if you're struggling with keeping moisture in your hair, you may want to use the uh their shampoo um, the conditioner, not i'm not a really big fan of a conditioner um i've been using. I got the mask to this and the mask is really nice and thick. So that's what i've been using this in the mask, but for the hair i'll be using on the conditioner, okay and also they also have one the their souffle that they have in the coconut. That'S the first thing i tried from them and it keeps my hair. So moisturized i mean right throughout the week, which is unusual for me. So that's why i decided to use these and they've been good, so i'm gon na be using it on my wig to wash it, but first i'm gon na bleach the knots okay, okay guys! So now i have my my quick blue, along with my third i'm using the 30 volume developer and i made it nice and thick so i'm just gon na add it real quick to the closure. Let'S give it a few minutes and i'm gon na wash the hair. I think there was a string of hair and it's good to do the front if you're, if you're just doing it for the first time, try to do the front last like the front of the closure. Last because i realized the front of the um here. Normally bleach quicker take the reach quicker, so you may want to do the top and then one to the front, but i'm just going to put it on there for a few minutes. I'M just doing the whole thing: i'm going fast, okay, so i'm just going to give it about five to ten minutes and then i'm gon na go ahead and rings, okay, guys so i've already washed it i've. I rinsed the hair and then i used my purple shampoo on the closure uh to take out any um glassiness. That would be there from bleaching it. So now, i'm just going to add some mousse and then add my gel and leave it to dry. I think i'm probably gon na i'm not gon na, pluck the closure much because it's already pre-plucked and i think it's okay, i don't like plucking my closure. My frontal is too much if it's not too dense for it to last longer. So this is the hair that i got after shampooing and conditioning the hair and using my paddle brush to detangle comb through the hair. This is the hair that came out. I don't want the hair to be too heavy, so i'm just gon na add it on, and then i'm gon na put my baby okay so i'll be using this um coconut and monoi um deep, moisture milk souffle from um design essentials. And if you have that foisty kinky hair that doesn't hold moisture, you may want to try this i've started using it and it's been working wonders for my hair. So i tried to like refresh like uh. Add it to my hair midweek to keep it moisturized and it keeps my hair moisturized for the entire week once i add it, but i still try to go in and add just a little bit more. So i'm just gon na add this over the hair. I'M not gon na put too much and then i'm also going to be adding. You know my usual um sculpting custard from um, so i use both. Usually i use this, but i started using this along with the souffle, so i'm going to use both okay guys. So i'm doing a quick um just make plucking my center part here and i'm not gon na. Take it all the way back, i'm just um just try to stay for my beginners. I just try to stay in the line here and you just want to follow the line and keep looking here, not making my part too too wide, and then i'm gon na do a little baby here. So now i'm just gon na take um a little bit from the front and i'm gon na cut that and do my baby hair here. So that way, once i fit the wig i'll, just like perfect it uh to fit my face, not necessarily have to do too much. Okay, adding my wax out to the hair. I'M just gon na use my hot foam, it's on maximum heat and when i'm doing it, i just take my time money through it. So it could sit on the front right there see and just it makes it nice and tight when i do it that way. From the face - and i don't like when my baby hair is too thick, so i didn't take too much hair out for that i mean when i'm cutting it the first time. I try not to make it too short. If i need to cut it shorter, then i usually do that it's gon na go i'm gon na, be speaking this way. Let'S blend it out just a little bit and then we're gon na cut it a little bit more and shape it, and i will be using my eco styler gel as usual. Now that i have my cap on, i'm just going to go ahead and cut the lace and then i'm going to go ahead and uh install away okay. So what i'm going to do is when i'm cutting here, i'm going to go as close as possible to the right, where it's attached to the way and i'm just gon na cut here. Okay and then i'm just gon na lift the baby hair up and go and cut under the baby hair. Okay, when i'm doing um cutting the waist off and i've already made the baby hair, you just want to make sure that it's set. You leave it to dry and then once it's set, you can lift it up and it's still gon na uh shape back once you um, install it. I'M just gon na cut under it see how i did that it's still there it's okay, so you can still see that it's still nice and late okay. So i'm going to continue so right here, there's no baby here there, so i'm just gon na go in on the lace and then i'm gon na lift this baby here up and i'm gon na put under it. So i'm gon na do that going all the way across a little bit. You have the option to make it before making your baby hair before installing or you can install it and make it it's really up to you my opinion. If you're a beginner, i think it's gon na be easy to make it off of your head, but you could um do whatever works for you, okay and you can always go back and cut. Some more leaves off if you wish. So i'm just going to go in on this one right where there's a space between the curve and this and um next baby. Here, i'm going to take out a piece of the extra lace, so once i get to this side now to get this lace off, i'm going to go over to that side to take that off and see here, i'm just going to take the extra piece from Under here as well - okay - so that's basically it i'm just going to cut an extra piece off here and then we're ready to go. So now i'm gon na i'm ready to install and i will be using this bed head um holding spray just for i'm not gon na, be installing for long term. So i'm just gon na use this in order to get it to blend in, with my skin tone, a little bit more. I'M just going to add a little bit of my mac um foundation. Color, i'm just going to use this little brush here and i'm going to go ahead and just uh cover the front of the lace and then in my part, okay guys. I went ahead and added a little bit more of my foundation and i did add just a little bit of my um liquid foundation uh to get done um, so i won't have to be using too much powder. So i'm just gon na go ahead. Get my wig on i'm just gon na take my bag back here and before i position it. I'M just gon na go ahead and pull my cap up and then i'm gon na add my spray to the front. Okay guys. So now i'm ready to apply my holding spray and i just grabbed my marrow that way. I could um make sure that i'm lining up my way properly in the front spray: some ice there: okay, okay, so i'm just doing just another layer here, okay! So now i'm just gon na go ahead and pull the wig to the front of my hairline. Where i apply the holding spray you know my face is guys it's a um bad habit of mine, but then i'm gon na have to move on to just uh reshaping my baby here, i'm also gon na be adding some water to the hair. Along with my first e serum and then i'm gon na move on to lean my edges, i'm just going to wet the hair down a little bit and i'm going to add, but i'm not going to make it too wet, because i like, when my curl here Has a body to it and i think i have to shave the ends a little bit so, but i'm loving it the only thing after bleaching it - and i think i gave it when i bleached it. I didn't let it sit too long, because i don't like to bleach my knots, but i gave it um a good timing and i still had to add my for some closures. You can bleach it just for a few minutes and it will give you that look without adding any additional like makeup or anything, but it really depends and then um, but initially when i just got it, i felt, like the you know some wigs when you get It the lace, is nice and soft. This one was a little bit on the harder side. So that's the only thing i can say, but apart from that, i love the curls and i love when my curls are a little bit poofy, especially for curly hair. So i try not to make it too heavy. I used to do that and i'm going to just make it um just nice and light enough. It was not laying down on your head. Well, it depends what you like what you go for, so i'm just going to, and i think i'm going to add some little more, probably holding spray to my baby here to stabilize a little bit more because i added the gel afterwards so or some more. So i'm going to go ahead now and add my um, my serum, to to take up some of my freeze and give me a little sheen to the hair, but so far i'm loving it tell me guys. Tell me what you guys think, but i'm loving the hair so far i added a little bit of my spray right there, so i'm just gon na use my brush okay guys. So i just uh did a small uh section over here just to balance out the side. Okay, so i'm just gon na add some of my john frieda for his ease to the hair about three pumps. I'M just gon na rub it all over the hair and i'm just gon na run over with my hot comb just to the top and i'm all finished okay. So i'm just using my hot comb to go over my closure uh, just to melt it a little bit more after adding the holding spray. And since i also had to reshape my baby hair as well - and i do have the hot comb on the highest setting, which is 20. okay, so i hope you guys enjoyed watching this video, please remember to like share and subscribe and uh so far. My view on this here i love the hair. As i said, the the closure could have taken the bleach a little bit better um, but i just went ahead and add some makeup to let it blend in with my skin okay. So i hope you guys enjoyed watching, please remember to like share and subscribe. You


Comments
oneil thompson: Great job beautiful
Cynthia Dzoti: wow so beautiful