Melted Lace | 5X5 Closure Wig Install | Tinashe Hair
- Posted on 24 October, 2021
- Closure Wig
- By Anonymous
Wussup babes, so today we giving scalp, we giving “it looks like a frontal but it’s not” lol. Tell me what you guys think in the comments below. If you guys loved the outcome of this install.
Catch you in the next one babes
——————————————
Hair Details:
• 18” 5x5 Transparent deep wave Closure Wig
Link to this unit⬇️
US $142.83 37% Off | Tinashe Kinky Curly 5x5 6x6 HD Transparent Lace Closure Wig 180 Density HD Lace Wig Brazilian 28 30 Inch Curly Human Hair Wig
https://a.aliexpress.com/_msvzvQq
Products Used:
• Watermelon Treat Adhesive https://erickajproducts.com/products/w...
• Watermelon Treat Adhesive skin guard https://erickajproducts.com/products/l...
• Ruby Kisses Conturing powder pallet
• Nairobi foaming mousse
• ORS Liquifix Spritz gel
————————————
Spam my Socials:
Snapchat: papi_brit
Instagram: _iam.Brit
Twitter: papi_brit
I do not own any copyrights to the music in this video.
————————————
Also I do make and sell custom wigs, check out my business IG: __thebriteffect
#closurewig #wiginstall #tinashe
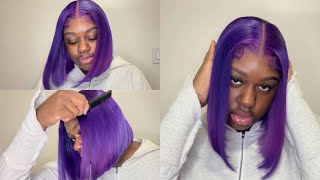
What'S up guys welcome back to another wig install today is going to be a closure wig install and right now, as you can see, i am just putting the makeup on her cap to make sure that it is the same exact color as her skin tone. So right now i am just adjusting the straps in the back making sure that the wig fits comfortable for her making sure that it is not too tight or not too big for her, and it just fits perfectly because i don't want her taking this wig off, Because the wig is too tight, so yeah, that's what i'm doing right now, guys all right so right now, i'm just pushing her with back making sure that i place some clips and put it out the way and then i'm just going to take my glue and I am going to continue to mold her stocking cap because i don't want this to be seen. I don't want anybody to see her, so i can kept underneath this wig. I want it to be flawless as possible. Okay. So next i'm going to take my skin guard by erica j love, her products, like all her products. You will see me using them in this video because that's all i use honestly but yeah, i'm taking my skin guard and i'm spraying that and then i just proceeded to cut the thick part of the lace and i cut that off because if you don't you Will see it once you like install it and like you see the final looks you will see that there, so you make sure that you just cut that off, because you don't need that guys you don't need, then i am going to take my razor comb. Let me see there, you go razor comb, take your razor comb, cut off the excess lace and make sure that you don't go as close as to the hairline, as you just want to make sure that you just cut off enough and then you can just go In later and then cut off what you didn't use, so hopefully that makes sense to you guys but you'll see you'll see okay. So next you just want to take your adhesive of your choice and you want to apply up to three to five layers of glue and um. What i do what i used to do is i used to blow dry in between each time. But now i just go ahead and keep continue to put layer at the layer until i get the desired layer that i want and then i go in with my blow dryer and i change it from hot to cold hot to cold until it turns clear, okay. So now that i've finished blow drying, i'm just going to take her lace and push it up past where the glue is and i'm going to stick that side down. I only did one side at a time just to make sure that the glue doesn't dry out on the other side, while i am brushing and molding in this side of her wig. So i do like to go in sections, sometimes, okay. So now i am just going to take a clamp and i'm going to push back this side of the lace so that i can proceed to do the same steps that i did on the other side. Like i said before, i'm going to take three to five layers and most likely i did three layers, because this is a closure, so you don't need to do five layers because that's unnecessary so yeah, i'm just going to continue to do that step right now. All right, so what i'm doing right now is i'm going to take my comb and i'm going to push the lace into the glue or the skin rather and just making sure that it's melted and it's not coming up and yeah. So that's what you see me doing right here: okay, so the little piece right there i did not glue. I did not place any glue right there. So that's what i'm doing right now, i'm just going in and placing layers of glue there so that i can glue that area down and then i will proceed to the next step. Okay, so i just used holding spray to spray the front of her lace and then i am going to take my elastic band and tie that and i'm going to keep that in place until i finished out like her hair okay. So now i am sewing down the back. I usually go in like three rows in sew, just to make sure that we get extra security in the back to make sure that the wig does not come up at all because, as you know, it comes with combs. In the back, but sometimes my clients don't like the comb, so i do cut those out and other than the elastic band that they put in there. I like to go in and sew the back as well. Okay, so here i just parted her hair in sections and i'm going to start from the bottom and i'm going to spray my spray bottle that is filled with only water and i'm going to detangle her hair, starting from the tips all the way up to the Roots and then i am going to go in and use my nairobi foaming mousse and i'm going to place that on her hair, just to define the curls a little bit better. So, okay! So now i am just going to take my comb and i'm going to straighten up her part, making sure that everything is in place. It'S not crooked, no hairs or in the wrong areas, so yeah, and then i'm going to take my wax stick and my hot comb and i'm just going to further straighten that part, making sure that everything is all flat and neat do okay. So now i am just taking my um stick. This right here is not mascara guys. This is actually a um like spoolie type of thing, and it's like uh, it's for it. I can't really. I don't know exactly what to call it. It'S just for like, if you have like gray hairs, and you just want to make them black pretty much so, and it comes in that same little like kit like a mascara, but it's not mascara all right. We are almost finished guys. So what i'm doing right now, i'm just going in with the same color foundation that i use to go underneath her lace, i'm going to put that in the part and just clean it up a little bit and make it look a little natural, because you know We went in with that touch-up brush and to clean it up, so we're just going to go in and fix that part and then we're going to move on to the next step. All right! So now i'm just going to take my right back home and i'm going to straighten up her part, making sure everything is straight and in place because we don't want a cricket part guys so make sure you fix that after you take your wrap off all right. So now i'm just going to go in with my hot comb and make sure that it is all flat in the neat and then i'm going to take the touch-up brush that i used before and i'm just going to clean up that area as well. In the front, because we don't want it to be like out of whack, so everything we did in the back, we had to do it in the front, because i didn't touch that part. So yeah, just a little side. Note y'all! Every time i freaking look at like i'm editing this video and i'm looking at my like the back of my neck, i'm like girl could have did better like what what is you doing? Every time i'm doing somebody's hair, my hair be looking jacked up, maybe looking bad like what and you a hairstylist but anyways. I'M just gon na go in and i'm gon na section out the pieces that i'm gon na use for her baby, hair and um. A little piece i left on there that i didn't catch at first, so i'm just going to cut that piece off now, just because i don't need that not really but yeah. So i'm just checking on the other side, but i am just going to go in and start the process of doing her baby hair. I'M lying, i'm plucking guys, i'm plucking all right, so i'm just going to pluck out just to make the hairline a little bit thinner because it just makes it look better all right. So now i'm just going to go in a jagged motion and i'm going to cut her baby hair and i like to cut them a little long at first and then i just go back in and customize it and tweak it a little bit but um at This moment i was using the um. What is it the ors brand? The fix it freeze stuff like it's like a spray, but it works good, but i i don't like it because it gets so sticky, but that's what i was using at first but then, as you'll see like in my upcoming videos, i start using the um. What is that crap called the gorilla snot, and i think i'm thinking i might change from gorilla snot too, because um, if you use that a lot, it just leaves like a a yellow like tint to the lace and it just kind of messes up the lace Over time, so yeah, so what i'm doing right now, i'm just molding, i'm just sitting in her baby hair trying to get them in place because, like if you know you know, baby hair is tedious and it takes time, and you have to like go over that. One little piece like a thousand times just for it to be right and i'm just i'll be over baby hair. So that's why i'm even doing my own hair, but everybody like baby hair, so we're giving this girl some baby hair because she's like baby here. So just continue to watch. So what i'm doing right now, i'm just going in and i'm just trying her baby hair, making sure that the product that i use is dry and then i'm just going to go in and i am trying to get that stuff out of the front of her Hair y'all see see that's what i'm talking about it'd be having like it be stuck now like it's a good product, but i just feel like yeah. You just can't use too much of it, but what i'm doing now, i'm just going in with my hot comb and i'm pressing the front of her hair all right. So i'm just going to go ahead and take that spray bottle again and i'm going to spray. The front and make sure that i just smoothed out the front because, as you know, we went in and we plugged and we did her baby hairs. So we kind of messed up that front area all right. So i'm just gon na go in and i'm just gon na pick the front just to make sure that the top is flat and then that just wraps up the rest of this video guys. So i hope you guys like comment, subscribe and share this video and make sure you comment below to let me know if you like this install and let me know how it turns out. Thank you. Bye, guys see you in the next one


Comments
Mikayla Ragsdale: how is the wig holding up? and did you bleach the knots? i’m debating on buying it