How To Make A Curly Wig With Bangs Without Closure | Long Term Protective Style | Lady Rette
- Posted on 18 June, 2021
- Closure Wig
- By Anonymous
How to make a curly wig with bangs/fringe without a closure. A long term protective style for transitioning/natural hair.
⭐ ORDER THIS WIG: https://crushonlulu.co.za/shop/lotus-curly-fringe-wig-synthetic/
⭐ SHOP MY HAIR COLLECTION: https://crushonlulu.co.za
► PRODUCTS/TOOLS LIST
• Magic Super Lexi Colour 1/30
• 22 inch canvas head
• Wig cap with adjustable straps
• Polyester thread
• T-pins
• C-shaped needles
• Seam ripper or scissors
• Silver metallic marker
• A healthy dose of patience
► Subscribe for more detailed tutorials and hair tips!
https://www.youtube.com/channel/UC1s3Wqoq-vPxdRLPViFDLLA?sub_confirmation=1
► WHAT TO WATCH NEXT
• How I Moisturize Cornrows Under Wigs to Grow my Transitioning Hair Fast: https://www.youtube.com/watch?v=C1tB0b...
• HEATLESS Blowout in UNDER 30 Minutes on Transitioning Hair: https://www.youtube.com/watch?v=keywKT...
• A Relaxing Wash Day and Chill on Transitioning Hair: https://www.youtube.com/watch?v=hH-1vm...
► SOCIAL MEDIA
• Instagram ➭ https://www.instagram.com/ladyrette/
• Facebook ➭ https://www.facebook.com/crushonlulu
► EMAIL ME FOR INQUIRES/COLLABS
FTC Legal Disclaimer - Some links found in the description box of my videos may be affiliate links, meaning I will make commission on sales you make through my link. This is at no extra cost to you to use my links/codes. It would just be one more way for you to support this channel!
► ABOUT ME
Hi there! My name is Sylrette Macauley. I'm from Johannesburg, South Africa. I am passionate about growing healthy, beautiful hair. I also love doing makeup, making wigs and playing bass.
► MUSIC
Music by KoVu & Michaella - Love Me Anyway - https://thmatc.co/?l=9E6B80E0
► TAGS
#howtomakeawig #wigmaking #diycurlyfringewig #longtermprotectivestyle
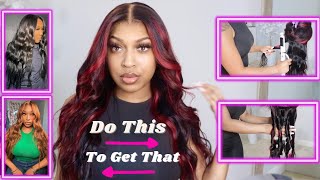
Welcome to lady ritt, it's celerit! You wouldn't see me until the end of this video, because i was recovering from a really bad flu, but i'm better now so i'm making awake with this gorgeous hair. I found at a beauty store. You know those shops you always go to, but you never know the name. It'S that kind of shop. This hair is by magic in the color one slash 30 and it has two bundles each of 20, 22 and 24 i'll be using my 22 inch canvas head. I just wrapped it with cling, wrap and clear tape so that it doesn't get dirty. That'S my little business card crush on lulu. All the wigs i make can be ordered from crush on lily.co.zede, with customization for human hair. Wigs. As always, i use a wig cap with adjustable straps always make sure the straps are on the inside of the wig. Never outside. I like to use polyester thread, it's stronger than cotton and it's stretchy. You need c-shaped needles, lots of t-pins and a seam ripper or scissors spine as well. The first thing i do is line up the center of the wig cap with the center of the canvas head, and then i stretch the cap and pin it all around i'm on the road, but i'm coming right back. You said i don't treat now i'm going to draw my guidelines using a metallic marker. You can use any silver marker because it washes out of the wig cap easily. I'M spacing this the width of my thumb, which is about 2 centimeters when i reach the part of the cap with the roses. I continue my lines as if there was a closure there, so the straight lines end there. The ones in the center will be short lines that basically form a circle. Now, for the part where the bangs will be, i find the center and make a mark. That'S where the closure piece will go, which i'll show you how to make, and then i start drawing circles or squares using my index finger for spacey. By doing this, the bangs will not be too thick. Okay. I know this ain't, nothing that you're used to. I got the money coming quick, like your ex. Do i'm going to thread three needles that way i don't have to stop and re-thread all the time don't forget to make a knot at the end of each thread, i'm starting with the longest bundle, which is the 24 inch now. These are not your 100 gram. Bundles, if you double your wefts or spaces wrong, you will run out of hair and then you'll cry also on single lifts. One side always has short hairs. The short side needs to be at the bottom facing the wig cap so that they don't show. I pin a weft down so that it lays flat, as i'm stowing the first two stitches on the edges, always go through the weft. Whilst the wrists go underneath as i go along, i wrap the thread around the needle three times before pulling it, and that makes every stitch secure in my own mind, but you give me time before i stitch to the end i cut the lift, then i begin Stitching through the weft again, but i go backwards and forwards a few stitches to close the lift. Then i make a knot and finally cut the thread and make a new knot notice that these bundles are smaller than regular bundles. That is why i'm sewing single wefts and then filling it in later. There'S just not enough hair to double the width from the start, but also using another pack of hair would be too much hair when you see how this turned out at the end, with only one pair, i used one bundle from each pair, so first i use A 24 then a 22 and then a 20 inch. The three bundles left will be used in between the lines. That is what the thumb spacing is for. Please the things that can't stay the same, we're both aware. I got the money coming quick, like your ex. Do and we fight and we cry we kiss and we scream, but we always link up like a bluetooth, and you know i love everything you gon say you know your body look great on the runway and them curves got these looking. So now i just added the bundles and ended at the center of the wig. When you add the first three bundles, it should look like this. I basically built the skeleton of the wig, and now i can flesh it out and start filling in the center with the last three bundles and i'm also going to carry on with the 20 inch and then fill in the wig with the 22 and the 24. Can'T admit that the list goes on and on trust issues, but you know i don't mean to try my hardest to change. When i reached the center, i have a hole where i drew a dot. I took a weft and rolled it to the size of that hole. When i got the exact size i cut out the extra width and started sewing that weft into a row. This is what it should look like, and then you need to find the center and spread out the hair. I forgot to film this, but you need to flat iron that centerpiece now i just sewed it into the hole which basically involves sewing around the edges of the piece. As you can see here, and you know, i love everything you gon say you know your body. Look great on the runway and them curves got these looking sideways when you walk in the room, it's like beyonce now, all i have to do is add the remaining two bundles starting from the center and working backwards, which honestly took very little time. I can't admit that the list goes on and on trust issues. I know i got ta change, but you know i don't mean to try my hardest to change. This is what it should look like with the full pack of hair now. For some reason, i thought it would be a good idea to try and cut the bangs while wearing the wig, spoiler alert bad idea. I could not see what i was doing and they were just too long. It wasn't so bad, but i usually cut the bangs on my mannequin that has a face, so that is what i ended up doing and i cut some layers on the side. This turned out exactly how i imagined it. It'S bouncy and full of volume, and because of how i spaced the hair, the bangs are lightweight and i can see my eyebrows. I personally prefer very light bangs on fringe wigs. I just think it looks super cute. This wig will be my protective style this winter. It'S really quick and easy to put on, because i don't have to glue down lace or make baby hairs. Saving me time and edges don't forget to like subscribe and share. If you found this video helpful bye,


Comments
Lady Rette: Glad to be back posting again! I've got a lot of videos planned that I can't wait to share with you all ☺ ⭐ ORDER THIS WIG: https://crushonlulu.co.za/shop/lotus-curly-fringe-wig-synthetic/ ⭐ SHOP MY HAIR COLLECTION: https://crushonlulu.co.za ► Subscribe for more detailed tutorials and hair tips! https://www.youtube.com/channel/UC1s3Wqoq-vPxdRLPViFDLLA?sub_confirmation=1 ► WHAT TO WATCH NEXT • How I Moisturize Cornrows Under Wigs to Grow my Transitioning Hair Fast: https://www.youtube.com/watch?v=C1tB0bwsMKY&t=6s • HEATLESS Blowout in UNDER 30 Minutes on Transitioning Hair: https://www.youtube.com/watch?v=keywKTuQpXU&t=47s • A Relaxing Wash Day and Chill on Transitioning Hair: https://www.youtube.com/watch?v=hH-1vmRcn_Y
Celeta Cruz: