How To Make A Full Kinky Curly Wig With A Closure: Hergivenhair | Defining Curls| Styling
- Posted on 19 March, 2016
- Closure Wig
- By Anonymous
Link to purchase: http://www.hergivenhair.com/?y=ytmsnat...
Hergivenhair is alway getting me together!! This hair is so beautiful!! In this video I share how I made my wig, defined the curls, prepped my leave out and how I styled the hair in it's wash and go state. The texture that I chose for this video is the curly texture. Although I have tried this texture in the past, this time I wanted to see how awesome it would look with a closure!! I was definitely not disappointed! Check out all the deets below for more info on this hair and ways to save (: Remember to Like, subscribe and tell a friend!! Xoxo
Hair Deets:
HERGIVENHAIR Curly Texture
Length: 16" at the top, 18" in the middle and 20" at the bottom with a 16 inch closure.
Save $15 on this hair:
HERGIVENHAIR Now offers bundle deals http://www.hergivenhair.com/bundle-de...
________________________________________________________________
Lip color deets: Limbo by Colourpop
Previous videos:
Updo Styles with Clip ins:
https://www.youtube.com/watch?v=p4GBDv...
Twisted updo:Great Natural Hair Protective Style
https://www.youtube.com/watch?v=kaIA0...
___________________________________________________________________
Discount codes:
Vanity Planet:
Discount on the Hair Treatment and Flat Iron
Link: vpwow.com/marytaylor
Code: marytaylor
Discount: 50% off Remi Hair Treatment
Link: vpwow.com/msnaturallymary
Code: msnaturallymary
Discount: 70% off Tame Flat Iron
Spin for Perfect Skin (www.vanityplanet.com)
http://vanityplanet.com/spin-for-perf...
Coupon Code: naturallymary
Discount: 70% off
Full Price: $100 | Discount Price: $30
** code can also be used on other facial brushes
Scalp Invigorator
http://vanityplanet.com/hair/scalp-in...
Coupon Code: msnaturally
60% discount off $50
Final cost - $20
____________________________________________________________________
Fingercomber units:
For free upgrade to priority shipping us code: MSNATURALLYMARY
_________________________________________________________________
Let's stay Connected:
Instagram: http://instagram.com/msnaturallymary
Facebook:https://www.facebook.com/mary.taylor....
Twitter:https://twitter.com/MaryTaylor7
Tumblr: Msnaturallymary
Pinterest:http://www.pinterest.com/marynatural/
____________________________________________________________________
For companies that would like to partner with me to provide reviews for your products or any other business inquiries email me at the provided address: [email protected]
____________________________________________________________________
Check out my latest hair related videos:
7 ways to Style a Kinky Curly Upart Natural Hair Wig: Hergivenhair
https://www.youtube.com/edit?o=U&vide...
BEST Kinky CURLY Wig: using HERGIVENHAIR NATURAL HAIR EXTENSIONS| U PART WIG
https://www.youtube.com/watch?v=6leCI...
How to Refresh the Kinky Kurl Out Unit by Fingercomber: Kinky Curly Wig
https://www.youtube.com/edit?o=U&vide...
6 QUICK HAIRSTYLES FOR A KINKY CURLY WIG Featuring: THE KINKY KURL OUT UNIT by Fingercomber
https://www.youtube.com/edit?o=U&vide...
Perm Rod Set on Natural Hair:
https://www.youtube.com/edit?o=U&...
LAJAY HALF WIG REVIEW:
https://www.youtube.com/watch?v=XyUoG...
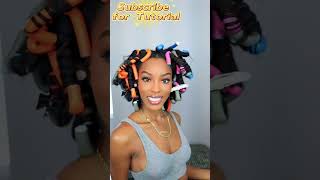
Cost me out of the dogs took my hand and led me on to a part where my spiraling to nothing, but you never. Let me go hi guys today, I'm here to show you guys how I went through the process of installing this beautiful hair that was sent to me from her given here. This is their curly texture. I have uses texture in the past. However, I decided I wanted to try it again, but this time with a closure - and you can barely tell that - I have a closure on which is pretty awesome. I have 4b 4c hair and I'm gon na show you guys how I went through the process of actually blending and also how I install the unit. So when stalling this unit, there are certain things that you need. You need a needle and thread. You need a dome cap. You also need hair forgiving. Hair is what I use, which I love you will need. You will need a mannequin head. I also recommend if your hair is black, like mine, I'd recommend, buying color dye and I use a natural, color dark and lovely fade-resistance dye. You can use that if you like, or if you want to dye this hair and this hair, is it dies really well, if you want to lighten it, you want to do it red. You want a purple whatever color you like, get the dye that you need and also you will need some form of conditioner, co-wash or shampoo, whatever you use. So I went through the process of actually sewing on the closure first and then, after sewing on the closure. I use clamp in order to restrict or get the hair out of the way. So, whichever works best for you, if you want to go ahead and sew on the hair in the back, get it up a good amount and then actually so the closure on one. You can do that or you can start with the closure. I started with the closure. First then, after sewing on the closure, then I started in the back installing the 20 inch and or sewing on the 20 inch and then going up, because I wanted this a layered look now, if you want more of a heart shape and you want it to Be longer at the top and then shorter so that it kind of expands out like this, you would just want to flip the lens so 20 at the top 18 in the middle and then 16 on the bottom. But I wanted some longer lengths. So I did it the way that you see it here, which I am in love with. I think it looks amazing. I also did not cut the West. When you're sewing on your hair, you can choose to cut the West if you like, but cutting the West. Actually causes some shedding or more shedding than what you would generally experience. It also causes a bit of friction when you're. Actually, if you make an error - and you need to actually do the unit over again, that can be a bit time-consuming if you cut the whips. So I would recommend actually flipping the West, so I used to flip over method. I did not cut the west until I got to, I believe it's hot I may have cut one or two because I actually had gotten to the top and there was no more space for any more hair. So there's like maybe with us about this width, that's left over, so that's the only one that I could, but the others I just simply went through the process of sewing it on and then just flipped over and kept going. You also want to make sure that you're spacing out the tracks in the back, because you don't want it to be too bottom heavy mistake that I made when I initially made. The unit was actually putting the West, too close, and so I ended up with all this hair at the bottom and then, when I got the top I didn't have an airlift, so you want to make sure that you're spacing them out a good amount and that You'Re also keeping in mind that this hair is very voluminous. It also has a great deal of density, so you don't need them really close together. If you were using straight hair, you might want to have them a little closer, but because this hair is not straight and it's voluminous, you don't have to do that now when going through the process of blending. As many of you all know, I am a 4b 4c girl, so this type of hair is not my hair texture. If you know anything about hair typing, you know that my texture is much kinkier than this texture, so blending I actually installed or did two flat twists. I did one coming down this way and then I did one going straight over and stopping at my part. I also use a toothbrush to slip down my edges and you'll see that here. So I'm sticking down my edges and I actually took the flat twist from this end over to this side just so it would have more height at the top. I wanted a little more lips, but if you're not gon na start with that, you can actually just flat twist it to the side, and then I actually just separated the flat twist, and I may need to separate them just a little bit more. So they kind of looks like I still have twists in my hair because of all the definition, but you can just manipulate it. How you want - and then I just take this area here near the part and I'm just separating just so you don't see any definition between my part or the part where the closure is. I don't want there to be a separation so that there's a great distinction between where my hair stops or in where my scalp starts and where the actual closure begins. So I actually was mindful that so just separating will help that process and maybe just kind of lifting some so that it's undetectable and then I just sweep it behind my ear now, the part at the top. I just kind of pulled it back and lift it over and I think it blends variable. I don't know what that was, but I think it blends very well now, on this hair, the only thing that I used was water. I used olive oil and I used Moroccan oil Kushina. I put that in a spray bottle, and I actually just spritz in my hair with that product and I use a Denman brush right back through or brush that through and then I actually applied mousse and I used cream of nature mousse, and I did that in Order to have some hold, you can choose not to use the mousse, but I want it more of a hold so that my curls would remain clump together and I just kind of lift it up. You can use a diffuser to actually dry the hair and create more clump curls, but I actually did not have a diffuser at the moment, so I just went and bought one today, but I didn't have a diffuser, so I just sprayed the products and then just Clumped and you'll see that process, and this is how the hair dried it looks, so natural look like it could have grown out of myself and it's really really soft. If you're looking for oil, that's really good with this hair and just works wonders olive oil is awesome. I have the curly texture, but I made a different. It looks like this, but I actually cut it so it was shorter and I did not actually have a closure in the past. I had a. I did a three forces unit and I actually cut it about here and I've had it since my birthday, my last birthday in July of last year, and I wear that unit every single day and what has helped to maintain or keep that unit. Looking awesome is olive oil, water in the Moroccan oil conditioner. So if you're wanting to refresh your curls that those on the mix of those products is phenomenal, you just spray it on and then just rake it through and the results are phenomenal. This hair does get pretty big, so I've tamed the curls now I could actually send them a little more, but I love the definition and the volume that I have now. But if you want more volume - and you like your hair bigger, then you can use your fingers to actually lift and make it bigger or you can use a thick to make it bigger and in the front, if you've noticed, I've been pulling this back quite a Bit, if you don't want to have to constantly do that, which is what I'll be doing I'll put a bobby pin here, I would suggest just putting a bobby pin and that should fix that problem. This hair can also be done in the flip over method, where you simply just take hair and just pull it over to the side, and this is probably how I'll be wearing it just so it looks as natural as possible. I just have a lot of definition right here separate if you want to cover this area completely, you could always just take your leave out and just lift it all the way over something you don't have those gaps and then just pin it. That'S a cute little style. There just make sure that this comes over fully. You can wear it like that. I, like my hair behind my ear, so do it like that subscribe to my channel guys tell a friend and also follow me on Instagram I'll leave that here so you'll have my Instagram name, my facebook name. All that will be at the end of this video. I will also leave the website address for heart getting hair, so you all can go out and purchase this hair. If you have any questions about any other texture, I have tried the quali texture and I have several videos on that hair as well I'll be doing some tutorials with this hair, some styling tutorials, showing you guys how you can style it at a later time. Leave your ideas or different options, things that you'd like for me to try with this hair, leave those down below and I'll, be sure to get that video out for you all. I look forward to hearing from you guys just having a wig cap, currently I'll, be showing you guys how I install the unit and the take down of the Swiss

Comments
Aya Libra: Great job!!!! I love that hair
lakeema richardson: Thank you so much for this video
GoldNava: You're so beautiful. Lovely skin tone.
N G: I love your hair!!!! Which hair do you prefer this or Queen a Weave Beauty Ltd. Brazilian Kinky Curly???? Please help I'm on the fence between the two. I do want hair that will curl.
Kiuana Henderson: Yaasss u made it!!!!
J: Can you please tell me the name of the song playing at the beginning