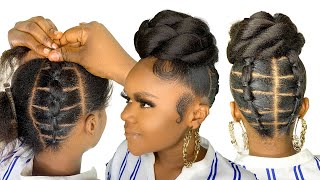
Diy: Lace Front Wig Cap For Crochet Braids Wig
- Posted on 10 March, 2023
- Closure Wig
- By Anonymous
How To T-Part Lace Frontal Crochet Wig Using Marley Kinky Hair | Realistic Hairline https://youtu.be/3plElTPMsbU
DIY: Lace Front Wig Cap For Crochet Braids Wig https://youtu.be/tSfUbhaWX-E
How To Make: Half Up Half Down Crochet Wig Using Braiding Hair | DIY https://youtu.be/jZKrtAEhsgw
Thanks for watching!
Please LIKE, SHARE, COMMENT, and SUBSCRIBE for more videos!
How To Fix unnatural Knots On A T-part Closure https://youtu.be/CPIpoLDSUig
IG: https://instagram.com/vivianbeautyands...
Email: [email protected] (For business inquiries)
Based in Abu Dhabi (UAE)
My second channel https://youtube.com/c/StylebyViv (Sewing channel)
How To Make This Detachable Wig Head Increases https://youtu.be/IfbgbCeMro4
CLOSE-UP: How-to Ventilate Hair Lace Closure/Frontal wig Using Ventilating Needle
Kinky Marley Braiding Hair https://s.click.aliexpress.com/e/_DlVT...
Where I purchase my materials/tools (Aliepxpress Links )
Wig mannequin head https://s.click.aliexpress.com/e/_DeAE...
Adjustable Wig Stand https://s.click.aliexpress.com/e/_DnOz...
✨SWISS LACE NET FOR WIG MAKING✨
1/4 Yard Swiss Lace For Wig Making https://s.click.aliexpress.com/e/_DF2G...
Closure/Frontal Lace (4x4'' 13x4'' 2x4'' 2x6 and more) https://s.click.aliexpress.com/e/_DEsC...
3 Pcs Pin ventilating needle https://s.click.aliexpress.com/e/_Dke0...
Small/ Tiny Latch Hook https://s.click.aliexpress.com/e/_DlrG...
✨✨WIG COMBS✨✨
5 Colors lace Wig clips Steel Tooth https://s.click.aliexpress.com/e/_DEBK...
✨✨CAPS✨✨
Mesh Dome Caps (Small-Large Size) https://s.click.aliexpress.com/e/_DCke...
Spandex Dome Cap (Small-Large Size) https://s.click.aliexpress.com/e/_DCke...
Big Hole Mesh Dome Wig Cap (Small-Large) https://s.click.aliexpress.com/e/_DmjY...
Elastic Band https://s.click.aliexpress.com/e/_DDf7...
AMAZON LINKS
Swiss Lace For Wig Making https://amzn.to/3tiErPJ
Small/ Tiny Latch Hook https://amzn.to/38U5Kc2
4 Pcs Pin ventilating needle https://amzn.to/3tk64Yz
Spandex Dome cap & Mesh Caps For Wigs Making (Small-Large Size) https://amzn.to/3NYCxLU
Black Elastic Band For Wigs https://amzn.to/3NpendS
How To Make This Detachable Wig Head Increases https://youtu.be/IfbgbCeMro4
$15 Hair | How To Make A Beautiful Wig Using One Pack Of Kinky Straight Hair https://youtu.be/Lg9RFZ9A4UU
NEW Style Wig Cap For Crochet Wig https://youtu.be/OTFgZw8okLc
More videos
JUST ONE BUNDLE NO PRE-MADE CLOSURE: How-to/ DIY Closure Wig Side Part https://youtu.be/-oQXwQ49lrc
How To Natural Texture Hair: DIY U-part Crochet Wig With Leave Out https://youtu.be/kXzGeAApKGs
HOW-TO: Lace Frontal Crochet Wig Using One Pack Of Braiding Hair! |Straight Crochet Wig https://youtu.be/bVY7Ulf9LfU
How To Make A Lace Frontal Crochet Wig | Yaki Straight Hair https://youtu.be/3PMboDarNCs
DIY 2*5 Lace Closure Straight Crochet Wig Using Braiding Hair https://youtu.be/FbjtbxL_1xU
HOW-TO Braided Lace Front Wig With Baby Hair Using All My Leftover Braiding Hair | DIY Ombre: https://youtu.be/dtU2WsZGsBE
HOW-TO: DIY 8x6 Lace Closure Wig With Kinky Curly Human Hair Bundles https://youtu.be/6BKSo9sNpGE
#howtomakeawigcap #lacecap #VentilatingKinkyCurlyHair #SingleKnotMethod #WigVentilation
#customwigmaker #makingawig #howtoventilateaclosure #hairventilation
This video is not sponsored. The links above are affiliate links. This means I'll make a small commission if you make a purchase using any of the links
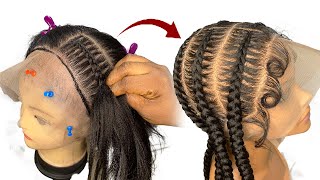
Hello guys and welcome back to my channel if you're new, here you're welcome - and I hope you are doing well so in today's video - I'm going to be showing you how to make this crochet wig cap that you can use for your own um, crochet wig. So with that said, let's jump right into the video, so you want to start by securing the black cap to the mannequin head. So just go ahead and place the cap on top of the mannequin head. So next take your pins and pin the black cap to the mannequin head all the way around. So this will prevent the cap from shifting while trying to pin the lace in place. So next take your lace in place position it where you want it to sit making sure you have a little bit of lace hanging in the front, so nice take your paint and paint start by peeling one side of the lace and place your security in place. So right here, I'm taking a pain, I'm gon na paint this side in place first, a little bit behind the ear, the mannequin ear. So now that that is done, I'm gon na paint the other side in place doing the same thing. I'M gon na pin it a little bit behind the ear so now that that is secure. The next step now is to adjust the lace and positioning how you position it properly, how you want it to sit so if you need to pull it forward, a little bit go ahead and do that so once that is done so once you make this session On that, it's not time to smooth and pin the lace where you want it. So for me, I'm going to be doing a a curved curvy, um side part. So if you want yours to be straight, you need to go ahead and smooth a straight side pad. So, like I said, I want mine to be a bit cold so right here, I'm going ahead to smooth it to clear up the part. I want to make sure that to get rid of any bubble on that particular area, as you can see right here, so once you smooth out the side part, the next step is to take your pins and clean along the edge of the the side, part making Sure that the actual part where you want your your side, part to be - is bubble free. So once that is done, you need to take a fabric marker or a concealer and draw in a line a little bit above the elastic band on the black cap, because we're going to be cutting that out. So, as you can see, this video go ahead and draw in your line and also you need to draw in the line for the uh, the side, part, foreign needle and I'm securing the lace to the black cap before going ahead to cut off the excess lace. From the back, and also I'm going to be sewing the lace to the lace and the black cap together using my sewing machine, so attaching the the lace and the black cap together have to secure it in place. So that way, when I remove the cap from the mannequin head, my um, my lace will still be intact and nothing will burn the the placement of the lace. So you need to go ahead and attach your lace to the black cap using a needling thread. So once that is done, it's time to take your scissors and cut out the excess lace from the back of the cap. As you can see in this video, the next step is to sew the lace and the black cap together. So to do that, you need to sew along the edge of the lace to the black cap, so I then Fame the video on on this particular one. So I'm using a different clip here just to demonstrate how to sew the lace to the black cap. So you want to attach the lace to the along the edge of the lace to the black cap, as you can see right here, so this is when you're doing it by hand and to sew it on your sewing machine. You need to use a zigzag Stitch to sew the edge of the lace to the black cap. So again, I'm using a different clip, because I didn't film, the the uh the process of the very cap so again to sew the lace and the black cap together. Using your sewing machine, you need to use a zigzag. Stitch sewing along the edge of the uh. The lace so once you're done sewing in the next step is to cut out the thread you use in securing the lace to the black cap. So once that is done, the next step is to cut out the black cap under the lace, so we're cutting out the elastic band. Okay, under the lace making sure to pay attention to what you're doing you don't want to accidentally cut the lace, so pay attention to what you're doing and gently cut out the black cap from under the lace. So we want to remove the elastic band first before going ahead to focus on the side part. So right here, I'm going ahead to cut out the black cap from the side. Part area again be careful and pay attention to what you're doing you don't want to put on. You don't want to put in all that work just to end up cutting the lace so pay attention to what you're doing. Thank you, okay. So once you're done cutting out the black cap under the wig cap, your cap should be looking like this, so next place it back to the mannequin head and pin it in place and your wake up is ready for your project. So here is the wig, the crochet wig I made using the wig cap. The link to the video on this crochet wig is in the description box down below so be sure to check the description box to watch the video on how you can make your own beautiful natural, looking crochet wig and as always, if you find this video helpful. Please go ahead and give it a big thumbs up and also hit the Subscribe button down below. If you are new to my channel. Thank you all so much for watching and I'll see you all in my next one. Thank you.


Comments
Chandra Rushing: Why does she NOT have more subbies..she is truly gifted and talented...
Yvette Saunders: I love you work and you teaching very inspiring ❤️
Smith Sadusky: this beautiful
chelagirl 9: What type of sewing machine do you use?
DeTriplet Worship: How much is this natural hair wig? And how do we get it.
Glory Ndubueze: Thank you
Smith Sadusky: this beautiful