Half Up Half Down Wig Tutorial | Styling A Wig | Curly Frontal Wig Install | Amazon Yuzhou Grace Wig
- Posted on 12 March, 2023
- Closure Wig
- By Anonymous
#amazonwig #amazonfinds #wiginstall
Hi and welcome (or welcome back) to my channel!
In this video I unbox and install an 20 inch curly wig from Yuzhou Grace!
20 Inch Curly Wig: https://amzn.to/3ytTto5
SNTE Wax Stick: https://amzn.to/3YMOCcq
Style Factor Edge Booster: https://amzn.to/3hZzCrz
Ebin Lace Spray: https://amzn.to/3IghQLS
Ebin Lace Tint Mousse: https://amzn.to/3xAHcxC
Shea Moisutre Curl Mousse: https://amzn.to/42if3cS
*As an Amazon Associate, I may earn a commission from qualifying purchases made through the above links.
00:00 Intro
00:20 Unboxing
01:15 Pre-Styling
04:34 Applying The Wig
05:03 Cutting The Lace
09:47 Styling Ponytail
14:09 Styling Curls
16:00 Final Look
16:50 Outro
Follow me on Instagram: https://instagram.com/tinaware
Visit my Amazon Storefront: https://www.amazon.com/shop/custom2fly...
For Business inquiries: [email protected]
#tinaware #hairtutorial #lacefrontwig #wiginstall #curlyhair #halfuphalfdownhairstyle #halfuphalfdown #closurewigs #naturalhair #hairstyle #hairinfluencer #wigs #wig #wigreview
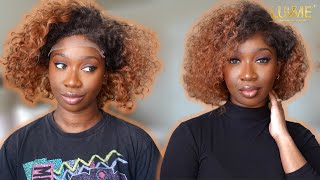
Hi and welcome, or welcome back to my YouTube channel in this video, I attempted and was successful in a half up, half down Style with a curly wig. So, let's start off by getting into the wig, so hello hi and this wig came with some lashes and it came with the wig cap, and you know I always like when it comes little bonuses and there's the wig. So very nice and curly the curls, like the hair, the wig itself was dense, the curls were curling okay and the lace itself. The knots we could have tinted them. I went ahead and I said even if they could have went without tint. I always like to err on the side of just bleaching anyways because of the style, because the hair was going to be up. I went ahead and bleached it anyway, so I bleached and bleached and well not bleaching bleach, but I bleached them and then I wish I had a video. I didn't record how it looked after. I finished bleaching it, but this is it on the mannequin head. So here I'm going to prep the style only because I didn't want to be using the hot comb and pressing out the hair, while the wig was on my head, so finishing touches yes, but to try and style this whole thing on my head. I just knew it was not going to happen. It wasn't going to work. I also didn't want to do the entire Style on the mannequin, because the last time I did that it didn't work out too well with the baby hairs and such so. I was only going to press it out and just kind of you know: uh just make the the part of where the half up so where the ponytail was going to be, and then press that part out so that when it came to styling on my head, I wasn't going to be using any heat at all or it wasn't going to be using too much heat if any at all. While it's on my head, so I went ahead, made the lines. Okay, I went ahead and parted the hair, and at first I was gon na, do the entire hairline up, but then I was like you know what, since it's my first time and that way, if I did the entire thing up, it would put a lot more Pressure on me to nail the sides of the hair as well, and I was like there's really enough pressure on me - trying to nail just the the very front and the part that's going up. So, let's not make it that much more complicated by having to get the entire hairline laid, and so that this way I could leave a little bit on the sides. And if there was any mistakes on the the sides with cutting or with bleaching or with anything. Even trying to glue it down, then that would alleviate that pressure. So I went ahead and I hot combed the size just a little bit, not too much, but just enough so that it would lay flat hot comb, both sides. And then I went ahead and hot combed section by section: okay, so little by little. The entire ponytail part - and you want to do it little by little because especially with curly hair, because you want to get the curls out so that when you go to actually slick it into the ponytail, it slicks and it's not bumpy. So make sure you take your time when you're actually doing the ponytail itself so that it you have a nice smooth, ponytail and I'm gon na leave it here and let you watch the rest of me straightening out the ponytail foreign, so I do apologize. I did not record me spraying down my hairline with the adhesive spray, but if you watch any of my videos before you know, I like to use a little bit of got to be and some of the ebb and adhesive spray. And then I just went ahead and plucked the lace on, and I've done nothing else to the hair. This is how it looked after I'd done, the pre-styling, and now I'm just waiting for the glue to dry before I go ahead and cut the lace, and now we take the Melt band off and wait and you'll see. That is it's late, like the hairline looks good. So at this point I'm just saying: okay, I see the vision is coming to life, I'm proud of myself and we can go ahead and cut the lace. So I like to cut my lace, cut down the middle first and then cut the sides with scissors and go and cut the actual lace off with a flat blade and that's or an eyebrow. It'S actually more of an eyebrow razor and that's just because, as I've stated before, giving it a jagged cut, helps it the hairline look more real people's hairlines naturally aren't like completely straight. So you want to kind of give the illusion, and you always want to leave a little bit of lace too. I know people feel like cutting all the way to where the hair starts is what you're supposed to do. But you want to leave a little bit of lace and as long as you bleach the knots properly and you have a good tint something to tint with it, then you should be good now. I also do want to mention that after I bleached the nods, I did go ahead with a little bit of powder inside the the wig itself on the lace, so you want to do a little bit of that. Just to so, the lace is not as white, because you can even see here that at the front the lace looks like very, very light. Very white foreign lifting, but not to worry, just go over it with the adhesive spray and unfortunately the best thing to do would have been to use a blow dryer and add some heat after I spray it down. But before I tie the Melt band on, but my son was sleeping right next door and I wasn't trying to wake him up so I couldn't. But as long as you're able to use a blow, dryer you're definitely going to want to use a blow dryer, because it'll help the adhesive get tacky and then that way, once you put the Melt band on like you're good, it's sticking. You are good, like just look look how it Blends in before I even use the Melt band, so this is some good stuff foreign. Take the Melt band off you'll, see the difference, and I'm just gon na go ahead and separate some hair in the front for baby hairs and spray the adhesive again and tie it down one last time just so. It lays flat before I tint the hairline foreign and while I'm waiting for the adhesive to dry, I'm going to go ahead and work on the ponytail, so I start off by taking some styling mousse setting mousse. Oh my goodness. I keep messing it up. So I'm setting moves, and after the mousse, I'm just gon na use, some freeze, freeze, spray or Spritz, and that's gon na help that Harden and again after you use the mousse and the freeze spray. If you have a blow dryer use, it it'll help dry faster help with drying faster. I could not use a blow dryer, but it still did dry, especially overnight, and it held it and that will give it that nice slicked look while also keeping it in place. All right and I did use an elastic band for the ponytail, but then I wanted to go back over it with some of the hair itself, just to hide the elastic, and so you just take a piece of hair and as you're wrapping it around the ponytail. You use some freeze spraying again. If you have a blow, dryer use the blow dryer to hold it, and you just keep wrapping it and spraying as you go around and that will hold it. And, of course, if you have thicker like more dense wig or if you want to make the wrap itself bigger, you can always do that, and here I've taken off the Melt band and you see how bright and white that hairline is looking. So this is where the tint comes into play, and I think I've learned my lesson now not to spray the tint directly on just because it's very pigmented and number one. You don't want it running onto your face, um like it did here for me, but also because where you sprayed it definitely will it will leave a darker Mark there than anywhere else. So, as you can see here, I realize very quickly. Let me just spray it onto the brush and then put it on the hairline myself so that I have more control. So I would definitely recommend doing that and not spritzing it or spraying it directly onto it, because you will have some like dark blotches just because, where it kind of lands, first is where it leaves its Mark and you want it to be distributed evenly along the Hairline and you also kind of want to brush back instead of brushing forward because again then you'll just get some on your face unless you're going to put makeup on or if you're going to wipe or wash your face immediately after. But you kind of want to brush it back away from the hairline and you want to make sure that you're not done overly dying or overly pigmenting the lace itself foreign. While I wait for that to dry, I'm going to go ahead and work on the curls. Now these curls still look really good. I actually washed them twice and they still held the curls so shout out to the curls, but I just wanted to go through and add some mousse to it. So this is Frizz Control, mousse, just to kind of make it pop, but just a little bit more, especially because it was a half up. Half down. I was like okay, let's see what we can do, so the down part didn't need the mousse as much as the up part, because it had been straightened a little bit. It did lose some of the curl, but honestly it did not need it like these. Curls still looked really good, but I also like the way that this mousse smells so yeah and then you're gon na want to use a diffuser, of course, and I could not because my child was sleeping but you're definitely going to use a diffuser after two and Again, it's not 100 sorry, depending on the type of curls that you have, but I would still go ahead and recommend it, especially for me this was like late at night and going to sleep and waking up in the morning. You don't know how the curls are going to look. So this is a good precaution to take foreign, and this is the finished. Look so you're probably wondering what happened to the footage of the baby hairs. Well, let's not talk about that. Okay, this looks good, so we'll leave it at that, and this is how it looks zoomed in so you can see, it looks good, like even the hairline looks good. The curls are popping - and I like it, so it's not very hard to execute at all, actually and probably a lot easier than trying to style it afterwards, and then this is how it looked after I put on a little bit of makeup and some lashes. So this is definitely a way to Jazz up a wig to make it. You know if you have an old, curly wig. This is definitely a way to Jazz it up and do a different style.


Comments
Shekeyla Mandigo: This looks so natural
Inspirational sxm: This is soooooo cute
anushka anderson: It looks very cute
Curvy Kie: First and beautiful sis