Mslula.Com Bob Wig With Side Part Unboxing + Styling
- Posted on 20 June, 2017
- Closure Wig
- By Anonymous
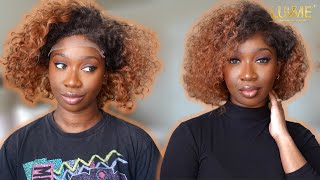
Hair: Mslula 14" Bob wig with side part
Hair link:
http://www.mslula.com/bob-lace-frontal...
our official website: www.mslula.com
Any problem, feel free to contact us: (Wholesale or dropshipping is acceptable)
·Email: [email protected]
·Whatsapp: +86-18820015737
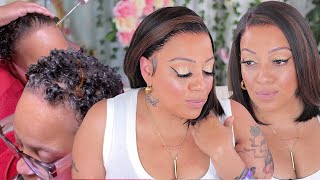
Hey everyone welcome back to my channel, i'm sorry mcqueen in today's video, i'm going to show you how i easily and quickly styled and customized my frontal bob courtesy of miss lula hair before we get to styling. This is how your wig will come. It comes in this cute packaging, with miss lula all over it's nice and pink, and it's cute, and it comes with this information card that lets. You know how you could get a free flat iron as well as twenty dollars off your next purchase. So that's really cool! So if you get this wig just make sure to check that out and it comes with this silk storage bag, which i really like. The wig is going to come in this protective plastic bag. Labeled 14 inches, letting you know the length it comes with this hair net over it and it has like the paper inside so it keeps its shape and yeah. The first thing i immediately noticed when taking this hair out is how soft the hair is and all of the protective lace which you know you could be more careful while you're cutting the hair - and i like that too - and it has lace in the back. It has three combs an adjustable, strap and yeah, so this is how it looks as soon as you put it on i'm just gon na adjust it to the side, because this is a side part bob. It is a brazilian straight hair and i have the length 14 inches so the way that it was packaged. You know it's going to like leave a little dents in it, but this hair is super soft and i like how it's not too full this wig was not super full packed with tracks, but it was like a nice natural density. So if you're into that, then this wig is definitely for you. So before i start, i'm just going to go ahead and cut the lace from the back off and go ahead and focus on the rest of the wig. So sometimes we got to fake it till we make it honey, and that means and not bleaching the knots. But instead i'm going to use my foundation with a beauty. Blender flip my wig inside out on my styrofoam wig head and just press that foundation into that parting space all over just so that it looks like i bleached the knots, but without all of the work. This is super easy and it's faster than bleaching the knots, because if you want to go and rock your wig that same day as soon as you receive it, you know nobody has time to you, can mix up some bleach apply it. This method is super easy and yeah takes no time at all. Literally so once i put my first layer of foundation, i'm going to spray it with some um hairspray and then i'm going to go back and spray that again with hairspray just so that it'll hold and it'll last longer and it won't transfer onto my scalp. While i'm wearing the wig, so here's the wig on the part looks way better now with that foundation method and i'm showing you the hairline, there's so much more, that could be done with this wig like you could make it super natural looking by going in making Some sideburns and stuff like that, but i skipped that today just because we wanted to do a quick little fix. So i went ahead and laid my edges down like the best way. I could because it is a little little big, but you can always secure that either with um got to be glued or pins. So i just adjusted the straps for this video, so i laid the edges down. So it looks a little more laid and yeah. That is honestly the end. It'S so easy, so simple and you can definitely try this and throw that wig right on so far with this hair. I am loving it. It'S super soft and go and get you one girl. You can use my coupon code to save money on your purchase. It is zarya 15 and yeah. I will see you in my next video


Comments
Talks with Mellow: Why do they put lace on the wigs if people just cut it off any way