Get Into The Slayyyfull Parting Space | 13X6 Straight Lace Wig| Ashimary Hair
- Posted on 10 March, 2023
- Closure Wig
- By Anonymous
●▬▬▬▬▬▬▬▬▬ ❤Ashimary Hair❤ ▬▬▬▬▬▬▬▬●
Shopping By Influencer, Get 25% $$ Off+ Exclusive gifts- lady bags ,Code:IA25
Hair Details: Ashimary 13x6 HD Full Lace Frontal Wigs HD Transparent Straight Hair Wig,28inch 250% density
Video hair Link➤https://st.ashimaryhair.com/3T96kpe
√Deep Parting Everywhere
√ New 3D Lace Shape-Fits Better
√ Crystal Swiss Lace -Melting Perfect
√ Small Knots-Bleached Well
HD & Transparent Lace Wigs:➤ https://st.ashimaryhair.com/3SIkXPQ
Color & Highlight Wig: ➤https://st.ashimaryhair.com/3J8gIKe
13x6 Full Lace Wig: ➤https://st.ashimaryhair.com/41J8Syf
Beginner Hairstyles With 4C Edges Hairline: ➤https://st.ashimaryhair.com/3kBqZ8B
Wear & Go Glueless Wig:➤https://st.ashimaryhair.com/3ENDJ2v
★Find Ashimary on Social:
Tiktok:https://st.ashimaryhair.com/3J5dwiB
Facebook: https://st.ashimaryhair.com/3J8h5V8
Instagram: https://st.ashimaryhair.com/3ETCrTX
Youtube:https://st.ashimaryhair.com/3mnMudy
E-mail: [email protected]
WhatsApp: +8613273746020 (Provide Wholesale)
Let’s Get into The Slay Beauties
Are You looking or Booking ⁉️
Click link the bio/below to Book✨
Www.iBhslays.com✨
Products ALWAYS Used from @thebhslay
For Installation tutorials Subscribe to IambeautifulhustlerTv on YouTube ✨
Celebrity Clients | Bridal Parties
Email : [email protected]
Contact Number: (786)571-1313✨
#explore #explorepage #trending #reels #miamihairstylist #miamihair #miami #lahairstylist #houstonhairstylist #browardhairstylist #wiginstall #lacewigs #calihairstylist #calihair #atlhairstylist #atlhair #frontal #closure #closureinstall #fulllacewig #fulllace #miamibeach #Atlanta #tapeins #naturalhair #iambeautifulhustlertv #Beautifulhustler #thebhslay
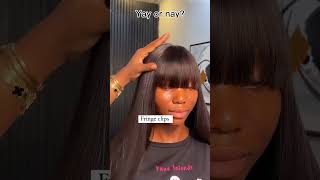
Thank you, hey Beauties and welcome back to I'm beautiful Hustler TV, and if you are new to my channel, then welcome, don't forget to like comment subscribe and turn on your notification Bells. Now. Today we are back with another install and this video is so raw. You guys, I know you're going to love it, so we're going to jump straight into it now, for starters, this week is provided by Ashley, Mary hair. They sent me this bomb 28 inch straight wig, 250 intensity, guys and when I tell y'all it is 13x6 full parting space like oh, my gosh y'all know. I love me a wig with some parting space and I absolutely love this wig, because I have full creativity with the styling because of How Deep The Parting goes from ear to ear and also in this packaging. They did give me some goodies. They gave me a little hot curler, the little tiny one that I use to like curl the edges or, like tiny wand curls. They gave me some caps Edge brushes. You know All the Basic Essentials you need for your wig install, so we got ta appreciate them for day as well, but jumping straight into this later day. Y'All know I will be using today. Y'All see my gym, my cousin Genesis, um, you know it's here in Miami, so y'all know before she we never should come down. We got ta give her a sleep period before she go home, so um we will be doing this lace-week install, which is basically like a bus down the middle to ponytails, where the two little bangs in the front love it. The hair was so sleek and it was just giving everything it was supposed to give it more as you've seen from those small little clip in the beginning of this video, but jumping straight into the sleigh. You guys I'm gon na go ahead and start by adding that Foundation. Ruby kisses, I use palette number 14, but I will be using that level 15 palette later on down the line in this install. But for now what we're gon na do is just go ahead and cut off the extra lace from around the ears and some of the extra lace from around the top. Because you know it was a lot of lace in the front um. But once we get that cut off um, you know and everything that needs to go goes. I will be using four layers of my strawberry, sensitive adhesive and I just want to let y'all know y'all. The big restock is coming on March 14th, which is my birthday. Okay, shout out to all my Pisces out there if you're a Pisces, just drop in the comments, let me say yo shout out to all my places out there. Yes, y'all, I will be doing a restock the first week stock on all glue sizes will be on my birthday, which is March 14th and then the second restock which will be um. You know, which will be a few days later for the wax sticks skin. Protecting all of that - and you know moose and more so make sure you guys stay tuned for that as well, so the only way to stay notified guys. Please turn on your notifications. Okay, because that's the only way you're gon na keep up with the updates, but nevertheless, let's go ahead and get into adding these layers of blue. Like I mentioned, I am using my strawberry scented adhesive and I will be using four layers today for Genesis and also with the restock. We are restocking, our strawberry scented in original scented and all bottle sizes from mini to Mega. So don't say I can tell y'all. Also, I have to melt belts as well, y'all know the Vibes and then, like I said we will have that second restock, so make sure you guys um go to my website www.ibhslaze.com, as in I beautiful Hustler slays.com and you know, have get your little subscription subscribe To the site, so you don't miss out on the details when I send my mass emails out for the restock but um. Nevertheless we're gon na add four layers of this adhesive and once I have all my layers, my layers applied. We will go ahead and begin to melt the wig on down. So once again I did use four layers so once the layers start to turn clear, you could go ahead and begin to add your next layer. So after that, fourth one we be getting a melting process started and just get ready for the sleigh, so I hope you guys enjoyed this video stay tuned because I promise you'll love it foreign. So now that I have all of my layers applied, I like to start from the center first and work my way onto the sides, and you just want to be very careful of where you're, placing that lace and once you have that lace placed exactly where you Needed to go, you can go ahead and push it down and start to. You know comb that lace on end and you do want to have them hold down the sides, as you place the wig into place, and you know kind of like pre-melt, that wig um the wig in and then repeat the same steps to the other side. Now it's very important that you're a client that you're working on or, if you're doing it on yourself, it's a little bit harder, but as far as working with a client make sure they hold that lace firm into place just to make sure the wig is laying Flat, it's not Rippling or anything and that you can achieve the best flat um. You know undetectable results and I like to take my blow dryer and I blow dry on the heat setting um a lot of people. Ask me why don't I use cool um, you can it's always a preference, but for me personally y'all I just felt like when I heat that glue up with that lace. It just really helps it melt better and that's why I also go in with my hot comb. After doing this step and hot comb, the edges of the wig back as well, just allowing more of that heat to just really seep through the lace and just kind of like heat, the glue up to really give the best melting results. But once I'm done pressing that lace in I will go up, you know go in, of course, with my melt belt and tie down my melt belt to the hairline and let that sit for about five minutes and then, while that Mel belt was sitting, I did Go ahead and press out the hair, you know kind of like pre-press it so when, after I finish like The Styling, it's not much to press it'll be like you know, for the most part, pretty much done, but now it's time to go in and cut off That extra lace. So I start by slitting the middle of the wig down the middle and just going in with a nice fresh, eyebrow razor and I'm going to razor that extra lace off across the hairline and then go back in with my glue and then tack down any little Places that may need to be tacked down. Thank you, foreign foreign, foreign cut off and everything tagged down. The first thing I'm going to do is start by parting, the wig down the center and guys for today's install, let's just trust the process. Okay, I know right now: um the foundation is looking lighter than her skin tone, but you know we still have to do our second melting step process and also I will go back in with uh the darker palette, which is the level 15 and then tap the Darker foundation in that palette, across the lace - and this is a prime example when I tell you guys - sometimes their exact skin tone May blend the wig or sometimes depending on the lace, the color of the lace itself. You might have to go in with the darkest a darker shade to get your Perfect Blend and that's all it is in this case so um like I said it might look a little lighter now, but once we go in with that level, 15 and tap it Across the hairline, you guys are going to see The Perfect Blend, the perfect male, and I will give you some up close and personal shots at you know towards the end of this video, but the base um outline of this style is a part down the middle. So we're going to start by you know, but some uh Jin almost said sorry y'all, busting gin down the middle and then I'm gon na start pulling out my sections for her two bangs. Basically, um, you know just to like have Circle sections on each side of the head, and I just like to Plat it out the way and I just kind of carve it a little bit um. You know just to give it a nice little clean little round. Look or whatever so everything that I'm doing on one side, I'm going to repeat to the other side. So once I get both things sections out of the way - and I put it out the way - then I would start pulling down the section for the baby hairs and then pre-styling uh, the two ponytails that we're gon na do for this look so um. I am going to um after this go ahead and work on pulling down my Sideburn area on this right side of her head um, because we're getting ready to do the ponytails and stuff before tying down that meltbook um that melt belt. For that. Second time. So put on your Sideburn area pluck out hair if needed, you can do it before or after you spray it down with the Melt belt. Your preference either way, you know just get it done, and then I'm also going to put down a baby hair in that Temple area as well, and then we're gon na get into to parting out the section for the ponytail and sleeking that area out and if You'Re, a true beauty, then you know when it comes to my styling techniques, to make everything as symmetrical and as clean and as neat as possible. I like to pre-style everything um before doing my final touches, so everything you do from this point on out be neat and be sleek, and that just makes everything so much more easier when you're trying to finish off the style. So once I finish, uh platting out the temple baby hair out the way I will start making my hair um sections for the ponytail, the part that I'm going to leave down and just make sure I have every section clean and neat by parting hair in the Um places to cover up tracks all of that using the wax sticks leaking things down just getting everything nice and prepared before we tie it down with that melt belt once again, so just take your time, make everything neat and make everything sleek and then make sure Whole styling process so much easier foreign and of course, you guys, you know it's very important to cover the track so make sure you do that little horizontal part across the back and you're combing, the hair um, where the tracks are straight back. So everything is nice and neat in a section, and then I I'm also using um my Glam wax to get everything super Sleek, because neatness and sleekness is the key to a raw install Okay. So, oh that thing ain't even finished yet, and it's just giving already. So now we're going to take that wet, stick and applied around that ponytail area. I'M going to have Genesis, hold that bang piece out the way um. So everything is nice and clean and then add that wax thick hot comb, it up add a little holding spray and create the ponytail make sure it's super sleek and then I repeat, the same exact steps to the other side of her head. All right foreign foreign foreign do y'all see it is giving already so now we're gon na go ahead and repeat the same steps on the other side, pulling down the baby hairs parting, it off um sleeking it with the wax thick hot combing, sectioning and, of course, Ponytailing, the other part, then we would go back in with that Foundation, spray that hairline with that even spray and tie it down once again with that melt belt for our second step in our melting process, all right, thank you and we're just getting up close and Personal y'all see me just hop calming sleek and hot comb and sleeking and Bam whoa. That ponytails is given. If you don't believe me, then you are here, come on Beauties y'all make sure y'all send some love down in the comments send some thumbs up. Y'All know we need the support, push the algorithm, so people could see this lace, okay and you know improve their installs, whether they doing it on themselves or their clients. Like help a friend help a friend help a friend or help with beauty help a beauty, help a beauty, potential Beauty period. So y'all already know when I spray my holding spray, I go in with the comb or the rat tail comb Edge brush whatever, and I just comb everything down in the direction that I wanted to flow just to make sure it's super super super super neat because Needing this is key, don't mind me y'all. I look like a goddamn fried something I just look terrible, but don't worry about me. Um y'all know imma get me together, um rough night, but nevertheless, let's get back to the slang. So I went ahead and tied that melt belt down. So what I'm gon na do is just let that go ahead and dry completely, and I'm just going to take the hot comb. How calm that little bang area, so it's nice and flat, and then we're going to remove that mail belt and get into cutting the bangs bumping them lightly on the ends um, this style gives me very much like Spice Girl in a way like I just you Know I just love to do. Creative looks like I know, every person when it comes to the hair game, they have their Niche, their theme um and I would say my thing is just my creativity with the styling, like I don't like to just do the Basic Metal Parts basic side Parts like I like to give a look, I like to give inspiration like I love when I see people recreate my looks and they kill it like that's that's what I love like. I want to bring the creativity to YouTube because everybody about almost everybody on you know YouTube know how to install a lace very well, but you know I like to bring the creativity bring the spunk bring the fun because, honestly, on a viewer, hair stylist. If you know you know, we get tired and bored of the same looks over and over and over just think about it. It'S the same wigs over and over and over and barely you know, people like to spice things up. So that's why I like to bring y'all the nice cute funky spicy Styles like this, you know, give it a little Edge. You know so. I'Ve had so much fun. Creating this look, and especially because once again y'all this is a 13 by six and y'all know. These companies is not giving us no 13x6, but thank you Asha Mary for finally giving the girls what they need part in space. So big shout out to Ashley Mary make sure you guys do check out the description details down below, because if you ain't want no other wig baby, you need this wig. First of all, it's super silky super full and The Parting space, and, did I say The Parting space come on now: y'all stop playing with Ashley Mary. They getting the girls together, okay. So what we're doing now is just Sleek in the bang, cutting and making sure they're even bumping the ends just slightly remember, y'all know how you feel about the grandma curls, not the hard bump. Okay, soft little Tender Touch on the ends to just give it that nice little girly effect. Okay, so once we get those bangs under control, I will show you guys how I created the baby hairs very simple. You know nothing too fast, see how I do my typical typical, my two little size, soups or whatever. So I'm going to be cut and curling and swooping the baby hairs, and I'm going to show you that whole process on one side and we're going to do the other side off camera and the holding spray that I have been using recently y'all other than the Even spray has been the uh Sebastian's shaper spray love it 10 out of 10. 10 out of 10, absolutely love it, and I've been using that as well with my even spray lately, and it's just doing what it's supposed to do and um. If you don't have like a beauty, supply store that sell it Amazon y'all know I'm a big amazon Shopper. You can get that thing right on Amazon, okay, but let's go ahead and get it to these baby hairs. I'M going to start by coming out the Sideburn. I'M going to you know, pluck a little bit if necessary, chop it down curl it with my Edge curler and using my holding spray swoop, the baby hairs very simple, very cute, very fluffy looking and I'm going to do the same thing to my Sideburn baby hair. As well foreign foreign thank you, foreign and the baby hair is complete on both sides. So now we're going to go ahead and do our finishing touches now usually y'all know I do the rubber the wrap around method around my ponytail, but I wanted to keep the rubber band showing with today's install like I've been seeing. People do like the two ponytail looks without doing a whole wrap around method and it's actually been cute. So I decided to keep the rubber bands showing today, but if you prefer, you can go ahead and do the wrap around method um around your rubber band, to make it more seamless, um and you know the transition from rubber band to hair. But you know I always usually do that, but today I just actually like the rubber band look like with the rubber band show, and I thought it was actually really. You know sponge, so I kept it, but to top this off even more and just really give it that pop we're going to conceal the part in Black spread to get that perfect straight parting. So you want to go ahead and use the same Foundation or concealer um, that's closest to their skin tone applied in a part and just lay your rat tail comb. Oh y'all seen that crispy part right in the park because when you first add a concealer, it is going to widen it up. But then, when you do go in with that black spray, you lay that tail comb very gently being careful not to get it on the front of that lace. It will clean that parting up and give it the sharpest line. You'Ve ever seen in your life. Okay and we love a clean shop line where we have our straight Parts. You know curved Parts. You got to be a little more gentle, but when your straight Parts baby make them straight, and I just took a little bit, uh Sebastian's, holding spray and spreading on our parting areas just make sure it locks in that uh, black spray, color and then we're gon Na comb and touch up with the flat iron and need it be in certain areas, so just finish off that sleekness and stay tuned for the finished look foreign. Let'S talk about a new scalp period and that's how they go get into the sleigh come on. I dropped the Flames, the heart eyes, Beauties, show, love and appreciation to the channel. After all, it's free, it's free to show love, it's free to leave a thumbs. It'S free to share it. It'S free to comment so show love. Let'S push this algorithm and show the Beauties and the new potential Beauties, who really the Queen of this YouTube stuff are real for real y'all know I bring the Vibes, I bring, looks okay and that's on period 28 inches and do y'all see how full this wig Is - and it looks so much longer than 28, we love a wig that give more okay. So thank you guys for watching. I hope you enjoyed this. Video Genesis is Lay okay, so show some love. Thank y'all. I appreciate all y'all for tuning in and watching. Don'T forget to like comment and subscribe period, see you later Beauties, bye,


Comments
#MadeInDesignzSlay: Happy Birthday!! this slay was giving #AsAlways
Kemo Bennett: Am loving every bit of the style
Ashimary Hair: wonderful style for spring
CiCi La’Beth: You did that ❤
Michelle C: Looks good and her lashes are fye
Tenisha Stair Praise God: Pigtails looks cute!
Ashimary Hair: amazing job
Unathi Dlamini: May you please do a spikey bun with the same bangs as these tutorial
Carmen Carma: Let’s FCKING GOOOOOOOO Stop playing with SHAE PERIOD❤
Shell Shell Beyond Beauty: 03/01 yoooooooo happy early birthday Shae. Love ya boo.
Sammy Da Goat:
YeaShebomb Kee: 3/13 #TeamPisces
2bajohnson:
O'Shea Brown:
stephine brown: ❤️❤️❤️❤️
Frankela Blizzard:
Kacey Cook: Big Pisces SZN 3.16
V_III: YURRR BIG PISCES‼️♓️
Kasion B: Pisces all the way
Shanniel Dawson: Yoooooooooo My birthday was Tuesday
The Black Harley Quinn: Pisces gang