How To Customize A Closure Wig| Bleaching Knots + Plucking + Styling | Its Queenkay
- Posted on 02 June, 2021
- Closure Wig
- By Anonymous
Hey Kaybabes! ✨ In today’s video, learn and watch how I customize my wig units.. bleaching knots, plucking, and styling.
Thank you for watching! If you liked this video, be sure to give it a thumbs up and subscribe for more✨
Follow all of my Social Media:
Instagram: @__kaykayb__ ( https://www.instagram.com/__kaykayb__/... )
Snapchat: @kaykaybillups
Twitter: @kaykaybillups ( https://mobile.twitter.com/kaykaybillu... )
TikTok: @kaylabillups22 ( https://vm.tiktok.com/ZMeTC4Nsg/ )
_____________________________________________
I DO NOT OWN COPYRIGHTS TO THE MUSIC IN THIS VIDEO , ALL RIGHTS BELONG TO THE OWNERS
*WATCH IN HD*
PSA❗️: I am a Klaiyi Hair promoter!
Visit their official website ( https://www.klaiyihair.com ) to get possible discounts!!
Use my referral link to receive a discount on your order: https://www.klaiyihair.com/?rfsn=43585...
____________________________________________
If you would like to collaborate with me or want me to promote any product, email my business email below: ⬇️
Business email: [email protected]
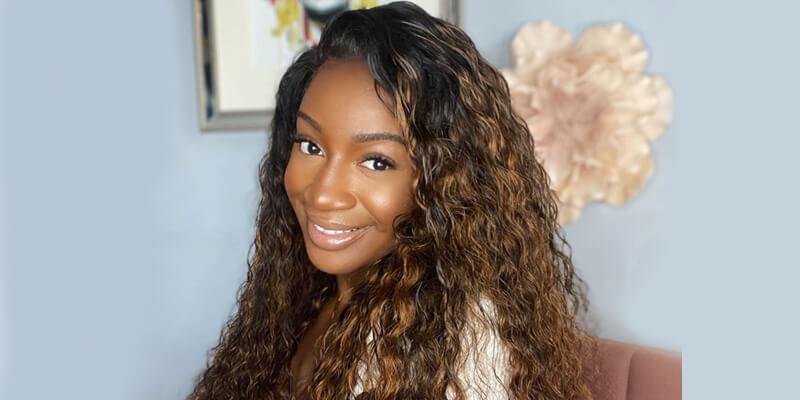
What'S up my k, babes, it's your girl, queen k and i'm finally back with another video in today's video. You guys i'm going to be showing you all how i personally bleach my closure units and how i customize it so how i pluck and how i style and how i prep my wig before installation. This video is going to be especially for beginners, because i'm still a beginner myself. So why not make a video that we all can relate to period if you're interested? And you obviously are because you clicked on the video please make sure to like comment and subscribe and we're going to go ahead and jump into this video all right. You guys so first things. First, i'm going to go over what all you would need in order to properly bleach and customize your wig unit or, let's just say you have a frontal or closure, i'm just going to go over the few little items that you will need. So i know this looks crazy right now, but first you're going to need a wig stand and, as you can see, i got my right here and you're gon na need a canvas head. I got mine wrapped up just because, but you would need one of these uh firm canvas head just to work on excuse the needle and thread this is for when i make wigs, but you will need t-pins, i don't know if you can see it excuse. My nails y'all need to fill in, but you will need tea pans in order to keep the lace or the wig in place um. I usually use about two, especially since i'm doing a closure unit today, i'm just going to use two so bleaching materials. First of all, you need a face mask this. Is a dingy old face mask y'all, but i'm using it because the smell of the bleach be so strong. You'Re gon na need at least something or in a room with ventilation, use the clairol um 30 volume developer, because i'm not too fond of using 40 volume developer. Yet because i'm not that comfortable with it, but i use study volume developer. I use the clairol bw2 bleach and i use these two spatulas, depending on the size of the closure and, of course, a mixing bowl, a couple of other items i use - or i you should have when you're wanting to customize and bleach your wig units or your Closures or frontals is got to be spray and i'm going to use got to be spray to keep the um i'm going to spray the hairline before i begin bleaching the nut so that all the hairs could be out of the way, because if you don't do That step you're going to end up bleaching a couple strands of hair on your wig or your closure, and then you're going to have some black hair, some bleach knots and then some bleach strands of hair. And we don't really want the strands of hair to be bleached. We want just the knots on the closure, so you'll spray, this on your hairline or just keep the hair out of the way i got my little spray bottle just to spray the hairline. When i do get ready to um spray it with the gopher spray and then just a comb or brush whichever one you prefer um, i really don't know which one i'm gon na use, but i got both just in case so now that i showed you guys Everything that you will need in order to bleach your knots and customize your wig units or your pieces, individual pieces, um we're gon na go ahead and jump into this video and i'm not gon na be talking the whole video. It'S mainly gon na be a voice over, but let's go ahead and jump to the video in today's how-to video, i'm gon na be working on a wig that i purchased from clay hair um. This unit is a 4x4 closure unit and it's 14 inches and what came in the package, of course it has a cute wig bag to protect it and keep it in and store it in the wig itself, a headband and some new wig caps. So i'm going to begin by unpackaging, the wig from the packaging and i'm going to take the wig out of the bag, and when i was looking at it y'all, i realized that the wig is so thick and full like just feeling it after it's coming out. The packaging and the lace protectant y'all this wig is so full and luscious. I promise you there's no doubt about it, but now i'm fixing to go ahead and show you guys three combs and the lace of the wig and then i'm gon na get ready to run my fingers through it and y'all. It is so soft, like very, very soft, so now i'm going to put it and secure it onto the wig head, using my two tpins that i mentioned earlier, and i'm just going to get it ready for when i get ready to comb the hairs back before We start the bleaching process now i'm grabbing my got7 spray and my comb and i'm just going to spray the hairline of the wig, and now i'm going to simply just comb the hairs back so that all the hair can be out of the way. When i get ready to bleach the lace next, i'm going to go ahead and flip the unit over and put it on the weekend so that i can get ready to bleach the knots and you just want to make sure all the hairs are pushed out of The way so now you got something preparing my bleaching mixture, i'm going to apply a face mask because it's a very strong aroma, so you don't want to just sit there and hail all that put at least a face mask on when you're doing this or be In the room with good ventilation, but as you guys see, i'm scooping or finishing ready to scoop um one scoop of the bw2 bleaching powder and add it to my mixing bowl. Next, i'm going to take my 30 volume developer and i'm going to add only a half a scoop of developer to the bleaching powder mix. This is going to give you the precise amount for the closure, as well as the best consistency um. You want it to be a toupee consistency, so that it won't seep through the lace and the knots and get onto the actual hair. So, as you guys can see if it's toothpaste, consistency and it doesn't fall off the spatula you're good after you prepare your mixture, it's now time to begin bleaching, your knots. So, as you guys can see, i am lightly and when i say lightly, i'm emphasizing lightly tapping the brush onto the lace. If you press down too hard, the bleach can still seep through the knots of the lace and get onto your hair. You do not want that, so it's best to always just lightly tap and press the brush onto the lace and smear it on to your lace, closure or your frontal, whichever one you are customizing in that moment, um as you guys can see i'll go all the Way down to the hairline - and you just want to make sure you cover every area as precise as possible. Um, i probably cut the clip out, but i did go back over this layer just to make sure i put enough bleach, uh product on lace and so yeah. You start from the back and then go to the front, because you want the back to process faster than the front of the closure, and here i am just showing you guys, the final product, because i used 30 volume developer. I let the bleach sit for 15 minutes after the 15 minutes were over with i began to wash the unit. You want to make sure that you get all of the bleach off of the lace closure so that it won't continue processing. Thus, you also want to make sure you do not get any of the bleach in the hair and, if you do, please take the precautions of washing it out thoroughly, combing it and etc. Next, i'm going to take my shimmer lights, purple shampoo, so that i can tone down the brassiness or either the yellowness or orangeness of the knots after bleaching um. I apply a lot and i rub it in and let it sit for about 5 minutes after rinsing out the like shampoo, i'm going to apply my ogx argan oil off my rocco shampoo and you just want to um thoroughly lather the hair, the closure, everything you Want to lather real good and you're ready to just wash it as normal. After this, i applied the same um ogx, argan oil, morocco conditioner, and i let that sit for about five minutes and you just continue with your normal, washing routine, all right y'all. So, as y'all kiss as y'all saw in the previous clip, i was just trying to blow dry the unit just to speed up the drying process. Um, it's not all the way dry, as y'all probably can tell just by the texture of the hair. It'S still a little damp, but for the most part i kind of you know sped up the drying process. Let'S just get into these knots y'all, i don't know if y'all can see it, i'm gon na bring it up. Like can y'all see that, like, let's just get into the color of the knives, look at that hairline y'all and i did not pluck this yet you know i was gon na plug and show you guys how i pluck in this video as well. But when i was watching it and when i was bleaching it i realized i said yo. This is pretty much a pre-plucked unit y'all. I know um at the hairline. I still have some. You know black knots, but look at the parts you can see. That is bleach, i mean it. Um yeah it bleached really well y'all like really well, and i left it on for 15 minutes um and i use 30 volume developer. If you saw previously earlier on in the video, i used sterling dirty volume developer and i left it on for 15 minutes and it actually it pretty much. Did it perfectly in my opinion, like i said before, i'm going gon na reiterate, i have not plucked it. Yet this is like a pre-plug unit um and it looks pretty damn good for it to be pre-plucked, but i'm gon na probably go in and touch up where i want my part because i'm gon na clean up this part as well. I just want to part it for the sake of me trying to blow dry it. So yes, y'all get into it. This hair is so freaking soft, like it's so soft. I um washed out the bleach, of course, on the lace. Then i applied my shimmer light. Shampoo, as you all saw in the previous clip, and then i washed my hair with my shampoo on my conditioner, and it is so soft and it was luxuriously soft before i even you know, bleached it y'all straight out of the pack. It was so soft and luscious and it moved so freely and the lace i thought it was supposed to be light brown, but baby this looks transparent to me. I think it's probably like a light, medium brown, but it really looks transparent. I'M going to go ahead and let it finish drying and then, when we, when it finished drying, i will come back and let you guys see any customization. I do um, since this is this wig or this unit. It'S for my birthday photo shoot this saturday um. I'M probably not going to install it until like friday night, so i am going to record a video for you all of me installing it um. This is a new method that i learned just from doing some research and learning and watching other youtubers um. So i'm going to install it for you guys, friday night and then yeah you guys will be able to see, and i also might shoot a little video for behind the scenes of me getting ready for my own birthday photo shoot. But yes, you guys so i'm gon na, let her finish drying and air dry and then i will get back with you all when she's dry and we will see how i will customize it i'll catch. You guys in a little bit, what's up k babe. So it's been actually about two days. I think, since the last time i recorded um some content for y'all. I was in the works of customizing and plucking the stuff off my wig for my birthday photo shoot um. So i already did the plug-in portion. I just haven't: did the customization like uh, the hot combing and styling and stuff, but i decided i'm gon na go ahead and do that for y'all, real quick today stay tuned and watch me customize, my wing, okay, guys so, first off before i start anything, i Took my cream of nature, argan oil heat protector and smooth and i'm applying it all throughout the hair, and then right here you guys will see me just getting rid of the hot comb in the hairline back and just hot comb on the hairline, the other side. Hairline and my part next, i'm just showing you guys the hairline and showing you guys, my part and how it looks and i'm going to fix up that part of using my wrap tail comb and just make sure it's neat and straight as much as it can Be foreign, so once i got my part the way i wanted it and comment, though the most that i could i'm going to take my curling iron and begin to style, my hair. I wanted to go for some fluffy um curls, not too tight, but like midway type, so i decided to curling iron, my hair and curl my hair and, as you can see, i'm going to curl this texture by section and then before i started, i parted out My baby hairs and hot comb them as well, so one technique that i learned when curling hair is that you always want to clench the hair after you release them for the curling iron. I learned that this helps your curl, keep it some form and it helps it lasts longer. So, as you guys will see, as i section and curl each section once i get done, i immediately clinch the curl just to keep its form and texture and now move on to the next, and i'm just going to do this for the whole wig uh. I also forgot to mention earlier that i was adding on my heat protector to each section that i did curl up and i did curl just to make sure you know it's keeping the hair healthy as possible, although i am applying heat to it. So once i got done curling the whole entire wig i went through and ran my fingers through each and every curl just to make i mean just to loosen them up. Like i mentioned earlier, and i wanted some semi-tight curls, nothing too tight. Nothing too. You know strict, i wanted to have some fluff and bounce to it. So that's why i ran my fingers through it: okay babe. So after i got done running my fingers through my curls, i apply just a little bit of got to be free spray, so it can hold its texture and form and also apply flexi rods that night and then right here you guys could see me just creating A little bang or bump effect near my part, because i wanted to give it a little um volume so yeah. This is what i did once i got some curly hair, okay babes. So, as you guys can see, i finally finished styling my wig unit. It'S a 4x4 closure, 14 inch body wave unit from clay hair, and i mentioned that earlier in the video when i was giving you guys details on the hair, but just look at these curves. They are so cute and like i want to get a more defined curl through here, but other than that these curls are beautiful and they're holding really well. When i was hot combing it flat on it or curling, it section it out, and i applied a little bit of my cream of nature, heat protector and smooth and polisher smooth and shine polish it and it works really. Well, i only literally like put it out like this much a little bit more, maybe a little bit more hot comb, the part - and i still need to give me either a wax stick or some mousse to uh, get it flatter than what it is right now. I forgot to get at the hair store when i went today, but i basically parted hot comb, the part in the surrounding areas. I hot combed and parted out my baby hairs that i expect to do when i install it tomorrow and then i curled it and then i flat ironed the top part right here. So you get a little bit of a bump. You know show off that. Um neat and fluffed hairline period, so this is overall a great video. You guys um, it's been a long video and if you guys have stuck around to the end. Thank you so much um. If you love these types of videos where i bleach and customize wig units or closures or frontals, let me know in the comments drop it down below in the comments that you guys want some more content like this, like i promised earlier on in the video, i Am going to do a installation video tomorrow night, so stay tuned for that when i upload that and i'm gon na try my best to do it behind the scenes getting ready with me for my photo shoot saturday. It just depends because i feel like i'm gon na, be running around with a chick like a chicken with a head cut off. I feel like i'm gon na be stressing, but it's all in guys hands. I'M excited. I am going to be doing a video on how to make a closure wig, because i am going to actually make me a body wave wig from scratch, um for my actual birthday trip to panama city beach. Once again, thank you guys for watching. If you love the content of this video, you love hair content. You love how to videos drop it down in the comments. Um. Just remember to do that. Remember to give me a big thumbs up and hit that subscribe button. If you love my content and my video get you guys in this video bye babes, you


Comments
JOEY T: The bigger the more softer the thrust