*Easy* Step-By-Step Wig Install (Plucking, Bleaching Knots, Styling) Ft Bgmgirl Hair
- Posted on 10 February, 2021
- Closure Wig
- By Anonymous
Welcome Back #KashBabies Join me & SUBSCRIBE on the #Roadto400k
Use My Special Code Get Extra $8 OFF: kashiajabre
The Hair I’m Wearing:https://bit.ly/3nXbwLt
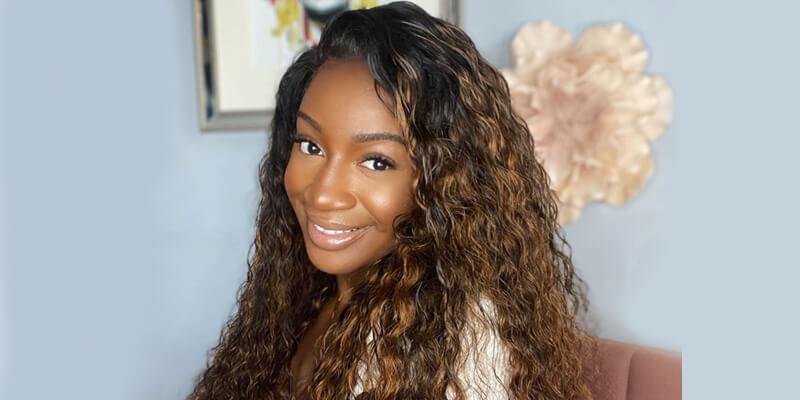
180% Density Brazilian Body Wave 24inch 13*4 Lace Front Wig
Valentine’s Day Sale Salyyy ALL 50% OFF!!!
Don't Miss IT!!!
My other videos with Bgmgirl Bob Wigs: https://bit.ly/3aTMnwu
Other Deals For Brazilian Body Wave:
4*4 Lace Closure Wig: https://bit.ly/2Kr0G2E
Bob 13*4 Lace Front Wig: https://bit.ly/2XV4nRe
T part Wig: https://bit.ly/3nZl5JX
Headband Wig: https://bit.ly/2KqYeZZ
Bundles With Closure: https://bit.ly/2M7p1Le
Contact Us:
Email: [email protected] (Wholesale Provide )
Imessage/whatsapp: +8616696806669
●▬▬▬●Bgmgirl Hair--Black Girl Magic●▬▬▬●
Share Picture for Ca$$$H Back!
IG@bgmgirlhair: https://www.instagram.com/bgmgirlhair/...
FB@bgmgirlhair:https://www.facebook.com/bgmgirlhair/
YTB@Bgmgirl Hair: https://bit.ly/3g99cht
Connect with Me:
My Instagram: https://www.instagram.com/kashiajabre/...
Twitter: https://twitter.com/KashiaJabre
Snapchat: @kashhbabyy
SHOP SPOILED CO. kashiajabre.com
Business Inquiries:
Age: 18
Camera: Canon Powershot
Current Subscriber Count:
368,654
Life without you been feeling kind of strange. Well, i see that you doing very well, you looking very well. I miss the way your perfumes smell. I miss the way that you blow up my line just to make sure that i'm feeling well welcome. Back to my channel. I am casey jabrie and today i'm going to be showing you guys how i install this hair from bgm girl hair. It is so bomb y'all like so bomb, i'm going to be showing you guys how i did it from start to finish how i bleached the knots, how i plucked it, how i installed it everything girl. So if you are interested in that, make sure that you just continue watching this video and also make sure that you thumbs up the video up and also comment down below and tell what you guys want to see next and also subscribe to my channel. Because my cashback is lit, i'm lit and if you subscribe then you can be linked to in that song period. Okay, so let's just hop right into this video okay. So i'm going to be doing a mini unboxing for you guys. So when you first open up the box, you can see the hair is in there super neat, but we're going to get into that a little bit later. They also sent me two wig caps, some mink lashes and also a little pamphlet, which was so cute on the inside um. It also had a coat on there, so if you guys want to use that go ahead, but let's get into this hair, so they sent me a 24 inch body wave unit. This is brazilian hair and it was also 180 density. But look at this y'all. Like look at the girl, it looks so freaking cute and bomb like if i actually wore my body wave units wet, they would be bomb, but i like to curl them for some reason: anyways um, they sent me transparent lace, i believe um, and it appears to Be pre-plugged, i believe this unit was a 13 by four um, i'm not sure, but check in the description box for everything everything is going to be there and it's going to be correct. But now, let's get into how i bleach my knot, so i use the clairol bw2 powder lightener, which is just a powder bleach and i use a 30 volume developer. I got both of these from my local beauty supply store, but you can go to sally's um. I know walmart sometimes have the small packs of bleach, but they don't ever have the big one. So i suggest you go to like a normal beauty, supply store or sally's, or something like that. Anyways, i'm using one and a half scoops of this bleach and i'm also just going to be eyeing it y'all. I don't measure anything because i've been doing this for such a long time, but if this is your first time, then you might want to use measurements. I don't know the private measurements. You did not come to the right place for that, but i will show you guys how i get the perfect consistency every single time. So i use one and a half scoops of that and then i add how much um developer. I put in and then i just start stirring it slowly, because if you stir, if you try to start as fast, it's gon na like hop out the bowl, because the powder is so fine. So you got to be really really careful with this. Also guys also awesome awesome if you are doing this for the first time, wear gloves, because i heard that you can get burned by this stuff. I'Ve actually never been burned, but i don't want you guys to hurt yourself. So please just use gloves if this is your first time um, so the consistency that i'm going for is going to be like a toothpaste, consistency. I know you guys have probably heard that before, but i promise you guys it would never ever steer you wrong. Um. Every time i go for this consistency, i never had over bleaching um, so yeah just look for that thick um paste like a toothpaste, i kind of know it by. If i like pick up the the brush and some drop. I know that it's not thick enough because toothpaste is thick so um, it's it's! Okay, if you don't get it on the first. Try you can add a little bit more bleach. You guys are gon na see me do that as well, because i don't have it perfect all the time. So i add a little bit of bleach if the consistency isn't right and then eventually it's perfect. So that is how i prepare my bleach and, as you guys can see, it is not falling off that brush. So that's how i know when it's like literally perfect okay, so i'm going to be showing you guys why i bleached knots. So if you look closely on the lace, you will see like little black dots, i'm going gon na push the mannequin forward, so you guys can see it, but that is basically where they loop the hair through the lace till i get it to stay. So it's it's completely normal. If your wig looks like this, it's completely normal. That is why we bleach the knots, because a lot of people actually don't know why um, it also makes the wig look a lot more natural. You can skip this step, but i prefer to bleach my knots every single time around, because it just makes the wig look like scalp, but, as you guys can see, i am putting the wig on the mannequin head backwards so that i can access the lace and I'M using some t-pins, i got these from my local beauty supply store as well um. I know that you can find them on amazon um. Basically, they just hold the wig in place while you're customizing it. So it's super duper helpful. So i'm going to just be putting for those all around the lace, just making sure that the wig does not move at all and then we're going to start the bleaching process. Okay, so now onto the bleaching process. So the main thing when it comes to bleaching the knots is basically you just want to bleach just the knots. So you don't want to use too much pressure on whatever you're using to put the bleach onto the lace, because it will push the bleach through and that's not what you want. You just want the knots literally just the knots to be bleached um. So i can't really explain to you guys how much pressure i use, but i'm doing it very lightly. I'M just gliding it over i'm using the very tips of this brush to even glide it on there, because i know that it's very easy to push it through. The lace - and that is not what you want at all, because it's a little bit it's a little bit of a test to try to fix over bleach knots. I'M not going to lie. It happens, but it's a test to fix it. So yeah you just don't want to be using too much pressure and also when i start to put the bleach over the hairline, i'm going to go a little bit over the hairline, because i don't want to miss any of those hairs, because that is what you're Going to see that's what is going to be in the forefront, so you just want to make sure that you have all of those hairs and yeah. That'S basically, it um just make sure you use a generous amount and you're not using too much pressure. Okay, now we're heading over to the sink um. I left that bleach on for about 30 minutes, and now i'm rinsing it off. I just like to get it all off of the lace guys, please make sure when you're doing this you're getting it all out, because it's been so many times that i have rinsed out the hair and i've installed and everything and realized that i left some bleach In there, so please make sure that you get all of the bleach out. I'M going to be using some shimmer light shampoo, it's just a purple shampoo! It'S going to erase any of that brassiness that came from bleaching, um the knots and just give it a more natural look. I put on a thick layer of this. I just leave it on there for about five minutes, and then i come back and i wash the wig like normal. You can use whatever shampoo you use for your hair. It doesn't really matter just make sure that you're cleaning the wig very well before you install it okay, so now i'm just going to be using a round brush in a blow dryer on high heat and i'm just going to be blow drying all of this hair. I like to work on dry hair because i feel like it helps me see what i'm doing more, rather than wet hair, because wet hair can transform into something completely different. So i just like to know what i'm looking at so yeah. That'S what i'm doing here. I'M not using any product, i'm just blow drying it. Okay, so in this video i'm going to just be showing you guys how i plucked the part, because the wig already came pre-plucked, so i kind of feel like it was cheating. If i showed you guys how i quote-unquote plug the hair, because it all half of the work was already done for me, so what i'm going to be showing you guys in this video is how i pluck the parts. So i learned this technique from someone. It was a woman um, she had a class and i really wanted to take it because her parts are always super duper straight um. So i'm going to teach you guys the technique that i learned. Of course, i'm not going to say her name, because i want sis to get her coin, but i'm going to be teaching you guys. So basically, if you look at the lace, it is a piece of fabric, so pieces of fabric have like lines where you know it was put together and lace has lines. So basically, it is the simplest thing ever, but you would never think to do it. If nobody ever told you to all you have to do is look at the lace, look really closely and pluck every hair that you see in that one straight line. I really hope that makes sense to you guys um, but if you see lace next time, you look at lace, you're, going to see the lines that i'm talking about, and it's going to. Click to you, in your mind, like oh, this is the. This is the lines that she was talking about, but basically all i do is i just go down in a straight line of the fabric and i pluck every piece of hair that is in that line and when i get done it is the most straightest perfect Part ever is not over plucked because you're literally plucking the smallest line, and it's just so perfect, so yeah, that's my little technique. Um, you guys will just see me doing that for the next few minutes and yeah, you guys will see how fabulous it looks in the end. Do you guys see how natural and perfect that line looks like it looks so pretty, but okay now we're moving on to my wig cap method. As you guys know, i wear two caps, so i put the first cap over my natural hair and i basically do that. Just because i use a lot of makeup - and you know i use glue when installing the wigs and it just protects my natural hair and then i'm going to be using this one. This is the one that i'm going to quote: unquote, melt and um. You guys have saw me: do this, a million and one time, so i'm not really going to be going step by step with you guys, but i will tell you guys everything that i'm doing so, i'm just going to be cutting ear holes after i cut the Ear hose i'm going to be using some got to be spray, and i'm also going to be using got to be in the black gel and i'm going to be putting that all over the lace. Well, not the lace. What am i talking about the cap and then i'm going to be blow drying it on low heat and cutting the lace and applying my color makeup? If that makes sense, so i hope you guys are following you guys will see it when i'm doing it um. It'S not all that complicated, but i do have a new technique for my caps, which is not in this part it's in the next part, but i'm going to show you guys so yeah we'll talk more when we get there my so this is what the wig Looks like when i first put it on um. I did try the widow's peak technique, but i did not get to show you guys, because i was literally watching someone else tutorial. While i was doing it, but it was basically like in the plucking part um next time when i get the hang of it, i'm going to show you guys. I don't like to show you guys when i'm trying stuff out because it'd be a mess but um yeah anyway, so i'm just basically adjusting the wig on where i want it to be um, seeing if everything looks good and then um you guys are going to See me pull the wig back and adjust the cap up underneath, because when you are putting on your wig cap, you don't really keep in mind the um, the hairline of the wig. So you have to go back in and really adjust that type of thing, and you see me like kind of trying to memorize where i need to cut with my fingers um. I do that. Sometimes i don't i've actually tried like drawing on the the hairline and that didn't work out for me because it left like residue and stuff on my hairline. I didn't like it um and it got super cakey. I didn't like that. So i just kind of like used my fingers and kind of scratched my head. So i remember when i pulled the wig back where to cut and i'm going to just cut all of that extra cap and then i'm going to put the wig back on my hair readjusting keep doing that. Basically, until i feel like it's perfect now, i'm just going to be going in with some ghost bond. You can get this from amazon um. Actually, some of these um i keep saying um, that's annoying um, and then i say it again like really okay, but somebody. Some of the hair stores up here in atlanta have goes by so maybe your local beauty supply store carries it. I know in my small little town it didn't, but yeah i normally just organize from amazon. This is the only glue i ever use. It'S never let your girl down, so i really like it and i'm just going all over the cap with that, and this is the technique that i'm telling you guys about. So what you want to do is you want to take the comb, and this is how you're going to quote unquote melt your cap you're, going to use the glue and you're kind of going to roll the comb so that you're pressing the cap downward on your Forehead that makes sense, so it's basically just going to ensure that the cap does not go nowhere. Like it's literally going to melt the cap up underneath the wig. You won't be able to see it because it's going to be glued down to your head literally so yeah, that's the new. You know, cap method that i've been using and it works like a charm. So this next step is optional um. If one layer of glue is good for you, then that's just what you'll do, but your girl over here be needing two layers of glue because i sweat a lot. I shower without a scarf um yeah, so i've been going crazy over here, so i'll be having to use two layers of glue now and i'm just going to be basically just spreading that out um when you're applying this wig glue. You just want to make sure everything is smooth. You don't want chunks of glue because once it dries it's going to be really hard to get out and you're going to be able to see underneath your wig so just make sure that you're just smoothing it um. I was using this comb, but it's better if you use like a popsicle stick or something with a smooth and flat surface, so that you can like really get an even amount on every area, but yeah i have one. So i just was using a comb and then i'm just taking some alcohol and going over my face and just getting all the excess glue off, because you don't want all of that on your face, especially when you're about to lay down this wig because it like. Stick: the lace that you don't want on your face on your face, like you, don't want that so anyways, i'm going in with the same powder that i use for my cap and i put that all over the lace and i'm positioning the wig to place it Down on my head and um, once i place it down how i kind of get it to stay, is i take a comb and then i take the blow dryer on cool heat, and i just press it down if that makes sense, so i just make sure The lace is close to my skin and this helps the drying process a lot, because sometimes after a while the wig glue, if you don't properly dry the wig glue, it will turn white, and so i just find that doing this. Just kind of eliminates. All of that so yeah, that's what i'm doing here. Okay, so this is another optional step. If you like, baby hairs um, i like to go ahead and pull them out, and i do this because, as you guys know, i don't cut the lace first, i style the hair first, so um yeah i'll go ahead and pull out the baby hairs everywhere. Where i want them, it didn't end up working out how i thought it was gon na work out, which is why i'm like skipping around a lot of this. I was spraying some got to be all over it um. I think that was a mistake. I'M also going to show you guys, um something else i think was a mistake, but i'm going to be just using this elastic band that i got from my local beauty, supply store and yeah. As you guys can see, the baby hairs are just hanging down and i'm going to cut them and yeah we'll talk about that. A little bit later, i'm just going to be laying down the hair and it's got to be straightened and everything. That'S what i'm going to be doing to this hair um yeah here i am cutting the baby hairs child. I don't know what i thought i was doing. I had good intentions, but it you know sometimes stuff just don't work well. I actually did end up working out, but i'm going to show you guys what happened um but yeah. Now i'm just going to be going through and flat ironing the hair, the only product that i'm going to be using is this um bio silk and it's actually the light one l-i-t-e um and that's what i'm going to be using to straighten out the hair. I think i straighten it on 450 degrees and i'm using a babyliss flat iron. So i'll have all of the tools that i used and all of the products that i use in the description box. So you guys can go there, but i'm using the chase method to straighten out this hair and this hair straightened out so freaking pretty like i love the way this hair straightened out. It was just so bomb um, but you guys will see more of that when i get done so yeah, i'm just going to be going through and doing that to my entire head me yeah, yet so y'all look how freaking pretty this hair is like it straightened Out so freaking beautiful, so anyways, i'm going to be um clipping the hair backwards so that i can go ahead and cut the lace. Now, i'm also going to be removing that elastic band and also pushing the baby hairs that i cut back. I just like to pull them down because it helps separate them from the hair and that helps a lot when you're laying them down just separating them. So yeah anyways, i'm just going in with some kitchen scissors girls, these ain't, even no shears. These are some kitchen scissors because i don't know where my shares went like. If you were on my live that day, then you know like i was interrogating zay for my scissors and he just act like he don't know what happened to him. So i had to use some freaking kitchen scissors to cut my lace and it ended up working out pretty well, because the lace was transparent and you couldn't really tell like it looked like scalp. You couldn't even tell the difference. So the first thing that i do when i'm doing my baby hairs is i go ahead and just take some tweezers and i thin them out because i don't like thick baby hairs, so yeah, i'm just thinning them out um. I'M going to tell you guys what i feel like. I went wrong in this process um this part, i do vouch for i love thinning out the baby hairs. Do this okay, but you guys will see a little bit later um what happened? I'M just using some edge booster. I was always kind of against using like edge control and wigs, because i just thought that it gets greasy, but i decided to try this wax stick and i kind of actually like it so yeah, i'm just pushing the hair back. Um away from the baby hairs to separate it once again, and then let me tell y'all where i messed up so um. I have been using this ors foam and um. As you guys know, i also use ghostburn glue and i'm gon na tell you why this is a problem. So to deactivate ghost bond glue, you need alcohol, that's what you use to take it off in the ors. Foam is alcohol. So when i was laying down the baby hairs, my wig was coming up as well, so that caused the problem um. I ended up just having to relay down that side of my hair um, but you guys will see where it started to go wrong. I cut out a lot of it just because i don't i don't really like to glorify. You know me messing up. I do like to tell you guys how i messed up um, so yeah, as you guys can see here, it was just getting really bad. The lace started lifting and yeah child, so i had to get it together, so i stopped using the ors foam and i started just using um got to be in the black gel bottle and that's what i use for my edges and i just took them like. I would my regular baby hair, so nothing special here, but i just like to share my mistakes with you guys, because i don't want you guys to make the same ones. I will not ever be using that gel again i mean that foam again when it comes to my wigs, because i'm gon na forever be using ghost bond and it's just not compatible but yeah. So yeah, that's what happened with that. That is the mistake. I was telling you guys about, but i really like this wax stick. It really kept the hair in place and intact and it worked really well with my hot comb. So i like the wax stick, but the orange foam is a no-no. So now you guys are gon na see me thinning out my sideburns um. I know right now, they're looking real thick, they look like some elvis presley sideburns, but i'm going to show you guys what i was going for. You guys are going to see me use my flat iron and flip them upwards. Please don't come for me, i'm going to show y'all what it look like when i'm dressed and got all my makeup and everything like that so y'all be coming for me. It actually looked real cute. It looked a little bit questionable when i really got nothing on, but it's cute, so yeah, that's what i'm doing here and after that girl. That'S pretty much it for this install. If you made it to the end of this video. I just want to say thank you so much for watching um and tuning in um this week actually is going to run you about 205 dollars. But if you stay to the end of this video, i got a little bit of surprise for you. I'M going to put the code on the screen and that's going to give you some money off of this wig, so yeah, that's my little gift for you for just staying and tuning in with your girl. So yeah i'll see you guys in the outro okay, so that pretty much concludes this video. I really hope you guys enjoyed it or that you guys learned something if you did make sure that you thumbs this video up and also comment down below anytime. You guys want to see next and also subscribe to my channel, because my cash baby is lit, i'm lit and if you subscribe me, you can be lit too in that song period, so yeah, i'm gon na see you guys in the next video bye. You


Comments
imightbe: I love these types of videos. It’s something so satisfying about watching the results all come together seamlessly
monique: Girl!! That middle part trick hit DIFFERENT!! im too lit about my wig! Thank you for SHARING!!
Lizette Baldeo: I am so appreciative of the fact that you let us know where you made a mistake with the ORS foam...I’m getting into frontals, wigs, etc and used that foam as well. I couldn’t understand why my units kept lifting and NOW it makes sense! So thank you and you look beautiful as always ❤️
monique: Bruhh this tutorial took my wig game to another level!!!! The widows peak method was what i needed!! And the middle part plucking gem.. FIRE
Carizma Moore: Omg you have grown so much throughout the years. Your content, instructions, and overall quality has improved so much on your beauty tutorials. I love it here
Briana Newman: Wow i literally plucked my wig while watching this and you helped me so so so much!
shaleta jones: Honey I have learn how to lay my wig bc of you don’t never stop teaching us
Cecilia Roche: This was a class for me, love it
Mo Styles: Beautiful install and very informative!! you inspired me so much I feel comfortable bleaching my own wigs ♀️ what happens if your knots don’t bleach all over on the first round? Do you rebleach on wet hair?
h xo: i’ve ordered my first ever wig and been watching 463828 how to bleach / pluck and install wig and you are the BEST omg i can’t wait to try it
NightBlossom: Yo...you literally don’t even understand how excited about my part I am rn. I tried your method yesterday and my husband probably tiiieeeeddddddddd agreeing how bomb this part is laying ♀️ You are the
Annise Amari: Love you Kashia keep it up! I don't even wear wigs but I watched this whole video and was all into it lol
Jetaun: I love this plucking technique im gonna try it next time!! Where are the tweezers from?
katy clark: So pretty! I love that you tell us the price of the wig!
Zhane' Williams: I liked it before even watching it bc I knew you were coming through with the gems girl!!
Blessing Akindele: been waiting for this all day !!
isyss paige: why do you make it look so easy
Lisa Palmer: Soooo pretty.. FLAWLESS!
DariaunSoSweet: your hair is beautiful ! loved this video .
Tee: your nails always look so cute !!
Mia Bailey: how long do you usually keep the install in?
Kesa Lekaote: I love ur content♥️ How u overlay so everything making people wanna watch more of ur vidoes♥️
Blueprint Ree: Thanks for the middle part!!!
Maria: I loved this video like it was perfect ion knw why somebody hadda dislike it
Chelsea Wiafe: can the middle part trick apply to site parts as well?
Ahijanae: I just live for your installs
Olivia Armani: yesss ma’am needed this
HannahbelleB: Hair is alwaysss on pointtt
Sincerely Leshawn: Your nails are so cute! Beautiful...!
TheReal Mikiah: Forgot to show us up close the finished bleached knots results so that we’ll know what to look for but ig I’ll use another video as reference ❤️
Tiy-Tiy J: yessss this is itttt I love your videos!
reasha biggs: The intro tho
suzi crossley: Imagine the poor guy who thinks this is how we look naturally lol
Goddess Houzé: Do you spray the lace before apply the bleach
Bella Rose: You did bomb girl did you find a better foam to use asking for my self
Raven H: I'm finna start doing two wig caps
Tiara Morton: Great video. Can you show us a reinstall
Marc Henderson: HairLine needs to be plucked just a little more towards the middle
Fredericka Indi: Your voice is so satisfying. Thank you for sharing these tips.
Faithfulness Princess: Well Valentine’s Day is coming need my hair to look cute
Brittany Little: This is a question for anyone who would like to answer but I am weary about trying vendors I usually order off of Amazon but not very happy with my last wig purchase is this a good vendor try? The hair in the vid looks very well made.
Martha Kasheeta:
neshaaa:
natali park: Yesss that wig is LAIIIIDDDD
theylovelyricaa: love youuu
Dee Luther: Another Video LoVely thumbnAil tho Road To 400k U definitely slay this looK You Are Sooo Freaking Pretty Makeup Very NicE EnJoy your Night as well Happy Bless Weekend ahead Stay Safe always
posh princess: Where do u get ur wig cap from ? N what brand is it ??? Looks thin n nice !!! The second one u applied
999chandell: imma try this wig company out
Lyssa nette: Can you make a video on how you did your intro. #kashbabies
Beauty By Shaye:
Barbie folks:
Madam Butterfly: Has Anyone Tried This Company ? Any Suggestions On Good Quality Hair Companies ?
Reee love: ❤️❤️❤️❤️❤️❤️❤️❤️❤️❤️❤️❤️❤️
Giana Joseph:
Drippykiddzai:
Juelz Dreams: Yayyy been waiting
Iyana E: Who can make an intro for me like that ????
lORA rI: Collab: do love ur posts sweetie, check ur Email from TTDEYE plz.
TheyKnowSummer: i’ve been watching her for 2 years
FashnJunkie: What’s better the black or the yellow Got2B?
Diamond Nosistel: okay intro come thruuuuu :)
TOOMUCHROB: YESSSS FRIENDDD
Ashanti Goode: Scalppp!!
Shelbbbsss: What camera ??
Chelsey Sadé: where’s the shirt froooom
Sydney Gaines: First!!!
RH: i’m earlyyyy
chris flores: how been you
Angel J: Do you go to Georgia state?