How To Make A Glueless Wig| Wig Construction| In Depth Plucking #Customwigmaker #Hair #Business
- Posted on 25 March, 2022
- Closure Wig
- By Anonymous
Thanks so much babes for watching my video! Let me know in the comments what you want to see more of and don’t forget to hit the notification bell so you can be notified of future videos! Love you babes!
Www.bougielifestylecollection.com
24 inch 5x5 hd closure unit made on a 24 inch mannequin head!
Intro: Emily Nicole
Instagram: __queenbougie
TikTok: Queen Bougie
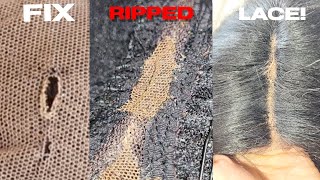
What'S up budget babes, it's your girl, queen boujee, and i'm back with another freaking video. As you can tell by that title, we are going to be doing a wig construction, video y'all, it's been a while, since i have done a weird construction, video on my channel. So we not even finna, do a long intro we're going to go ahead and get into it. If you are a new viewer to my channel. Thank you so much for watching my channel, don't forget to like comment and subscribe and click that notification bell. So you can get notifications for when i do upload a new video and if you are a return to subscriber how you doing bae, how you doing let's get right into the video all right babe. So, as usual um, i am just positioning the closure where i want it to sit. This is going to be a middle part unit, so i am positioning it in the middle and holding it down with t pins. Now i didn't say this in the original intro um, but this is going to be a 24 inch. 5X5 hd closure unit um the hair and everything that we use today is from bougie lifestyle collection. Of course, all of the details and everything will be in the description box below if you bought your babes, want to shop. Okay, all right! If you are original boujee babe, then you already know what's going down. If you are new to my channel, let me go ahead and learn you something so what i like to do is i like to start in the middle of the closure and or frontal whichever one i'm sewing down, and then i like to work my way to The right side i like to cut the needle and thread, and then i like to work uh start back in the middle sorry start back in the middle um, and then i like to work my way to the left side. I don't like to use the same noodle and thread all the way around the closure end or frontal, because to me it just makes it easier so say, for instance, if some of your thread moves or anything of that nature, and you have to replace the thread Instead of replacing the thread on the entire closure or frontal, you would only have to do that. One side, you see what i'm saying so it makes it easier and it does make it last longer. Don'T forget bougie babes. You want to make sure that you're doing your stitching close together. You are pulling your needle and thread as tightly as possible and tying knots periodically. So is so. What you're going to do is when originally putting the track on you're going to put the needle and thread through the actual weft of the tracks, of course, you're going to keep it doubled over. It'S not going to be a single weft, but you're going to put the needle and thread through the track initially and then the second time you pass through you're going to go underneath the weft tie a knot and then proceed with your sewing process when sewing on The band part you do not want to put the needle and thread through the actual band. You want to put the needle and thread through the black mesh part on top of the band. That way, your wig will still have some stretch to it and will not be shown sewn tight, sorry y'all. So this is how i like to do my fold over method. I like to tie two to three knots at the end before i flip it over um and then i put the needle and thread through and then tie another knot just to secure it and that's how i do my fold over method. It'S very easy. I hope you guys can see what i am doing. If you can't see what i'm doing, please, let me know in the comments below and i would do a up close uh more up close visual for you guys. So you want to make sure that you comb through after each bundle just to get all of the hair and everything that was caught by the needle and thread when pulling it through after the first bundle. I don't like to do the fold over method anymore. I like to cut the needle and thread in the track at the beginning of the cap. To me it makes it lay flatter and it doesn't look bulky towards the top. The consistency of the bleach needs to be thick, so it does not seep through and over bleach the knots and get onto the other hair. So so i've already rinsed out the bleach and i've already um. You know rinsed it and washed it with the purple. The purple shampoo, the lace um so now this is just me rinsing out the purple shampoo. I wanted to show you guys this clip, because i want to show you guys, um and let you guys know to make sure that you're getting all of the product out of the hair when you're, washing it or using silicone mix bleach or anything like that. That'S the reason: another reason why the hair doesn't do what you guys want it to do, and it doesn't maintain well, is because you are leaving a lot of product on the hair from when you are washing it or anything like that. As you can see the more i rinse out the more purple that comes out of the hair, so you want to make sure that you're getting all the products next, i am just going to add some silicone mix and let that sit on the hair i like To add silicone mix to it as well, whether i am bleaching it or anything of that nature just to get the hair back to its natural texture, even when ordering from vendors across you know the seeds or whatever they do add product to the hair before shipping. It to you, so i just want to make sure that i'm getting everything out of the hair, so my customers don't have anything to worry about when using their wigs or maintaining their units. So alright, so i have already let the unit air dry overnight. So it is time to get into the styling process. So, as i said at the beginning of this video, this is going to be a middle part unit. So we are just going to you know part it down the middle. You do want to make sure that you are using your bio silk as well as your heat, protecting protectant when putting any type of heat or anything on the hair and and then we're going to get into the plucking process as well. Plugging is pretty much easy. The the more you do, the plucking, the easier and more comfortable you would get with the plucking um, and i will have my next couple: videos to really be in dip as far as the plucking process, so just stay tuned and make sure that you pay attention. Bougie babes, it really is an easy thing to do. You just have to do it a couple times just like anything just to get comfortable with it, so so all right babe. So that completes this video. My customer did want everything to look as natural as possible. So we didn't do baby hairs or anything of that nature. As i told you guys, this is a 24 inch, 5x5 hd closure unit in our body wave texture. Of course everything came from bougie lifestyle collection. If you bought your babies wan na shop, everything will be in the description box below again. Thank you so much for watching my video don't forget to like comment and subscribe and i'll see you boogie babes in the next video


Comments
Nikalya Ledezma: This video was very descriptive and helped me a lot! I always wanted to learn to make wigs so this video was perfect
Touched By Kalya: Great video! Very detailed keep it up!!
Veronica Mills: great video! I learned a lot and will be putting it to use very soon! I'm trying to make money like you lol
Barbie Vlogs !: I love this glueless wig
Zee Mlaba: Very detailed. And your bundles looks nice and full.
Dee Smoove: Hellava a Process I can tell you’re official In your lane ✌✌
BEAUTY & BRAINZ: This video is right on time.