The Ultimate Melt Lace Wig| No Tint No Plucking No Bleaching Ft. Hairvivi
- Posted on 19 April, 2022
- Closure Wig
- By Anonymous
PRODUCTS USED:
Wax Stick: https://go.magik.ly/ml/1gtvt/
Andis Hot Comb: https://go.magik.ly/ml/1gtvv/
Ghost Bond Lace Glue: https://go.magik.ly/ml/1gtvx/
Fenty Beauty Bronzer: https://go.magik.ly/ml/1gtvy/
Eco Style Get-Glued: https://go.magik.ly/ml/1gtvz/
Kiss Pencil Pro Styler Flat Iron: https://go.magik.ly/ml/1gtw0/
Enjoy $25 OFF DISCOUNT: Kiara (Limited Time)
▬▬ ★☆ HAIRVIVI Free Return No Reason ☆★▬▬
Mia Wig in Video: https://bit.ly/3Ob0P6s
Length & Density: 18 inch & 160%
Lace Type: Invisible HD Lace
▬▬▬ #Hairvivi *NEW* Fitted Glueless Wig ▬▬▬
a snug, fitted hairline with an elastic band and combs for extra security.
worn with or without glue - the choice is yours.
✔ Clean Bleached Hairline & Frontal
✔ Piano Keys Elastic Band
✔ Pre-made Fake Scalp
✔ Real Invisible HD Lace
▬▬▬ MORE WIGS FOUND HERE ▬▬▬
▶ Hairvivi 13x6 #HDLaceWigs: https://bit.ly/3EaiqXH
▶ Hairvivi Official Website: https://bit.ly/3xvToRk
▶ Hairvivi #GluelessWigs: https://bit.ly/3JFU9K0
▬▬▬▬ Hairvivi Social Media ▬▬▬▬
Instagram: https://www.instagram.com/hairvivicom/...
YouTube: https://www.youtube.com/channel/UCWK7J...
TIKTOK: https://www.tiktok.com/@hairvivi.com?l...
Facebook: https://www.facebook.com/hairvivicom
Pinterest: https://www.pinterest.com/hairvivi/_cr...
Closet/Wig Sale: https://shopkiarakaybrown.bigcartel.co...
Need a YouTube Intro Made? Contact [email protected]
My Website: https://kb-kollection.com
KBKOLLECTION IG: https://instagram.com/shopkbkollection...
Want to support my channel?
PayPal: [email protected]
Cashapp: $kiarabrownn
KEEP UP WITH ME ON ALL SOCIAL NETWORKS
Instagram: https://www.instagram.com/thekiarakayb...
My Website: https://kb-kollection.com
Twitter: https://mobile.twitter.com/KiaraKayBro...
Business Inquiries: [email protected]
==============================
Are you a YouTuber looking for Sponsorships?
Join Octaly: https://www.octoly.com/youtubers?yt_re...
==============================
I use MagicLinks for all my ready-to-shop product links. Check it out here: https://www.magiclinks.org/rewards/ref...
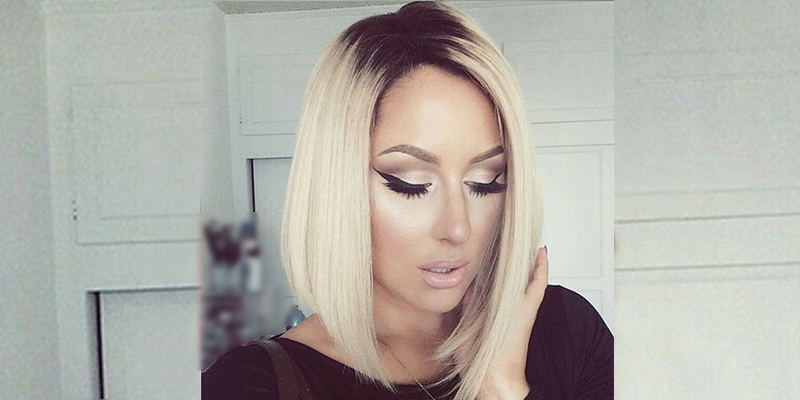
Oh girl, i think i want proud, hey you guys, welcome back to my channel, so today's video is sponsored by hairv and all their hair always comes really neatly packaged. So i'm just going to take everything out and just open it up and, like i said, their package is top tier. So i'm going to show what i got so i did get some hair clips and also got an edge brush that will come in handy and then i'm going to take the wig out of the packaging. Their wigs are always really well constructed. They come with a cap on the inside elastic band. It'S pre-curled cut layers. The knots are bleached. The hairline is plugged like literally ready to wear. So this is the wig on my head, like i said it's pretty much styled and ready to wear right out of the box, i'm going to give you up close visual of the lace and the hairline. It looks very natural, so i am going to cut off some lace that is going over my ears. I cut it really low because i wanted to avoid cutting the cap that is sewn underneath the lace now, on the other side, i did cut it just a little bit. I was trying to avoid that, but it is really important that i cut this lace to fit my head so that it lays properly. I am going in with a wax stick and i'm just going to go over the hairline and then i'm going to go over. That with my hot comb and just press that out, i really like to press out the hairline, because it just makes it look more sleek and it also just reveals where the hairline actually starts at. So you can see the difference that it makes just hot combing. It i am not doing the ball cap method, but i am going to take some of my foundation and just apply that onto the wig cap, so that you can't see it underneath the lace, because this lace is very transparent. So i just want to make sure that it's not being visible and then i'm going in with some lace glue - and this is the go spawn lace glue a little bit goes a long way. I know my previous videos. I was using a lot of a lot. A lot of glue, but i'm kind of taking it back now and just using smaller amounts. So i just apply that going across my forehead and then just spreading that out with the comb, and it also dries down a lot quicker when you don't apply a huge amount of glue. So yeah, i'm just going to spread that out. Make sure that it's blended evenly and in no time it dried down clear, so i'm just going to go ahead and lay the lace down on top of the glue, and i just like to lay the middle first and then i will lay the sides next. I also want to mention that i didn't tint this lace. I didn't put any product on the lace like i said right out the box we're just leaving it as it is as it came. So i just wanted to mention that, and it's really important for me to press the lace into the glue with the comb. So that's what i'm doing and i went ahead and i cut off that lace that i didn't need. I cut it off right away, just because i wanted to cut off, like i said, the lace that i didn't need and then there was areas that i wanted to go back over and just glue down to make sure that everything was nice and secure. So that's why i went ahead and i cut the lace so there's going to be some parts of the lace that is lifting and, like i said, i'm just going to go in and touch up those areas. Once i cut the lace off - and this is what i was saying - there's some areas that just need to be touched up with some glue. So, that's all that i'm doing i'm going to touch up all of those areas and just make sure that everything is laying down and that everything is sticking. As you can see, she blended really well with no product added onto this lace, but i want to get the ultimate melt, so i am going to tie it down with an elastic band, so everything can finish drying down and setting into place, and this is just Really going to melt this lace, while i have the elastic band on my forehead, i can kind of get closer to the hairline without having to burn myself. So i just really want to press the area out and also make sure that the top is laying down nice and flat, like the hot comb really brings everything together just makes it look really nice and sleek, and that is what i want. This is me just running my fingers through the hair and just checking my progress, so this is after i remove the band. As you can see, she is melted. That'S exactly what i wanted. You can definitely stop here and leave it there if you're into the natural hair line, but me i'm gon na do some baby hairs. If you know me, you already know so, i'm going to go ahead and section off the baby hairs that i want. I'M only going to be doing the two baby hairs on the side that i normally do to me. I like it. I think it looks cute on me and it's not too much it's not excessive, so yeah, i'm gon na get my parts and just section it off, and i'm also going to go ahead and section off my other side as well. Just trying to make sure that i get equal parts, i also use the clips that came with this wig, like i said, came in handy but yeah. I use that to clip it out the way and then, like i said, i'm going to go ahead and section off the other side as well. Just to make sure that i have equal parts of hair because i want them to look identical and then i'm going to go ahead and cut it and curl cut and curl cut and curl. So this is the kiss pencil pro styler love this. I can really get nice and close in a really cute curl, so yeah, that's what i'm going to do and then i'm just going to lay my baby hairs in the way that i want them to lay and just keep working with it until i get them To look how i want them to look, i'm using the eco style get glued hair gel is basically a dupe for the got to be glued, but i'm using that to lay the baby hairs um every now and again i'll switch out products, but for right now I'Ve been using the same products but yeah. That'S all that, i'm using to lay them it works really. Well, if you want to make sure that your baby hairs are staying in place and they're not going to move, you can definitely try this out. I am going to be doing sideburns as well, and i basically just do the same process cut and curl and then lay with the eco styling gel and i am using the edge brush that also came with this wig. So i pretty much use everything that came with it and it definitely came in handy so at this point i am pretty much done. It'S not really too much more that i could really do to this wig because, like i said it, pretty much came ready to where i am just going through the hair with a wide tooth comb to kind of just you know, fluff it out a little bit, But this is pretty much it so we're gon na go to the ending clips. I'M gon na show you guys the final look and i have nothing but like good things to say about hair vivi. Like i said every week, i've got is high quality, just everything the lace is high quality. The milk is amazing, like i said everything that you need in a wig. They do it for you, so i will have all the details listed down below for those who are interested so make sure you check that out, comment down below give me a thumbs up sub to my channel, if you're not already and make sure you turn on That bell, so you never miss an upload for me and i will catch you guys in the next one. Is you man,

Comments
Kiara Brown: All products are listed and linked in description box
Kersha Beaver: Beautiful ❤❤
Dee Luther: Good Video as always Stunning thumbnail tho Beyond Gorgeous you are Ur Makeup always on Point EnJoy your night Happy MarvelouS Week Too Be Bless n Stay safe always
Re’Mona Lavon: Slayed
Merle Lewis: Yes sis i love you look fabulous