Beginner Lace Cutting 101| Glueless V "Glued" | No Baby Hair W/ Highlights | Lovelybryana
- Posted on 06 June, 2022
- Closure Wig
- By Anonymous
Twitter/IG/Snap: @LovelyBryana
Enjoy BIG DISCOUNT CODE: lovelybryana (Limited Time)
▬▬ ★☆ Free Return No Reason ☆★▬▬
Hurry up!! only pay $119 to get this Hairvivi wig today!! Enjoy 4 interest-free payments of $119
▶ Julia Wig in the Video: https://bit.ly/38Gd9f7
Hair details :
Wig Cap Construction: Free-parting 13x6 Clean Bleached Frontal Wig
Length: 18 inches
Cap Size: Medium
Fake scalp color: Cappuccino
▬▬▬ MORE WIGS FOUND HERE ▬▬▬
▶13x6 #HDLACEWIGS: https://bit.ly/3L7wDaq
▶Best sellers #LaceFrontWigs: https://bit.ly/3EzOPag
▶Hairvivi #GluelessWigs: https://bit.ly/3Mnsn6V
▶Same YT Gurus Wig Kit For Sale:https://bit.ly/3ECYfBF
ALL To Make Your Wig Natural
Clean Bleached Frontal
Piano Keys Elastic Band
Pre-plucked Hairline
Pre-made Fake Scalp
Real Invisible HD Lace
Beginner Lace Cutting 101 | Gluess vs "Glued" | Brown Hair With Highlights | LovelyBryana x Hairvivi
Hairvivi Official Website:
https://www.hairvivi.com?sca_ref=11438...
Follow Hairvivi on Social Media:
Instagram: https://www.instagram.com/hairvivicom/...
YouTube: https://www.youtube.com/channel/UCWK7J...
Facebook: https://www.facebook.com/hairvivicom
Products I Use:
EBIN lace Holding Spray - https://amzn.to/3AAZv52
Clear Got 2b Glue (Black tube) - https://amzn.to/2Q8viXA
Lotta Body Foam Wrap_ https://amzn.to/2TZloX3
Pattern Beauty - Jojoba Oil - https://amzn.to/3FstBtZ
Conair 1 Inch Barrel Curler - https://go.magik.ly/ml/1ccr3/
Revlon Curling Wand - https://go.magik.ly/ml/1ccr7/
BabyBliss Pro Titanium Flatiron - https://go.magik.ly/ml/ltc8/
Perfect Line Grid Eraser (my match: TAN)
https://perfectlineswiss.com/?wpam_id=...
Purple Comb: https://www.pitreessentials.com/
Esha Fusion collagen Glue - https://amzn.to/2Qo58Pa
Esha glue Remover - https://amzn.to/2CWmQGp
Esha Primer/ Skin Protector - https://amzn.to/31s2oXj
Bold Hold Active lace Glue - https://thehairdiagram.com/products/bo...
Got2B Insta Hold holding spray - https://amzn.to/2WregWy
ORS Olive Oil Mousse - https://amzn.to/2ZCGIqu
Soft Silicone Medical Tape (Houseables Brand) - https://amzn.to/2AoNohL
Bed Head Hard Hold Spray - https://amzn.to/2U9ED1q
Bed Head Mini - https://go.magik.ly/ml/uypb/
Silicone Strip (ScarAway): https://go.magik.ly/ml/q9y2/
Lace wig grip : https://amzn.to/304dylZ
Sally Hansen Leg Spray Medium Glow - https://go.magik.ly/ml/kizp/
Wig Grip - https://amzn.to/2W8mOjh
Wig Stand - https://amzn.to/2W8mFfJ
Wig Head - https://amzn.to/2TbZMGg
Scissors/ Shears - https://amzn.to/2RT00F9
Tweezers - https://amzn.to/2CCfW54
Lotta Body Foam Wrap_ https://amzn.to/2TZloX3
Creme of Nature Foam - https://amzn.to/35AtDik
Got 2B Glue Freeze Spray - https://amzn.to/2BiTm1G
Clear Got 2b Glue (Black tube) - https://amzn.to/2Q8viXA
Yellow Tube Got 2B Glue - https://amzn.to/2ZEShhA
Conair Infiniti Pro BlowDryer - https://amzn.to/2DxWd8z
Conair Infiniti Pro Curler 1 Inch https://amzn.to/35dg2Nj
Pressing Comb - https://amzn.to/2HPKEMd
BabyBliss Pro Titanium Flatiron - https://go.magik.ly/ml/ltc8/
LovelyB's Edge Control - AmazonPrime https://amzn.to/2QaGZNr or www.LovelyBs.com (Also Amazon Canada)
Sephora Foundation Powder - Golden Almond - https://go.magik.ly/ml/kizh/
BH Cosmetics Foundation Powder - 240
~~~~~~~~~~~~~~~~~~~~~~~~~~~~~~
Helpful Videos:
Hide the Grids on Lace Wig
Baby Hairs Like a Pro
https://www.youtube.com/watch?v=EN35oL...
Bleaching Knots
https://www.youtube.com/watch?v=tccwTD...
Bleaching Knots vs Foundation
https://www.youtube.com/watch?v=2ORjQ3...
Plucking a Natural Hairline
https://www.youtube.com/watch?v=mYr2tx...
Melting Lace No Baby Hair
https://www.youtube.com/watch?v=3sQOpN...
Melting Lace With Baby Hair
https://www.youtube.com/watch?v=xr2x7Q...
~~~~~~~~~~~~~~~~~~~~~~~~~~~~~~~
FTC disclosure: This post or video contains affiliate links, which means I may receive a commission for purchases made through my links
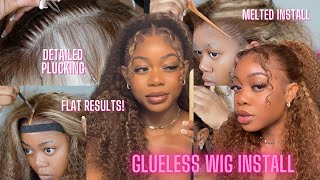
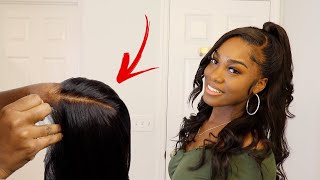
Welcome back to my channel so jumping straight into this video. Today'S unit is from hair, vivi and she's, just really pretty kind of reminds me of a reese's cup, so she's a chocolate color, and then she has these blonde highlights in the front which i freaking love. So if you're familiar with teraviva, you can go ahead and fast forward through this part, because i'm just going to give the specs of the unit, so it has the fake scalp in the inside. If you do not like this, you can remove it. It'S really simple! You just take out the thread and then it also has the adjustable elastic band which helps with it being glueless, and then it has the piano key where you can adjust where the strap goes on your ear, because you know not, everyone has their ears. In the same place, and then this is what the lace looks like close up against my skin and now straight to applying. So always always always i like to remove this little piece of lace. That'S on the side by the ear tabs. It comes on all wigs and i don't know why it serves no purpose and it literally just gets in the way, especially if you're cutting the lace. While it's on your head, which i'm doing today so i'm going to go ahead and remove this on both sides. I'M going to show you guys what the unit looks like glueless and tacked down today, so to make sure that is super secure. We want to make sure everything is fitted, so i'm going to take the elastic band in the back and i'm going to make sure that that's fitted to my head so that the wig is nice and snug. And then i'm also going to take the little bra. Straps in the back and i'm going to adjust those where i need to adjust those and then i'm going to take the unit and i'm going to fold the lace back. So this just helps when i put the unit on it, helps from getting the lace all like balled up. So i fold it back and then i go ahead and apply the unit and then i take the back clip or the black knot clip the back combs and i hook it right underneath the elastic band so because hair vv units have the fake scalp. You kind of have to play with the position of the units, so i like to pull my units forward, because if i have my units back like this, if i line up the wig hairline with my hairline, then you can see exactly where the wig cap starts. So i just pull it forward a bit and i line up the wig cap, that's sewn in exactly with my hairline and then whatever hair. That'S too far down on my forehead. I can go ahead and remove that later, but going on to the sideburns um, this one actually fits pretty. Well, it's just a little bit too long like it was going too far down my ear. So i just lift up and see where my natural sideburns are, and then i kind of shape the hairline of the wig to what my natural sideburns look like if that makes sense, so this was way too much like it would have been too far down on My face so i get it as close to my natural hairline as possible, but i still leave just a tiny bit of room so that the lace have some skin to stick to if that makes sense, but yeah once i get it shaped out like this, i Can go ahead and take my scissors and i just remove all of that extra hair, and then you guys will see once i get to the top of the unit, i'm going to remove a tiny bit of the hair on the forehead as well, because i told You guys before that i have to pull the units forward to line up the wig cap with my natural hair cause. I can't go without my used to tell so for this side. I'M going to stop right here, because i have to adjust the sideburns like. I did on the other side and if i completely just like keep cutting all the way down, i can mess it up and i don't want to do that and i couldn't really see. I want to make sure that i could see so i'm just removing all of this excess lace and i'm going to do the exact same thing to this side of the sideburn area that i did to the first eye. I want to lift it up and see where my natural side burns in and then i'm going to shape this hairline to my natural hairline. So again, when cutting i get it as close to my natural hairline as possible, like placement wise, but still with a little bit of room like literally a few millimeters of room, so that the lace has some skin to stick to. And it's not just like sticking directly onto my hairline um and yeah. I just do this because i don't like losing face if that makes sense, when i put my wigs on sometimes i feel like when you put a wig on and it's too far down it. Changes like how my face is my face is how my face looks, and i don't like that so yeah. That'S why i do this, because the first way that i'm showing you guys is glue glueless, i'm going to go ahead and take these two bobby pins and put one on each side, and this would just keep the wig from blowing back in case. There'S like a crazy gust of wind or something this would keep the tabs down like it, won't keep it as flushed against your skin as adhesive wheel, but it'll keep it from like completely folding back um and then i'm going to style the wig a bit. So i'm going to get it flat in the parting area and i'm going to add a few loose curls just using my flat iron. You can totally leave the unit like this and be on your merry way. But if you want to give like the illusion of it being a little bit more melted and get the lace to be a little bit more like pushed against your skin, you can kind of see it's lifted a bit by my ears. So i'm just going to fold this back and i'm going to use this mousse. So this is the ors olive oil mousse. You want to use one. That'S a little bit sticky like has a tacky feel because it'll really help to like lay this unit down, and you just want to put it along the hairline area, get it nice and like saturated, and then i'm going to take one of my wrap strips and Tie it down for a bit, i also use my blow dryer to speed up the process, but you don't have to do that. You could just tie it down for like 10 minutes um and then you cut it away and it is going to look melted. Okay should never drive you crazy, but i'll lose. So here's a close-up of what it looks like y'all, completely glueless, not tacked down at all um. I would recommend, if you're going clueless, to wear a wig grip underneath just to give it a little bit more security and to keep it from moving at all but yeah. If you guys can see it is not tacked down. But now i'm going to show you guys what it looks like glue down and the adhesive that i'm using today is the ebi in um lace. Wig spray, oh used to tell me, love, should never drive you crazy, so because i want this unit to last. A little bit longer and because i use the spray adhesive i feel like sometimes when i use the spray it doesn't give it. The melted look like as good as a gel or a real glue would so i like to take a little bit of the got to be glue. The clear one put it on the end of a rat tail comb and just press down the edges, and this makes the wig look a little bit more melted and it will make it last longer if you're, using a spray, adhesive um, so yeah. I just do this all around the edges and then i'm gon na go ahead and tack down my sideburns. I don't know why. For some reason i always do those last but yeah, i'm gon na tack down the sideburns cause cause. So i decided on no baby hairs again today, so right now, i'm just combing up the front with a little bit of holding spray just to give it a little bit of volume up there. Then i'm going to go in with my foundation powder and just to lightly tap it over the parting area, to get it all one color and to kind of blend in the front. And then i'm taking a little bit of like a dark brown mixed with a black eyeshadow and just cleaning up the hairline a bit but yeah that is pretty much it. This is what it looks like you guys. It is tacked down, it is not moving. It looks a little bit shiny on the sides because of the holding spray, so i'm going to take a little bit of my foundation powder again and just like just a tiny bit y'all, because i don't really want to color it. I just want to get rid of the shiny. I could have used translucent powder, but i had this right there, so i just went ahead and dusted this over the hairline area to get rid of the shine you guys, but that is it for this video everything i've mentioned or used will be down below in The description box - i hope you guys enjoyed it. I love you guys and i will see you in my next one. You
Comments
Jennifer Cruz: Hey Bry! Hey little Theodore! Bryana can I just say, you absolutely SLAY every time Hun. I don’t understand why you don’t get more thumbs up, with all the subs you have. I mean your wig game, makeup, natural hair, and of course your vlogs be on point. It’s crazy what people prefer to like . Your videos should be getting waaaay more views and likes. Thank you for sharing BEAUTIFUL!
Justice100 Wil: As a beginner I love how you break things down and explain them in a very easy way that you can actually understand. I absolutely love it, You did such a beautiful job and that hair is very beautiful.
IamKiaWoods: This is so beautifully well done!
Rhonda Seward: Both methods are flawless!❤️ Thanks for the glueless tutorial because I'm lazy!
larla03: You are out here saving wig lives! Thank you!
Adrienne Thomas: Beautiful as usual ❤️
Ms. Shabria Gxo: Beautiful
Azima Lewis: Awesome ♥️