In-Depth 13X6 Frontal Wig Install For Beginners | Ft. Hc Hair Amazon
- Posted on 12 May, 2022
- Closure Wig
- By Anonymous
Hey family❤️ Today I’m showing you guys how to install and customize a wig from start to finish. Make sure you like, comment + subscribe if you enjoyed! (WATCH IN 1080P OR HIGHER)
Link to wig: https://www.amazon.com/Plucked-Transpa...
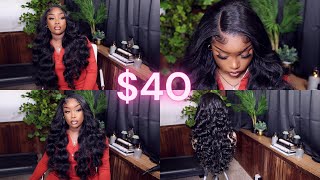
Frontal Type: 13x6
Length: 22 inches
Density: 150%
____________________________________________
Follow my socials:
➺ Instagram: Kiannamoracia
➺ Snapchat: Kiannamorae
➺ Tiktok: Factualbrat
____________________________________________
➺ EMAIL FOR BUSINESS INQUIRES ONLY:
____________________________________________
Intro Song: Live your life by Uptown (Go support a local CT artist and click the link to listen more of this song)
https://soundcloud.app.goo.gl/WsawFGz8...
Musin in video by southstreet24
____________________________________________
FAQ:
➺Age: 17
➺Ethnicity: Jamaican
➺Fave Color: Blue + Green
#wiginstall #amazonwig #closurewig
Hey youtube, so i know i haven't uploaded in a very long time, but today i have a wig from the company hc hair and right now, i'm just showing you guys the wig, it's a 13 by 6 22 inch straight jet black wig, i'm just showing you Guys, the cap construction currently and we're about to get straight into bleaching. So first off i have 30 volume developer and then i have my clairol powder mix and i'm just going gon na mix it into this small pan. Until it's a nice consistency, as you see right here and then i didn't have any knives or like anything that i could use to apply it on, i had a fork. So i used what i had because i ran out. So i just used the knife and i slowly and carefully spread it over the lace and i made sure not to rub it in or anything it's thick enough to the point where it won't absorb, but it will sit on the knot. So what you see me doing is just trying to spread it a thick, even layer as much as i can. I know i haven't uploaded a video in a while y'all bear with me. This is finals week for college, so i'm just trying to get everything done and get out the way, but i do have a lot of exciting videos coming up so make sure you guys stay tuned right. So when i mix the bleach, what i did was i did about two parts: um powder and then one part developer just so that it was a good ratio and it was thicker, and i left that sit for 30 minutes in foil paper. Now you just see me rinsing it off with some cold water when you're rinsing it off. You don't really have to worry about it, bleaching, the wig as long as you rinse it off. You know in a good amount of time, don't just let it sit in the sink. If you know what i mean, so i'm just making sure that all of the bleach is out of the before i start scrubbing and then i'm gon na take my shimmer and light shampoo just to tone down that brassy orange look. You can also use any like blue shampoo or clarifying shampoo just to tone the knots down, because sometimes after you bleach them, they do end up. Looking a little bit orange take a look at how i'm making sure my hands are actually scrubbing. All of the bleach out of the lace - i don't want any residue left over so that when we start our install there isn't still any bleach on it. I want to make sure that the clarifying shampoo gets on all the knots and it gets rid of that orange. Look as y'all can see right here. It doesn't look as bright orange anymore. It'S looking pretty good, so this is what the wig looked like after it was bleached and now i'm about to get into plucking. So i'm using the same technique that i usually use when i pluck i'm parting in small thin straight sections, brushing the hair back and then what i'm doing is taking my tweezers and i am just plucking, i'm not plugging in the same place. I'M continuing to plug kind of in a straight line, but i'm not plucking in the exact same spot. If you know what i mean like i'm going down the hairline as i go, and then i'm just making sure to comb out the hair. Now i do like to pluck while the hair is wet, because when it's dry, you can kind of miss some spots, but when it's wet you can also like you could pluck and then, when it dries it'll look a lot better. I just like to pluck when it's wet so every time i pluck i like to comb it out, so i can see how much hair has shed and everything and i'm just making sure to keep going in into that spot until i feel like that area is Cleared and once i think, i'm pretty much done with that - i like to comb it out and create a new section again now just keep doing that about three or four times until i feel like the hairline is thinning out a little bit. Okay, so my personal technique, when i'm plucking is i like to go back into the thicker spots, and i like to pluck more the reason why i pluck more in the back sections. That'S where most of the thicker hair is and when you pluck the front and make it thin, there is going to be a harsh line showing you that the back is a lot thicker, so you want it to flow evenly throughout the hair. You want the hairline to look seamless, so what i'm doing is i did that already and i'm just eyeballing the rest of the hair. I would not recommend doing this if you're a beginner, because i've had a lot of experience with plugging, so i could pretty much eyeball it, but i feel like if you're a beginner, you should just do the sections just to be safe, since i've already finished that Section closest to the middle: i'm gon na go ahead and go down the hairline and just do the same technique. I did before part off a thin section, start small and then just begin plucking wherever i feel like the hair is thick and i pluck in a pattern that's like intermittent, but i move back and forth so that way the hairline flows naturally, and it doesn't just Look like all the lines are going in one direction now the sides of this wig are tricky because it is a 13x6, but the sides are about like two inches. So what i did was i rotated it on my wig cap and now i'm just going in and plucking those sections out. I didn't really have to section it much for this, but you guys can see that hairline effect that i was talking about. It looks like it flows through seamlessly and you don't see that thick harsh line - and this is what the wig looked like when i was finished - plucking it so right here, i'm just showing you guys the box that it came in just giving you guys a full Tour, this is the box only thing that the wig came with was a wig cap, and you know i already have a wig cap on my head. I always use the wig cast from my previous wigs and this is the wig on the mannequin head. Now i'm going to take it off and begin this install so right now, i'm just showing you guys what the wig looks like when it's held up and the bleach knots. I had to take that um string off because i have forgot and next we're going to get into putting some foundation on the lace. I have my regular foundation that i always use and i'm just going to pat that into the lace until everything is completely covered. Now recently i have been setting my foundation after i put on my wig. I use a loose setting powder and that way that makes sure that the foundation stays and it does not slip. If i sweat now, i am going to use glue with this install. So i am gelling my hair back, so it can fit under my wig cap and that way my edges are protected and the glue does not drag them out. That'S one thing: i recommend, if you want your edges to stay protected, put some type of product on them. That'S all. I recommend when i was putting the foundation on the wig, i did get a little bit on the hair. You know my quick fix, for that is just putting a baby wipe on and now i'm just going to take some mousse and start brushing that into the hair. So we could gel it back and get ready for the install, because i don't even need to do much to this wig. I'M just brushing the mousse through it and making sure that all the straight hairs are brushed back. So that way, i can start cutting the lace and just get ready to install the wig in this clip. I was adjusting the way to see where to cut the ear tabs off now my phone stopped recording that part, and i really didn't know y'all. I was supposed to upload this video a while ago, but i never did because i went to the dentist and my mouth was messed up, so i couldn't do my voiceovers, so i didn't realize till now. Y'All, i'm really sorry for that. But it's okay! We'Re going to continue the video all right, y'all so don't mind the back of my mirror being open um. It fell right before i recorded this clip and what i'm doing basically, is i'm just going to take my glue and do a thick layer of bold hold glue. Now i am going to do multiple with bold hold. I feel like. I have to do multiple for it to last long time. If you don't want your install to last more than a week, you don't have to do more than one layer and after i do that layer, i'm just spreading it out and pulling the wig forward to see where i want it to be. So that way, i'm not touching the glue when it's time to pull the weight forward right here you see me adding another thick layer and i'm just going over that one part. I do like to do my front toes in sections because it makes it a lot easier, and i do suggest this if you're a beginner as well and now i'm just pulling the lace forward and then i'm going to try to comb the lace into it. Now that part is done and we're going to move on to the sides. Like i said, i am doing this in sections and i'm using the end of my rat tail comb to help me smooth out the glue, because you don't want any clumps or bumps underneath your lace when gluing down the ear tabs. You want to make sure that your layers of glue are like slightly. You know. Tacky don't be like me, do not be like me and then place the lace down prematurely. It will not stick for the ear tabs. I really was not being patient and that's why you see it's still lifting up right here, so i had to stop get off camera, take my blow dryer and then just dry it a little bit. So it would be fine all right so right now you see me gathering my edges and i'm about to start getting ready to do my twisty technique. I want my edges to be all the way around. That'S why you see me parting all the way to my ear and then after i do that i am going to do the same thing on the other side. Now the reason why i told you guys to wait a little bit and let your glue dry be patient. I did not and that's why you see me going in right here trying to glue that one part down so make sure you don't make the same mistake. I did, or else the sides of your lace really will lift. I tried to spray my got to be spray right here, but it would not spray. So what i did was, i just took some mousse and i ended up brushing my hair back because the spray was covered with, like you know the residue from the last times i use it. It was just sticky, so i'm just using my mousse and my edge brush to brush my hair back and then i'm doing my twisty technique again, just to make sure that my edges are sectioned before i do go in open that spray bottle and then spray down The rest of my hair, i'm spraying a thin layer, all around the perimeter of my hair and then next. What i'm going to do is just take my elastic band and tie that down now. The reason why i do the spray after is i wait till the glue, is tacky and not fully dry under the lace, and then i use the spray, because by the time that i take the elastic band off, it is going to be melted. And now one thing that i will note: i actually learned this by watching the hair diaphragm's um youtube channel. You are not supposed to use heat on bold hold. I did not know that you're supposed to let it dry with cold air. So what i'm doing right here is this is going to take me a while to style my hair. I use cold air off camera, but then i just let it dry by itself. Usually i use heat and sometimes the glue gets gummy. So now you know when you're using bold hold use cold air. If you want a melted, install that lasts all right so right there you just saw me, take my wax stick and start slicking everything back. I want this install to look as sleek as possible and i still ain't get the hot comb. I know i've said that like six times now, so i'm just taking my wax stick and i'm going in with my wand once again making sure that the hair looks perfectly okay and then i'm gon na put my part in the middle. I think i want to go for a middle part, if not i'll style, it some other way, but there's definitely going to be a part in the middle and i'm just doing that all the way back, since this is a 13 by 6 frontal, alright. So after i put my part in you know, i'm just smoothing out the sides and stuff because i did part it all the way back. So there's a couple bumps in the back, but nothing that we can't smooth out. You know with our wand and some mousse as you can see, the install is starting to come together and after this i'm gon na get into doing my edges. You know just making sure everything's proper all right so right here, i'm about to cut my elastic band off on and off camera. The amount of time it took me to keep it on was about 25 minutes, but when i cut it off right here, i accidentally slipped my earring out, so you just see me putting it back in and then i'm going to gather my edges after i've peeled It back, you know: everything's melted, the rest of the hair is separated and i'm just going to cut my edges in a downward motion. I'M cutting them like about two centimeters above my eyebrows or close to my eyebrow. Just because the shorter you cut your edges, the more natural they look when you swoop them, but you don't want to cut them too short or too long, i'm just going to apply mousse all over the edges and i'm using a very light hand. I know it might seem like i'm doing it hard, but that's just because it's sped up i'm using a very light hand and putting everything into my wrist. I'M not really so much focusing on curving the brush itself using a very light hand and just trying to sweep my edges into three sections as best as possible. If you need to redo them, you can add more moves. Just make sure not to add too much to make your lace start lifting if it does, you can put the elastic band back on, but right here, i'm just trying to perfect everything and make sure my edges look how they want to as well as swooping the Hair back and then i'm going to go in once again, i put some more mousse on it and i'm just combing it back to make sure none of my edges are overlapping and that everything looks good now, since that side is done right here, you see me Getting ready to do the same thing on the other side, going in again with my mousse, usually the second side that i do always takes me a little bit longer because i'm trying to get it exactly like the first one, but i got the hang of it. Pretty easily and that pretty much sums up my install, i did have to cut those edges a little shorter because, like i said, if they're too long, they won't look natural and now i'm just going in for one last time and swooping those ends so that they Can look like some really cute sideburns all right, so that pretty much concludes the install portion of this video. The only thing that i have left to do is just to set my edges with some got to be spray. That'S what i did. I had put a little bit of it over it, just to make sure everything was set and right here, i'm just stalling my hair. Now, since this is a 13x6, i felt like i needed to do a couple, unique styles with it. So i figured let me just do two ponytails and i'm just using some mousse to swoop the hair back into those mini ponies that you see me doing and i'm going to do the same thing on the other side, all right so first thing that we're going To start off with is saying one, your girl getting better at doing her edges. This is getting a straight scale too. I look like my little sister gon na insert a picture of my little sister right here, but yeah the hair is giving like. I don't know i'm tempted to try like uh another type of half up half down, but i don't think i'm gon na do that today. For one i love it, the lace is melted. I'M probably gon na i'm gon na make sure that tied down - and this is a 13x6, so the part goes all the way back there. It does have a lot of space um. It is very big head friendly and i have a small head. So i didn't like that. I know y'all saw me struggling with like blowing it down and stuff trying to get the proper placement, but once i got the hang of it, it was all right. Yeah, i'm really a fan. I don't know if y'all noticed, but you know i matched all my things today, so i have pink white and blue on today. It'S giving, let me brush it to the front. The hair does look really shiny because i put too much oil in it, but you know that's fine. It'S going to dissolve anyways. I haven't really gotten much shedding since i plucked it. I didn't even bother to straighten it again. It'S a pretty nice selfie straight wig and, of course this thing is 22 inches. I think it is 180 density if i'm wrong, i'm gon na put um the correction on the screen, but i think it's 180 density and yeah get into it. Y'All see us give a scalp. This is my second time bleaching, the wig too. So you know i don't really have much experience with that. Did it right this time? I left it on for 30 minutes instead of 35 and it ended up bleaching. Most of the knots the knots on this wig were really small to the point where you could barely see it. I'M sorry, i just got ta keep touching my head, you know when you look good and you just got ta keep touching your head yeah. My pigtails are cute, i'm probably going to do multiple styles with this wig, i'm probably going to do like a video show almost with hairstyles and stuff. I don't got no complaints. It'S given bust down middle part. It gave everything i was supposed to give, but yeah go copy. This hair, it is true length, does not shed takes bleach and melts pretty easily and if you like, the video, don't forget to like comment and subscribe, i'm gon na try to give you guys more styles, but until then bye


Comments
Elecia Robinson: So pretty Great video sis
Ambersopretty : love your videos! theyre so thorough
Kemesha Johnson-Braham: Beautiful
Marcus Henderson: Great in-depth video ‼️
Katrina Miles: Am loving this
iiamiracle: