*Must Watch* Quick & Easy Beginner Friendly 6X6 Closure Wig Install!! | Westkiss Hair
- Posted on 10 May, 2020
- Closure Wig
- By Anonymous
Stay tuned for more videos!! Don’t forget to LIKE and COMMENT on my videos and SUBSCRIBE to my channel!
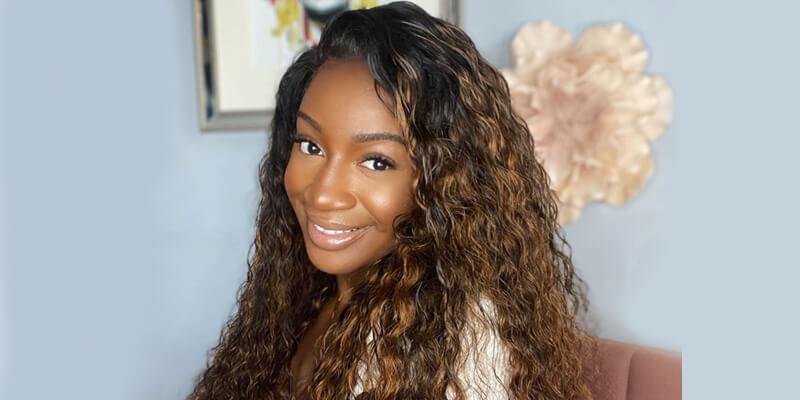
Wig Details
Lace: Transparent
Length: 24 inches
Density: 180%
Cap Size: Medium
Direct Wig Link
https://www.westkiss.com/body-wave-6-6...
Website Link
Add all my socials!
Instagram- @kay.ballard
Twitter- @kayballard_
Snapchat- @kayla.ballard1
Intro Song Link
https://www.youtube.com/watch?v=LZZsWy...
Background Music Link
https://www.youtube.com/watch?v=s7E_5Y...
So we're just going to jump right into our video, so today i am showing you guys my 6x6 closure wig from west kiss hair. It is a body wave unit and it is brazilian hair. It is a transparent lace and it is 180 density. I got it in the cap size medium, the length that i got is 24 inches and i just showed you guys everything that the box came with. It came with an edge wrap, it came with wig caps and the wig. You can see the wave pattern of the hair and the hair is super soft um a little to no shedding no tangles, and it did not have a weird smell to it or anything like that. I was really happy with the hair fresh out the box. Now the hairline looks really natural, it does look pre-plucked um, it is not bleached and on the interior of the wig, it comes with three combs two on the sides and one in the back and then, of course, you've got the six by six lace. I did wash the hair, and this is what you're looking at now, it's soaking in conditioner and water um. It does come with care instructions on how you should wash it in the box. So that's what i followed, and this is what it looked like fresh out. The wash so for my natural hair, i'm going to go in with two different moisturizers and run that all through my hair. Okay. So since my hair is already pretty much flat, i did not do a braid down, so i just put it back into a ponytail and put my wig cap on over it. I'M gon na go in with the end of my comb and push all of my edges into the cap since they tend to come out once you put it on and i'm going to go in with some foundation on my wig cap, focusing more on the part Area and since i couldn't go to the beauty supply store since they're all closed, i just put foundation on the closure, and that was the before, and this was the after. I just start off by pinning the hair back out of my face, and then i go in with some got to be free spray right on the perimeter of the lace right where the baby hairs would be - and this is all i use really for my glueless - Install then i go in with my blow dryer and just blow dry it on cool until it is dry - and i just repeat the process on the other side until they are both attached once it is all dry. I pull up the lace, the excess lace and then i cut off the little side thicker pieces with scissors. Then i go in with an eyebrow razor and cut off the excess lace. Then i double back with those scissors again and cut off anything that i miss, and i do this kind of in a zigzag motion to make it look more natural, and i just do that all the way across i clean up my skin with an alcohol pad And then i will start to work on baby hairs now. This is a little bit tricky since you did spray it with the freeze spray. The hairs tend to be hard, so you kind of have to brush through the hairs and fight with them a little bit to be able to pull them out. But once you do that, then you figure out how much you want and make sure it's not too much. So your baby hairs aren't extra thick. I cut them down with that eyebrow razor again and then i reapply some got to be because the lace tends to lift a little bit once you're fighting with them baby hairs. So i just reapply that spray it down and then i tie those down. I don't lay them yet because i want it to be able to melt for a little bit. So while that lace is melting, i just start styling my hair and i decided to just flat iron it for the time being and the key um product to have your wigs flat is to have a hot cone. I got this hot comb, for i think twenty dollars from walmart um. I know they sell some on amazon as well. Just get you a hockey home you're, not gon na regret it. I promise so once i finish styling my whole head. I just use some mousse to lay my baby hairs um. If you're like me, you kind of have to fight with them. I feel like i've been fighting with these baby hairs this whole time, but so you kind of got ta fight with them play with them. See what you like see, what you don't like and just keep doing it over and over until you land on something that you like um, so yeah just be patient. It takes practice and then once i finish that i go in with my hot comb again just to flatten everything back out, i also use some mousse on the top of the wig to hold down all the flyways. So my last step is to just go in with some makeup into that part and onto the edges really and focus on making it look as natural as you can um. Since i was not able to bleach the knots, then this is what i do as an alternative. I mean it kind of looks the same either way, but your main goal is just make it look as natural as you can. The link to this link will be in the description box. Like i said in the unboxing like this is 24 inches. Let me show you out the blank 24 inches. I believe it's 180. yeah. 24 inches 180 degrees, all right y'all. So in this part, i was basically just repeating everything that i said at the beginning in the unboxing, so um yeah. This is the finished. Look um, it came out really good. Um looks really natural to me so yeah. Thank you guys for watching the video. All the way, through don't forget to like comment and subscribe um. Let me know which i want to see more, like leave a comment down below anything that y'all want to see from me and more videos will be coming soon, so just stay tuned, y'all, i'm getting better at this. Just bear with me. Y'All bear with me.


Comments
Chianne Stuart: What wig?!!? YES MAAM ❤️