This Is Scalp! | Pre Plucked *Must See* | Hd Lace 5X5 Closure Wig Install | Ft Julia Hair
- Posted on 06 May, 2022
- Closure Wig
- By Anonymous
WATCH IN 1080p
●▬▬▬▬▬ ◆ #JuliaHair 5th Anniversary Promotion◆▬▬▬▬●
JuliaHair 5th Anniversary Big Promotion: Begin on 6th May.
Better than Black Friday★ $20 OFF for $199 Code: YTB20
Direct Link To The Hair In This Video ➤https://bit.ly/3vPaQ2b
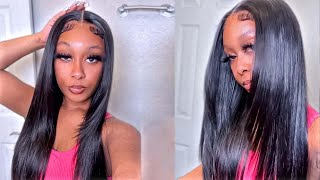
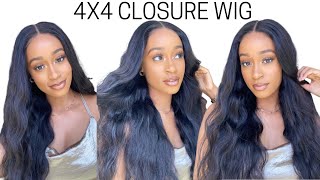
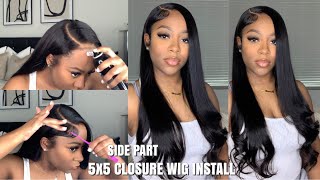
Hair info:5x5 HD Lace closure Body wave wig 24 inches
Top 1 Water Headband Wig ➤ https://bit.ly/3yco2j8
Affordable Kinky Straight Wig ➤ https://bit.ly/3vO5XX6
No Lace No Leave Out V Part Wig ➤ https://bit.ly/3yeo7CU
Everyday Flash Sale Get Cheap Wigs ➤ https://bit.ly/3P1x0Wb
https://www.juliahair.com/ ➤ Hot-sale wigs: https://bit.ly/3FoHTwX
Top Selling In Julia Hair: https://bit.ly/3P1nfaD
Best selling on Aliexpress store➤ https://s.click.aliexpress.com/e/_oDSD...
Amazon Julia Hair➤ https://amzn.to/3tdM8Wl
Subscribe #JuliaHair monthly giveaway on YouTube: https://bit.ly/3h1x09x
Follow IG @juliahair_no1: https://www.instagram.com/juliahairwig...
Inquire Now: WhatsApp number: +8615038958671
•
•
WIG PRODUCTS FREQUENTLY USED:
Ruby kisses 3d face creator foundation #14 https://amzn.to/3p408ja
Kera Care wax stick https://amzn.to/3ySbGuf
Got2b insta hold spray https://amzn.to/3yIajOK
Bio silk serum https://amzn.to/3vEFecM
Ion interchangeable curling wand https://amzn.to/3fVxNrc
Hot comb https://amzn.to/3i3I9b3
Pencil small flat iron (edges) https://amzn.to/34xr6X6
1.5inch flat iron https://amzn.to/3fwr08q
Curling iron https://amzn.to/3vBKpdG
Erickaj hold me down spray
•
•
SHOP NATURAL HAIR PRODUCTS
MAMÉ’S deep conditioning butter - https://www.tropictouches.com/product/...
Hair Growth Oil - https://tropictouches.bigcartel.com/pr...
Bonnet - https://tropictouches.bigcartel.com/pr...
Head wraps- https://tropictouches.bigcartel.com/pr...
•
•
Don’t forget to SUBSCRIBE https://m.youtube.com/c/ZelLewis
& TURN ON POST NOTIFICATION BELL so you don’t miss future uploads.
•
•
OTHER VIDEOS YOU MAY LIKE
How to cut your ear-tabs https://youtu.be/ReWTGiliV-g
How to cut your lace https://youtu.be/r_PPqUGLC7I
Pluck your wig https://youtu.be/KaZE5N9SDuU
Make a your wig GLUELESS https://youtu.be/U1dxZQjOAOQ
Free Highlight Class https://youtu.be/ISAWfVEYiyQ
Natural Hair Playlist https://www.youtube.com/playlist?list=...
Acrylic Nails Playlist https://www.youtube.com/playlist?list=...
•
•
Song In Video
—————————————————————————————————————
Follow @TropicTouches on Instagram
Don't forget to follow my social media accounts:
instagram - http://instagram.com/mamiistropic/
Business IG - http://instagram.com/tropictouches/
Snapchat - gizelle_lewis23
Twitter- TR0PICma (that's a zero lol)
⚠️⚠️ ↴
All inquiries contact
Email: [email protected]
—————————————————————————————————————
If you have any questions leave them in comments below
#ZelLewis
—————————————————————————————————————
DISCLAIMER ** I don’t own the rights to these songs**
** Some Links May Be Affiliate Meaning I Will Receive A Small Commission If You Choose To Shop Using The Links Provided**
Uh, hey guys, welcome back to my channel today's video is a collaboration with julia hair. Again this time i i have their 5x5 closure wig and same thing: wig cap, little gifts that come in their packaging. This is also a wig grip. I wear this under my closure, wigs or frontal wigs. It helps to keep your wig in place, especially when you're doing glueless. They also gave a little necklace. So i'm starting off by showing you how i pluck my wig i feel like this is a good tip for you guys if you want to pluck your wig by yourself and you don't want to send it to somebody else to customize. So i'm hot combing, the hair, going back. You guys already know we're doing the arrogance, hey method. I comb the hair going back you'll, be able to see everything perfectly fine and if you're not too confident, you can also just wet the hairline. So it should look something like this and we're gon na part out that area. That is a little bit thinner in the front. You don't want to plug that and over pluck it too much. So i'm starting off by plucking behind where you see that little dark line like there's a dark line, so you're gon na plug there and make sure the tweezers are down into the hair and keep going back into the hairline. I hope that is making sense. You can see exactly what i'm doing i'm plucking, but i'm making sure that i'm plucking into the hair, like into close to the lace and behind the thin dial area. You should be taking out clumps like this. It should have a good bit of hair coming out. So i'm plucking on one side and then i'm gon na pluck on the other side, try not to plug too much in the middle. Try staying more on the sides and work on the sides and keep going back so like the hairline is thinned out. But it's like natural looking! You can see it's starting to look natural already, so i'm gon na keep plucking until i'm pleased with this side. Okay, so i'm showing you the difference of that side and this side, and literally this plucking was like 10 minutes. So you could literally do this in 10 minutes, just try not to stay in one spot and you'll be perfectly fine, oh, and once you're satisfied with this, then you're going to go ahead and plug the front, so the front is just lightly plucking. You want to pluck it lightly just to thin it out a little bit, so it can give you more of a natural effect because it's already thin, but you need to be a little bit more thin. So your edges and stuff can look as natural as possible and then once i'm done, plucking i'm just going to brush all this hair back, give it a little hot comb again and then we're ready to install so for the install the basic we're gon na sleep Back our hair with edge control, i'm using the edge booster as usual, and i'm just gon na brush that back and since i'm doing a closure, i'm making sure that the top is brushed back and the side is like a little bit swoopy. So it could blend in properly and i'm not doing a block out today, but i am gluing this wig down, i'm putting on this dark brown, wig cap and i'm gon na be wiping my forehead with 91 alcohol. This is going to make sure that my skin is nice and clean of any oils and makeup. I don't know why i was wiping the whole hairline but two inches on, so i'm putting my foundation in the lace, i'm just showing you how the lace is looking. This wig is really pretty, and i'm going to use the number 14 ruby kisses and i'm going to put that all over the lace. These are the products i'm going to be using to glue my wig down. I'M going to put the skin guard first, wait for it to dry all the way down and then i'm going to apply the glue, i'm applying three layers of glue waiting for it to dry and turn clear in between very self-explanatory. So you guys can just watch this portion and once it's ready, i'm going to go ahead and pull the lace into the glue. If you already have your lace cut off, you could just go ahead and do the same exact thing, making sure that you put it a little bit in front of where the glue is laying down. You want to tie this down for about 5 minutes to 10 minutes and then once you feel like it's nice and melted in we're gon na go ahead and take the band off and start cutting off this lace. So i actually went in with a little bit of the number 15 ruby kisses to blend in the little white cast that was left and i'm using some of my evan lace spray just to seal in the sides of the lace. But then, once you do this, you can go ahead and start cutting down. I'M going to be using an eyebrow razor face razor thing to cut off the lace and once it's cut, i'm going to go ahead and seal the edges of that. With my ebb and lace, where you can use any lace for that, you're comfortable with it comfortable with just make sure that it's a little bit dry down before you tie it down, then i'm just cleaning it up, just making little corrections and just blending in the Line because when you turn to the side, if you see in like a little ashy white line or like ash line, you want to blend that in so i'm just seeing where my eyebrow starts to get the edges on both sides, because i'm not putting no edges In the middle of my head, i'm just having it on both sides of my temples. Once you do that you want to go ahead and pluck it a little bit more just so, you can be more natural one thing about the edges: you need it to be. A little bit thinned out not too thin, where it's going to get bald but thinned out enough where it looks natural and then i'm going to spray in between those areas with the spray. This is optional, but i like to do that and then i just tie it down and wait for it to dry for another five minutes once it's dry, i did go ahead and curl my edges and stuff, and i did not get to show you guys. So i'm just going to show you a little demonstration. I curled it going underneath just like that, i'm going to use my gorilla snot to lay down these edges. I want the edges to stay in place all night and i did not sleep with a head scarf. So i i didn't want it to move and it didn't move so i'm using this to sculpt down the edges and mold it in place and once you're comfortable with that make sure you just dry it down so that all like the wetness of it is gone. You can also just use your blow dryer. I really recommend that you use your blow dryer when you do the first edge blow it and then do the second one blow it on warm air and it will dry super fast. So i'm just combing this out. I did not put any product in this hair at all, but i'm gon na go ahead and crimp it. Oh actually, i'm not crimping it. I'M just like fixing the lace color and i'm putting some cara care wax stick to to um flatten out the top of the wig, i'm using my hot comb that i got from amazon and i'm gon na just flatten that out, okay and once it's to my Liking, i put a little bit more of that wax in my hand, rub it together and rub it down. You can see that looking nice and flat and now i'm going to go ahead and crimp my hair, i'm using my tgi, my tgi bed head wave artist, crimper i'm going to just crimp it all over my hair. I did not spray anything on it, but i did go ahead and use my got to be spray to hold these crimps in place. That was basically all that i did so you guys can just watch me and yeah. This is basically that's all i did so. This is the end of the video. This is how the hair turned out. I love it. Let me know if you guys are ready to see this makeup. Look because i tried some new products from ulta and some things are amiss like some things are not given. What i thought it was supposed to give, but some things are giving what it's supposed to get so make sure you like this video subscribe. So you guys can see all my other content coming up and i will definitely see you in my next one. Don'T forget to visit julia hair, i will have the links down below bye foreign

Comments
Rose Squ: Tutorial on this makeup look please!!
Shania James: You never disappoint I'm in love with this makeup look tho
AstroGirl: Sisss the hair is fire but this look omg I’m so obsessed
Sherika Brown: New Subbie Loving your content
Kersha Beaver: Beautiful as always
Cillean Fif: Ești un idol mikujava.Monster mereu în inima mea frumos, dragoste, alegere, cultural. Sunt unul dintrex cele mai bune concerte....
Nerm Mena: Ești un idol bigasss.uno mereu în inima mea frumos, dragoste, alegere, cultural. Sunt unul dintrek cele mai bune concerte....
Zoe Sunflower: Off topic but what did you use to do your thumbnail?
StylieStylish Vlogs Tv: #LOVE #LIFEITUP
Lucas Lima: Let's go