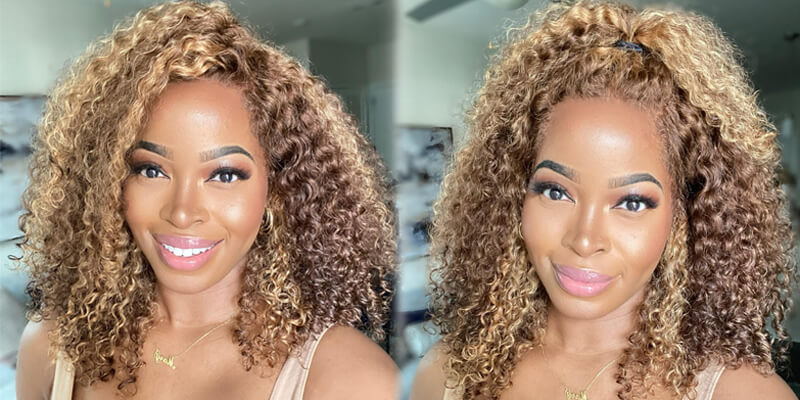
100% Glueless 6X6 Closure Wig Install | Ft Asteria Hair Water Wave Wig
- Posted on 31 July, 2021
- Closure Wig
- By Anonymous
Welcome back to the Kulture K Family!
I hope you all enjoy this COMPLETELY GLUELESS wig install❗️❗️❗️Watch me slay this wig with only my wig grip and an elastic band❗️
ASTERIA HAIR
Direct Link ➡️ https://m.asteriahair.com/water-wave-h...
Amazon
Wig Grip ➡️ https://www.amazon.com/dp/B01K9RYL4O/r...
CONNECT WITH ME ❤️
Instagram: @simply_kelly20
Snapchat: @jamaicannbhad
Today, we'll be working with asteria here, i accidentally threw away the box, but it did come with the regular satin bag, and you can use this to store your wigs in also in the box. Came your standard wig cap as well as an elastic band, so that you can sew this on the inside of your wigs. Last but not least, it came with a lovely unit. This is a 26 inch water wave wig. It is an hd 6x6 closure wig, and here i'm just showing you the basic construction of the wig. It comes with the two combs on the side and the third one on the bottom. So it's really your standard wig construction. This is also in a medium cap size and guys it's really been a minute since i've had curly hair, so i'm super excited for this wig install. So this is what the wig is looking like on my head. This is straight out of the packaging, no customization at all. Here, i'm just showing you what the hairline on the wig is looking like. They said that this was pre-plucked, but we're definitely going to go in and pluck the hairline some more as well as i will be bleaching the knots on this unit for a more natural look. I also forgot to mention, but this wig is 250 density. I love when my curly wigs are full and voluminous, so i know i definitely didn't want anything below 180 or 200 percent density, we're going to go ahead and bleach the knots first. So here i have my bw2 bleach powder as well as my 20 volume developer. I also have my mixing brush as well as my mixing bowl to mix the two components together. So here is what the wig is looking like against my skin, the lace looks pretty good, but we definitely want to go in and take away those black dots on the lace. So we're going to start off by pouring the powder into the bowl, we're just going to do this a little at a time and build up as we go and then we're just going to do the same thing with the developer guys. I just want to point out as a side note that i am using 20 volume develop developer, but you can go ahead and use 30 or 40 volume developer. If you like, i personally use 20 because i'm not a pro at bleaching and the 30 or the 40 tends to activate a little too quickly for me and i'm a person that likes to go do other things. While this is going on. So i would literally come back to yellow or blonde root if i use 30 or 40 so, and i just really don't have the time to go back in and buy the roots black, it's just too it's too much guys. So i just stick with 20, but you guys can use whatever it is that you're most comfortable with so i'm going back in just adding more powder to the bowl and, as i add more powder, i actually add less developer or none at all. Remember that you want to go for a very thick consistency. We don't want anything, that's too watery or too runny, because it will easily seep through the lace and that's not going to be good. If it does that we're going to go in and gently paint the inside of the lace and yes, i said paint i know on camera, it may look like i'm going in kind of hard on the lace, but i'm actually being very, very gentle. So i'm just going to go ahead and continue this process for the entire closure and guys, i'm so sorry for the changes of angles. It was very hard for me to record as a consistent angle to capture everything on camera, for you guys, i let it sit for about 25 to 35 minutes on the lace before washing it out. I used cold water and i just made sure that i got everything washed properly. I didn't want to see any white spots or any white dots anywhere and after that i used purple shampoo just to take away any harsh, brassiness yellow tones that may have been showing on the lace when i was done and once i'm done, you'll see that there Are still a few black dots on the lace, but you know that's what i get for using 20 volume developer, but i'm okay with it, because it still looks good. Do now we're on to plucking the hairline. I start by parting slightly behind the hairline combing through it and then i'm going to go in with my angled tweezers and then i just start plucking randomly within that section. But i'm making sure that i'm not staying in one area for too long, because, of course we want to prevent getting any bald spots on our lace. However, with that being said, ladies or gentlemen, do not be afraid to pluck on your hairline on your wig you're supposed to have balls and balls of hair when you're done so don't be scared to pluck, when i think i've plucked enough on that section. I just repeat the process by making another part behind the first and then i go back in pluck some more comb it out, and then i just repeat that process one more time on a third section now that i've plucked in all three sections on this side. I pull all the hair back and i just start plucking slightly strategically in the front and what i mean by that is that i'm plucking at certain strands on the hairline so that i break up that boxy. Look that usually goes straight across the front on these wigs. Once that's done, i just pluck a bit more just till it's pleasing to my eyes and then, of course, what i do on one side, i'm going to go ahead and repeat the process. On the other side, here is what the wig is looking like. No, this is after being bleached plucked and i went in and hot comb the front just to get it flat and to control the flyaways and remember guys from my description that this is a completely glueless wig. So we're now at the critical stage where it's time to sew on the elastic band and i went and just picked this roll up from my calls. It was about three dollars and some change. I usually prefer the thicker ones, but this one will do just fine measuring the elastic band. First is a key step to ensuring that your wig will lay flat and also stay secure, normally on a frontal wig. You would measure from air to air, but for a closure wig. You want to measure from the side where the closure starts all the way around to the other side and remember, to stretch the elastic band to ensure a secure fit once you've figured out the length that you need, then you're going to go ahead and cut it. After cutting, you just want to make sure that it fits your head properly, so you want to just go ahead and measure it one more time make sure that you're stretching it. When you do so, and if all is well, then this is the piece that you'll be using to sew on the inside of your wig. When sewing the elastic band, you want to make sure that you're sewing it under. If that makes sense, i'm hoping that the movement of my hands help you guys understand what i'm saying, but - and you also want to make sure that you're sewing it towards the front because sewing it under ensures that it will lay flat with no homes. So, just for a close-up. Obviously this is where the lace gets cut right right along the hairline. So right where you cut the lace and then on the other side right where the wig construction starts. That'S where you want to sew the band, because again, once you put on your wig, that elastic band will be pulling directly on the lace which will ensure that it lays flat and ensure that it's very secure, i went ahead and sold it off camera. Sorry that i couldn't capture it for you on camera, though, but here's what the band is looking like and as you can see, it's sewn underneath, so that the band goes downward instead of upwards and then it's sewn right towards the front of the closure. So again, it's going to pull down on that closure when you put it on so another key component to my glueless wig installs is my wig grip. It'S not a necessity guys, but for me honestly anything can happen. You don't know what can happen when it comes to completely glueless wigging stars and you won't catch me slipping and you won't catch this wig slipping. So i love to give myself an extra layer of security. If you guys would like to purchase this i'll, definitely leave it in the description box below. I got it from amazon for really cheap, but i know you can get this from your local beauty supply store because i've seen it everywhere. I then went ahead and i put the wig on my head so far. It feels very secure. I'M not gon na lie. It feels a little tight like i could have not stretched the elastic band as much, but it still feels obviously really really secure. So i'm okay with it um and so far, i'm really in love with this wig we're finally on to cutting the lace. So i'm just gon na go straight down the middle and then i'm going to go across one side with my eyebrow razor and i just start cutting like jaggedly along the hairline just making sure it's not in a harsh straight line across and then of course, what I do on one side, i will go ahead and do on the other side of where i put down the middle and then cut away any extra pieces that may be fraying or hanging. As you see, i'm just going in with a little powder on the front. So that it blends a little bit better into my skin and then i'm going to go in with my hot comb just to sleek it down and then once i think that it's sleek enough, i'm going to go in with some foam on the top to make Sure that the top is nice and flat as well. Last but not least, we are on to the baby hairs. I would normally go for three swoops, one in the middle and two on the sides, but this time around, i'm gon na go for the two side. Soups instead, so what i'm gon na do is i just take my comb and i just part out the pieces that i want to use for my baby hair and then i'm gon na go in with my hot comb behind the hairline to try and really separate It and then using the hot comb as well, i'm going to try and lay the baby hairs forward in the direction that i want it to go once i've sectioned off the hair that i'll be using for the baby hairs, i'm going back in with my angled Tweezers and i'm just going to start thinning out the hairline, because y'all can see it looks a little thick right now and then once they're to my liking. I'M just going to cut them at an angle and my preference is i'd rather cut them too long than too short, because you know, if you cut them too long, you can always go back and cut some more if you need to. But if you cut them too short, then you know i just chop, you get chopped, there's no going back. I'Ve been seeing this new technique everywhere, and this is my first time trying it. So i have a very small straightener and if there's a specific name for this, you can, let me know in the comments, but i'm just going to straighten the baby hairs, and i believe this helps to lay them easier. And in my opinion, they definitely do as you all can see. One swoop is already done, didn't get to catch it on camera, though. Hence the look on my face, but anyways we move on to the next, so i'm just taking my foam and you can really use any foam that you prefer remember that there is no adhesive being used in this install. So you don't really have to worry about the foam, possibly loosening the glue. So again, i just take my foam and shout out to my friend andrew who actually left this foam at my apartment. One weekend, it's really a good brand, but i just put that on my edge brush and i really just start swooping away, but just keep brushing them until you get your desired. Look you'll see here that this is why i said i'd rather cut them too long than too short and i'd rather be safe than sorry, because after swooping they still looked a little too long for me and they were still a little too thick. So i just cut some more at an angle and then thinned it out a little bit more with my tweezers added a bit more foam, re-swooped and then y'all can see they look a lot better. I'M definitely not an expert at this, but i decided to cut some layers in the hair so that everything wouldn't fall at the same length in the front. And i've noticed that when you layer your hair, it helps to frame the face a lot better. When you do this now, just taking my spray bottle and it's just water, no product, no conditioner and i'm just spraying and brushing through these curls - and i'm not going to do it too much. Because your girl is about to go out. And i don't want it to be too wet, i want it to be a little bit dry and like puffy uh, bye, all right guys. So this is what the finished hair is looking like. I hope you guys really enjoyed this install it's my first one. So i was really excited to do it, so i hope you guys enjoyed it remember. This is a completely glueless. You guys didn't see me use any glue, any adhesive, any sprays, any gel just wanted to check back in. I thought about it. I just went out - and i came back in i'm like people might think that i used glue behind the scenes. So i just wanted to come back here and show for anyone who did not believe like this is a completely clueless non adhesive, nothing completely glueless wig. All i did use was my wig grip and my elastic band back to the video. All you saw me use the only thing that is securing this wig on my head and when i tell you it's not going anywhere, the only thing that is secure in this wig is the elastic band that i sewed in on the inside of the wig, and My wig grip, i'm telling you guys if you want to purchase that wig grip. I think i think when i bought it, it was probably i don't know - maybe ten dollars - maybe eight - i don't know somewhere along those prices. Maybe it went over. I bought it from amazon and it's one of the best purchases i have made when it comes to my wigs. I don't really do glue anymore. If i do it's for a special occasion, but that wig grip really makes sure that my hair is down and with a tight, secure, elastic band, that's all i need. I can take this off when i go when i come in, i can just hang it up on my you know, hang it up and i can get into bed all free when i wake up in the morning, and i have something to do just drag it On really quick and i'm out the door, so i hope you guys really enjoyed this install. Maybe i'll do more like these. I think i might do some more like these. I'M also thinking to cut a little bit more layers a little scared, because i'm not a pro at cutting layers, but i really do like how this wig turned out and i will be on vacation in costa rica next weekend. So guys look out for our vlog. Coming soon, that's why i installed this wig, but guys this is it for at the end of the video go ahead and like comment share, subscribe, tell a friend to tell a friend to tell a friend about my channel because we're growing every day - and i am Really trying to push out consistent content for you guys, so i appreciate the ones who already showed me love, and i just hope that we just continue to grow over here on the cultured k family. I will see you in the next video


Comments
ASTERIA HAIR: Yesss! Flawless glueless install! Thanks for sharing asteria hair.❤️
Karlisa: This helped me so much! Thank you for explaining and demonstrating every step in detail❤️ I’m about to try it
Tanya Hutchinson: You did a beautiful job!! Love the hair!!!
SMonique: You’re so pretty and I love this technique Did you buy the wig yourself or did they send it to you?
Ashli Reid: You did such a great job! I love that wig & mi deh yah a wait pon yuh fi come do mine
Kesha Johnson: Looks amazing! What density?
Vivian White: Wow you slayed the hair very well
Sky is the limit: New Subcriber! Thanks for the detailed review. By the way your very beautiful and I love the accent!
Jacqueline Hall: You are articulate... Refreshing for a young lady.. On with the hustle too... Hold your own
Brittany: Flawless
Krystle Gourjuss: Pretty
MBXO: Sis your hair look bad nuh rarse ❤️
Ebony: density?
Che & Co.: Loved this ! What inch did you get ?
curlymami: Was this a sponsored video?