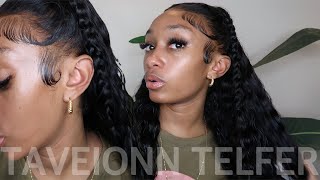
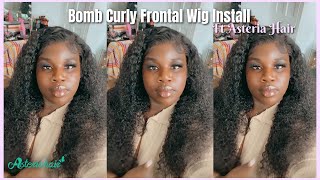
Installing My 6X6 Closure Wig| Ft. Asteria Hair Company
- Posted on 20 May, 2019
- Closure Wig
- By Anonymous
Hair: Asteria Deep Wave 6*6 closure wig 22' 180% denisty
Direct Link http://bit.ly/2LBQp3w
More 6'' Deep Part Wigs http://bit.ly/2VUK7jq
AsteriaHair OFFICIAL STORE http://bit.ly/2VPscuB
Affordable 13*4 lace front wigs http://bit.ly/2VYRw0Y
Best selling Deep Wave Hair http://bit.ly/2VNbM5Z
Natural Curly Hair http://bit.ly/2VYRGW8
WHOLESALE [email protected] Whatsapp: +86 15136424039
Subscribe http://bit.ly/2LJ0PhE have chance to win free hair
Instagram @asteria__hair http://bit.ly/2LA7MSt
Hey guys and welcome back today, we'll be doing a review on our stereos hair. Now I was so excited to do this review one because I've never had a 5x5 closure in my life and yet alone, a 5x5 closure wig that I did not have to make. So I was really excited and I love this curl pattern. I will have all the details listed down below about this hair and where to purchase and coupon codes and etc. So yes, guys, this wig is beautiful, it is gorgeous and it's extremely soft and, like I said, I've never had a 5x5 closure ever so I was excited. These knots were very easy to bleach and, as you can see, I went ahead already add in my foundation. Washed it and everything else now I will be using adhesive to install this wig today and, of course, my baby, the ghost bond. So I'm going to go ahead and do the same steps. I usually do for a closure in style such as cutting off the little big pieces on the side, and I'm going to go ahead and install my wig now as usual. The first step you want to do is: go ahead and clean your hairline. What'S 91 2 % or stronger alcohol and I thought I'd do that - I'm going to go ahead and cut the flaps off the sides and then begin to add my adhesive to lay this wig down now the hairline was already pre plugged, but I did go in And pluck it some more and it's just like everything about this week was just perfect, perfect, perfect, like I really really loved it and actually wore this to go out to my sister performance. So it was just like the perfect look for especially for what I was wearing that night, so it just went in so perfect. But, however, I'm gon na go ahead and glue this thing down and just add a couple baby hairs towards the front to give it a more. You know: hairstyle hairstyle type of look versus me. Just you know doing any simple install now I loved how to lace disappeared once I laid down my closure, so this lace is very good quality if I'm not mistaken, a maybe Swiss lace. However, it was just like perfect nuts were small and everything like that. So when I laid my closure down, it really like disappeared into my skin, so those are the qualities and hair companies that you really want to look for and you want novelty actually purchase the hair, but guys trust me on this. One like this wig is everything just it's like really everything. So now that I add on my layers, we're gon na go ahead and pull that lace down. It'S red, blue and I'm going to begin to blow-dry it down using my fingers to you know not really match it in, but to help melt it in, and I'm gon na go ahead and cut off the interlace and, like I mentioned before, as you can see Once I cut that lace sauce, it's just like, where is the lace like you, don't see it melted exactly? Let'S not even tat down all the way. So I'm gon na go ahead and you know slip the glue on other places that are still lifting and then I'm gon na get into the actual styling of this way. Now what I am proud about myself when it comes to this video is like it was. I did a better job at doing my baby hairs on camera. I usually like go off and do most of it, but actually doing most of it on camera. So I am proud of myself one that but of course, just like how you guys watch my videos. I'M always watching other youtubers videos to you know, try new things and stuff like that. So stay tuned for new videos that I'm posting I am. I have some new techniques to share with you guys as far as baby hairs install placement. Everything like I have so many tricks and new ideas coming so please stay tuned for all my new videos that I will be posting this week and don't forget to turn over those alarm bells. You don't want to miss out on anything because it's like I'm going to get more creative with my videos and everything goes but back to this install. I'M gon na go ahead and blow-dry that down and I am going to do a middle part. As you can see from this thumbnail, video would have thought the thumbnail clip or a photo. I will be doing any sense apart and I'm just gon na go ahead and part. My hair off we're gon na go ahead and wet it. I'M using water and conditioner. Then I'm gon na go in with my mousse at the top to help get it laid down a little bit more. So once I do that, I'm going to section of hair for my baby hairs or whatever like that and then pretty much. The rest is history. You guys should see what I so I am using that mousse to like smooth the hair back, because I want him to like push back a little bit towards the front and I'm gon na. Take my scissors and cut their hair down to about an inch or less cuz I'll, be using that for baby hairs and I'm just going to use the got to be gel to swoop the baby hairs, because I usually don't like my baby hairs to move. When I have it just easier for me, less maintenance for me, so I am using that mousse to the finer curls after I use my water. So just computer follow these steps for this something install and you should be satisfied now, I'm going to use a small tooth comb to you, know, sort my baby hairs and it keeps the sweeping baby hair. It'S just. You want to kind of just create C's like just move your hands and the steam motion using your hands and your fingers and whatever you're, using to smooth it. Just in your mind, think of creating seas, creating seas and once you create to see you just want to smooth the hair into the rest of the hair, so it blends in school. You might not cut enough candy to a baby hair. So if you do miss on pieces, just fall back in and cut. It is no no big deal or anything like that. Now, when it came to the finishing look, I noticed that it looks like the hair was a little thinner on one side, but it's not a problem for a quick fix. All I did was just lay my comb in the center of my part, and I took some black spray and I sprayed like both sides of the hair with that tail comb laying in the sin of my part, so my part is not black to make it Look, you know much fuller towards the top so, like I said, if you ever have an issue, my fish, just that's your quick fix, I'm sorry either they show you guys on camera, but I kind of hope you understand what I'm trying to say. So I'm gon na repeat it just in case you didn't catch it before that little spot. That looks thin right down the front. I'M just gon na take the end of my rat tail comb and lay it down in the middle and spray black fur on both sides, because this is the finishing looking if you notice that that little clear spot thinner spot is erased. But, however, this hair is absolutely gorgeous gorgeous gorgeous. I love it and I recommend to all to give it a try and purchase. So thank you guys for tuning in until next time.

Comments
Shanae T.: I love Asteria, I order through them all the time. the hair is consistently good.
Nicole.: Hey, what kind of stay did you use for the thin spot? I have the same issue with a 6x6 that I just ordered. Idk if I overplucked it or if it came that way.
krys alex: Sooo beautiful. What foundation you used?
casey baker: @asteria you guys never responded to my email about the hair I ordered !! I threw it away an will never buy from you guys again !!!! Will spread the word on social media as well
niki saun: It’s a 6x6 not a 5x5
Destiney English: Cute
Courtney P: I ordered this hair from them and it looks nothing like yours.. I"m so upset :(
Nykera Cosby: First
DeeDee's nails: It's cute but it looks like it's a little to far to the front of your forehead