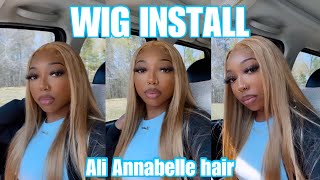
Glueless Lace Closure Wig Install | Beginner Friendly| Must Watch | Ft. Ali Annabelle
- Posted on 27 September, 2021
- Closure Wig
- By Anonymous
Hey guys In today’s video I’m installing a 4x4 lace closure wig Glueless ! It was super easy and quick to install ! I’m showing you guys step by step so it’s 100% beginner friendly thank you for tuning in
Subscribe and hit the bell for more amazing videos!
♡ ♡ ♡ ♡ ♡ ♡ ♡ ♡ ♡ ♡ ♡ ♡ ♡ ♡ ♡
Business inquiries email [email protected]
▷ CONNECT WITH ME!
TWITTER ‣ https://mobile.twitter.com/xeel__?lang...
INSTAGRAM ‣ https://www.instagram.com/xeel__/
Shop /Book me Www.Alexissjay.com
Follow My hair page : @Alexissjayy
Product Page: @AlexisJaycollection
▷ HAIR INFO
●▬▬▬▬▬▬▬▬▬♛Ali Annabelle♛▬▬▬▬▬▬▬▬●
Best Quality,Affordable Price
Extra 5% discount Code: AJ5
Hair Detail: Ali Annabelle 22 inches Brazilian Loose Wave Lace Front Human Hair Wigs
★Direct Link➤https://bit.ly/3nLTaR5
Bouncy Smooth Hair with Affordable Price
Ali Annabelle Hair Official Website: ➤https://bit.ly/3tUBu6X
Highly Recommend:
Ali Annabelle Body Wave Lace Front Human Hair Wigs Pre Plucked Peruvian Remy Lace Wig →https://bit.ly/3lDkHl3
Ali Annabelle Brazilian Water Wave Lace Front Human Hair Wigs Wet And Wavy Lace Frontal Wig →https://bit.ly/2XBjh2E
#aliannabellehair #aliannabellehairwig #aliannabellelacefrontwig#bodywavewigs
Instagram @aliannabellehair_01: https://bit.ly/36wpGgy
Youtube @Ali Annabelle Hair: https://bit.ly/3AKNGdw
Facebook @Ali Annabelle Hair: https://bit.ly/3wzHMc2
Wholesale Whatsapp: +8615617255695 E-mail: [email protected]
Hey guys welcome back to my channel in today's video. We are working with ali annabelle hair and they sent me a 22 inch lace closure unit and it is a loose wave guys. This is the wig fresh out of the box and out of the packaging. So you can see how it looks without me: bleaching the knots combing through it or anything. The curls are really cute and it's very bouncy and the hair is really soft. So in this next clip i'm going to be showing you guys how it looked once i bleached the knots and plucked the front to part: well, not the frontal, but the closure part and gel the back, because i am going to be installing it. You know like a closure with glue, but i'm doing it glueless. I just wanted to give that frontal look. So, let's just hop right into this video, i'm going to start with just cutting off those excess tabs, because you want to make sure that the lace is laying as flat as possible, and that would be in the way i'm going to also go in with my Spray, this is the best spray ever when it goes to doing glueless installs, because this spray lasts about a week without having to touch it up or anything. And it's amazing, and i'm also going to take my elastic band and just let it sit for about 10 minutes. While i brush through this hair - and you know, get it together and in the next clip y'all will see me, you know styling it and getting the baby hairs out and i'm going to be quiet until i get to the point where i need to explain, but Yeah y'all, this hair is really soft, and so full do now. I'M going in with my gorilla snot just to make sure my hair is as late as possible. This part is something that i do not miss when it comes to installing my wigs or front tools period, because i feel like just extra step well, this extra step right here just makes it even more flatter than what it could be. So this is just my. I said this is just this is just my opinion. So if you don't like the gel, you don't have to do the gel, but i like the gel. So that's just what i do my i really fell in love with doing my edges. This way, y'all, i'm not gon na lie, they are so cute. This is like my favorite right now, so this is really easy. All you do is curl the hair up and then you will take the guys to the spray and spray it and mold it. How you want it to make and they normally last so you you would have to touch it up. I'M not going to lie to you, but it's really easy, because once it gets old you just comb it out recurrently and then mold it again. So that's really all you're doing so. This is the hair with half side wet and half side dry. Like i said, i really do like the hair and i love how it look once it's wet like it's even prettier, it is poofy, but once you wet it, it do shrink a lot. So if you wanted to keep the wet look lasting all day and keeping it looking wet, all you have to do is put in like some leave-in conditioner, something that will help hold the curl down that'll help it stay, looking wet and heavy if i'm making sense, But i can do like a curly hair, routine video for y'all if y'all are interested just so you can see how i would keep my curls up throughout the day and how i tie my hair up at night. Maybe i could do like a curly um, a curly hair day routine or something like that for night and day. Just so, y'all can see how i maintain it and how i freshen it back up in the morning time. But as you can see, one of my edges was messed up, so i'm about to go in and fix it and then i'll just tune back in once i get to the end of this video, okay guys. So we are now at the end of this video. I hope you guys enjoyed me installing this wig. It was really easy to install. It literally took me under 30 minutes and my edges, i'm in love with them. They are so cute once i finally got them together. Thank you guys so much for watching this. Video make sure you follow me on instagram and twitter at xel underscore underscore make sure you comment below and thumbs up and hit that bell for more videos to come. I love you guys so much. All of the information for this hair will be located down below this wig was so easy to install like once i bleached the knots. It was just easy, breezy and a lot bleached really fast. So that's nothing to worry about. I love. You guys see you on the next video


Comments
Towonda Grant: Gorgorous as always!
Faith Shelton: Makeup tutorial?? It looks so gooddd