How To Make Your Closure Look Like Scalp! Start To Finish Closure Wig Install |Beauty Forever
- Posted on 18 August, 2021
- Closure Wig
- By Anonymous
Hello my beautiful subscribers (and non subs) ☺️
• I sell wigs after I review them! (Follow me on IG) I post the wigs in my story if for sale! But this wig has been sold ! @caroshair
Want a wig made? Want me to pluck and bleach the knots for you wig? follow my hair page @caroshair
personal instagram -IG:holaa_caro
Email:[email protected]
●▬▬▬▬▬ #BeautyForeverHair ▬▬▬▬▬●
☛Get $10 Off Use Special Code: beautyytb
☛With QuadPay or PayPal, 4 or 6 Interest-Free payments
I’m Wearing: Curly Wave 5*5 HD lace wig 26inch 180% density
Direct link➤https://bit.ly/36X8BMN
MUST HAVE Top 1 Selling➤https://bit.ly/3kRXDAy
Hot selling 5*5 HD lace wigs➤https://bit.ly/2WkozPf
Gorgeous Ombre highlight wigs➤https://bit.ly/3zwy8Zo
$10 Cash Back ➤https://bit.ly/3iAnsSE
https://www.beautyforever.com/ ➤Super Brand Day:
the 3rd Friday&Saturday of Each Month EXTRA 10% OFF
Aliexpress Beauty Forever Website: https://bit.ly/3epWyuk
Hot Sale hair on Aliexpress Store: https://bit.ly/3kVOzI7
Amazon Beauty Forever Hair: https://amzn.to/2KSGkyB
Instagram@beautyforeverhair: http://bit.ly/IGBeautyForever
Beauty Forever YouTube Channel: https://bit.ly/38akLUg
Customer Service WhatsApp:+8613783534924
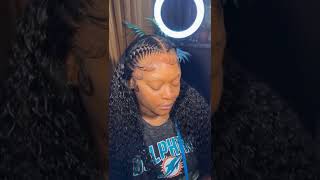
I got my peaches out in georgia: hey guys, welcome back to my channel, so in today's video we're going to be doing more of a chit chat, vlog style walkthrough tutorial on how easy it is to turn your closure wig into a well not until frontal, because It'S still a closure, but for it to give you frontal vibes, you know giving fresh out the scalp, because closures, if you were wearing closures back in 2015, 2014 16 low ke2. You know the struggle, you know the come up, so the closure they're working with today is from beauty forever. They just sent me this wig right here. I just got the box, it is there. Let me make sure i got the right information because i'll just be talking um. I believe this is their jerry, curl lace, and this is a just a regular. It looks like a regular four by four yeah. It looks like a regular four by four hd and so she's, looking like 26 inches she's, very long and very thick. So first thing: first, we have to do is bleach the knots i don't know if you can see these knots the little black thing at the bottom of the lace. First, to get a very natural coming out of our scalp look. We have the bleach the knot, so let's do that for not the tools you need is bleaching powder. I just use bw it's very standard, getting local supply, local, beautiful store or amazon, and i also like to use 40 volume developer and i feel like for personally, i would suggest using 30 to 40, nothing below or above that, because anything above will probably bleach too Fast anything low, like 20 volume, will bleach too slow. So your beginner, i feel like start with 30 and as you get more comfortable with bleaching hair, you can go up to 40 volume developer for much faster lifting now for bleaching. My knots i used to never know how much i needed and i would say, for closures honestly, you get a really big tub like this really one scoop. One scoop is enough for a closure and a frontal, and if you get the little like statutes that they sell the beauty supply store, you really just need one sachet for closure and two sachets or packs whatever they're called for a frontal cool. So i got my little one scoop going and i always say pour this in slowly, because you have to get the right consistency for you to not mess up this process. So i just kind of like pour a little bit in a little swirly swirl. It'S still very grainy pour a little bit in because i'm going for a nice creamy, not too runny type of consistency pour a little bit more make sure i mix it. This is still like this right here. That is too chalky like you, don't want chalkiness support. Just a little bit more give it a good mix, it's still, not there just a little bit, because now i don't want it too runny now, and that's it right here. You see that nice and creamy, it's not spilling like. If you pick up your little spatula thing, you tip it over and it's spilling. That means it's too watery and you have to make it thicker before i bleach. My knots i like to make sure the hair is on the frontal enclosure is always pushed back. I don't want to mess up and end up getting like bleach on the actual hair, so i'll just get some water and just spray the front and get like actually an edge brush or something and just push that hair back. So i know i'm not putting actual bleach onto the hair all right now. She'S ready is that i have my knots, nice and covered with bleach. I just go ahead and let the wig sit and time honestly every wig is different. Some knots will bleach easier. So not to take more time so i kind of just come back. I kind of just check every 15 minute interval as a beginner, so every 15 minutes come in check your knots. Let me zoom in a little bit, so you guys can see the knots understand what i'm saying so yeah every 15 minutes come back check your knots to see if it's gone from black to blonde black to brown and once you get to that right, blonde color! That you're supposed to be going for. That'S that's when you know it's time to wash, but honestly max. For me, 30 minutes is really the maximum and after 30 minutes the hair has not bleached. Then i probably have to wash it out and do it again do not be over here waiting 45 minutes to an hour you're, just gon na have your hair fall out. You'Re gon na get bald spots and damage the frontal so yeah, okay! So it's about! Fifth! It'S been about 20 ish 20ish minutes. I don't know if the camera's picking it up right, but i can see that the knots have at the bottom has definitely turned more of an orange blonde color. So i'm just going to go ahead and go ahead. Wash this out, because i don't like to over bleach it because sometimes i let it stay for too long. I noticed that not too very fragile and i get more balding in long term with my friend now. I'M also going to use this purple shampoo to help tone the orange knots to a more neutral, less brassiere bright color is now we are ready to pluck our wig just like a front tool. You need to pluck the wig to kind of reduce the bulkiness on the hairline to give a coming out of the scalp look. So i'm putting my wig onto my canvas head and under my canvas head or on top of my canvas head, i have these wet wipes or like napkins. Just to help me see my knots because much easier to see the knots when you're plucking on something white. I'M going ahead and just putting it down the wick, so she does not move and the wig is already parted in the middle. For me straight out of the box, so i always make sure my wig is party in the middle, even even if it doesn't come parted in the middle, i'm spraying some water onto the hairline. So i can push it all back, so i can really see what i'm working with these are the tweezers that i like to use they're from revlon best tweezers. I'Ve tried, in my opinion, make sure you get a slant tip tweezer and let's get into the actual plucking tutorial. So there's not gon na be an in-depth tutorial. I already have one up on my channel, but we're gon na do a little run through so first i pull out the hair that is in front of the actual hair. I mean the actual frontal. I pull this hair out because i'm going to save it. For my baby hairs, i don't want it to be too thin in the front and i have no baby hairs to work with. So i pull that out and i start to pluck behind the hairline, and i just go in my tweezers, making sure i'm pulling from the root pluck of space skip this place. Pluck a space skip a space, that's so hard to say, but yeah i feel like it makes more sense, probably visually. I try not to pluck in the same area so it's kind of like you're plucking, skipping plucking skipping, but not like super dramatically, because you don't want big gaps in your wig and then i do that comb. All that out. To make sure i get all the knots to see what i'm going with and then i just pull out another section and pluck behind that, once i have plugged all of the hair behind the hairline, i pushed it all to the front and plucked just a little Bit of the front just to clean it up the way that i like, and then i'm going to go ahead and do the other side. Other side is done and the wig is looking like she's giving a scalp and we are ready to in a stalk. So i have on a nude wig cap, and i just push that back because i don't want the wig cap to be peeking under the actual lace. Then i go in with my concealer, that is my exact skin tone match and just use that to buff under the lace. So i can get a really good match onto my skin and i use a blow dryer to just dry. All of that up, because we don't want any makeup residue on our head, wig is on and we are ready to install stuff like this second time. So i'm just cutting off these little side tabs that come onto your closure. You don't want to be gluing. This part down today, i'm using my got to be glued in the black gel. I normally like to use i've been a lace spray, but i ran out so this will surface. But honestly this works pretty well. I think it's got to be in quite some time. So i just go ahead and apply a thin layer under the lace where the hairline is going to lay, and i just go in with my blow dryer and a cool setting to just push that lace and gel combination into my hair. And i'm using my rat tail comb to really push that lace down to get a nice melt. As you can see this lace, it's already disappearing into my scalp, without even cutting it off. Yet it's not just giving you frontal it's giving you scalp! Alright! Now i'm using my eyebrow razor to go ahead and just cut off the lace and the importance of the eyebrow razor versus scissors is to get that jagged. Look which looks more natural than straight across cut on your head, as you can see, i'm still going in and pushing down that lace into whatever left over got to be is still on my head. That'S not dry to really make sure. I'M melting that lace into my skin. I go ahead and pull out the hairs, i'm going to use it for my baby hairs and then once i've done that i go in with this elastic band to just really help the lace lay down some more and to make sure it's nice and stuck and Dry, i let this stay on my head for another, probably five to ten minutes, while that is simmering, i'm just going to use this wax stick and my hot comb to help press down the hair all right now, it's time to do our baby hairs, my baby Hairs i'm using this eco styler gel. I love using this stuff because it gets really good hold, but also it's not too sticky and messy, and i can move the baby hairs around while i'm still figuring out where i want them to lay. So you know, i feel like baby. Hair is also a visual thing, so i'm just gon na. Let you guys watch my baby hairs and i'll come back when i'm done with that foreign all right, we are done making our little swoopy swoops and i'm going to go ahead again and lay down my lace using the elastic band to let that dry in place And we are going to start detangling and styling the hair. So, honestly, this part is super simple. I just have a spray bottle filled with literally just water. It'S all about how you brush out the curls to get that really nice defined curl, and i do have a detailed tutorial on how i get all my wigs to be really curly and look really nice and defined once i am done. Detangling, the hair and the hair has air dried i'll, come back and show you guys the final product. Oh, i got my pizza georgia, so it has been a couple of hours, probably two to three hours now this clip and the hair has air dry to about. Maybe ninety percent - this hair got super big, the more dryer it gets, and this is 180 density. But overall i really enjoyed this wig and the install right now, i'm just doing some finishing touches to really perfect the look plucking away. Some hairs. It'Ll belong there going in with some concealer onto the part to really make it pop in the clip, because my lighting is very orange. I was figuring out new lighting. The concealer looks really bright onto the lace, but i promise you in the daylight, which i will show the concealer blended in perfectly into my skin, to really give that really nice, perfect middle part. Look. I also use some mascara as well to fix the over bleach knots in some areas, but yeah, that's all i have for you guys. I hope you enjoyed this video. Thank you so much for watching make sure you like comment and subscribe. I hope this was helpful. If it was helpful, comment down below and peace out, girl scouts goodbye,


Comments
Noluthando Mbatha: This is the most detailed yet easy to follow wig customization tutorial I've ever watched. I feel confident enough to try customizing my own wigs ❤
GetKaseFit: This was very helpful! I’m going to use this video when my wig comes in to customize the front. I always do good defining the curls, I just always have trouble plucking the front so that it looks natural and melts into my scalp. Great job!
Cham Deezy: Absolutely beautiful!! Very easy to follow tutorial. Thanks for sharing and especially the tips on bleaching and touching up the knots!
Key🤍: I appreciate this tutorial more than you will ever understand ! can’t wait to do my wig & see how it comes out
DASIALOVÈ: this is probably one of the best tutorials i seen yet! keep up the good work sis. i loved the wig! ❤️
Peta-anne D: Glad I found this video! I actually bought this exact wig mine was a “natural color “ I guess dark brown. It’s also my first wig ever so I’ve had it for 2 months scared to start the process but my birthday is next week so I watched this video while bleaching it and why the hell did some of the knots not bleach! i thought I spread it evenly but idk I’m probably over thinking since I’ve never worn a wig but wtf do I do? In my head I’m like oh no people can tell some are still really dark but it’s probably not that serious lol
K’MyaDanae: I loved that you clipped the ends of the wig ,most people wouldn’t think to do that but sometimes the ends be kinda wonky so trimming them makes the hair appear even fuller
Tino: Definitely one of the best wig tutorials I’ve watched. Very beginner friendly
Santana V: you’re gorgeous ! and this was an awesome and very detailed tutorial .
kiana 12: We got the same wig! I needed this video. Thank you so much Queen
Shante Williams: I’ve watched this video more times than I can remember! Beautiful install!
Lipton T ,: Definitely helpful. I never knew you could spray water on top of the hair to keep it from bleaching the hair strands. You definitely saved me time because I would get bleach on part of the strands of my closures and I would have to go back and color the strains.
Ashah Robinson: I love how this wasn't super sped up makes it so much easier to understand how the process goes
jupiterxbliss: I liked this video within the first 10 seconds. This unit looks absolutely stunning on you! You are gorgeous!
Ty Nicole: One of my favorite youtubers. Such calm vibes and hella talented ❤️
Ebonique Knighton: You always do such a good job! I don’t remember you doing a t-part wig but if you could work your manic on one I’d love to see that or a Janet hd synthetic wig just for fun !
Anette Roberson: I can’t wait to put my wig on simple and detailed
Keeping Up With V: I love how you showed us , you styling the curly hair & seeing how it drys
Kaylyn Kenniebrew: you did so good !!! very detailed, not too much talking , straight to the point yet thoroughly explained & showed ! love the content mammas <3
Jaclyn Jones: You look so BOMB I’ll definitely use this for my next wig
Azja Rene': You’re so pretty! ❤️ and you killed this hair install !
JanayaSwain: This video was perfect! Not overly talkative AT ALL! Thank you
Sharon: Thanks for showing the back of the wig!
DestinyNoChild: Loved this video! How long did you wear this unit before it started shedding etc? Or if you even had any problems with the hair at all?
Antionette L.: This tutorial is really good!
Kelly Miller: Forget the frontal…. Your skin is glowing honey . What’s the secret?
Tesharra Cowan: Good job I could watch from start to finish cuz u understood the assignment!
Dildred Suttles: I APPRECIATED YOUR SKILLS ON SHOWING HOW TO PROPERLY LAY ALL YOUR INSTALL GOD BLESS YOUR HANDS KEEP UP THE EXCELLENT TUTORIALS.
Mona Bee: Very helpful ❤️
blkbarbie0: Very helpful doll, good job
Tonia Okolie: Love it!!
The Alyssa O. Journey: Love this video. Thanks so much.
Inconversationwithzoe: Wow, those curls
Sugar Bomb Bakery co.: This wig is laidddddd sis! You did that!
Meme Baum: Thank you for this!
Trycelle Bailey: Lovvvvvveee this very informative ❤️
ThiChicThrifts: I want this wig from you just for the baby hair ♥️♥️♥️
Grace N: Gorgeous!!
Emani Pettiford: You go girlllllll!!!!
Unique Nichelle: Oh this was flawless babe
Kamilah Reid: I like the way you have showed your wig to look as if was your own hair
Timi Ken Kayama: Hey caroline do you have your own Amazon store where you recommend wig essentials?
shayvonne braunson: It's very nice and very helpful as I'm am a beginning and learning how to make wigs
Robyn Nicole: How long did you keep the purple shampoo on the lace?
HERMOSA BRI: Love it boo
EatenCheesburger: just order this hair. i will keep you updated :)
Toya: Hi, I’m a beginner and I wanted to know do you wash the unit before you bleach it or after? Also what shampoo do I use to wash the hair?
Ren & Jay 💕: you did great girl!! fast af too .
Onaopemipofoluwa: Can I wear the wig without having to gel it down next time?
Jola Oyedepo: You did so good, I love how the accent came out. I do that too
Chanteek Smith: Can you use the same technique with a regular closure sew in ?
Kokoevi Lawson: This video was extremely helpfull,
Rayanna rayanna: How long does it last with the lace front glue?
Tijuana Skky: I would say buff out the concealer definition
Lovely SANNI: Your amazing
Katerah Fowlkes: This look niceeee
Trycelle Bailey: Love this keep doing GOD WORK FOR THE GWORLLLLLSSSSSSSSSSSS❤️‼️
n0limitgoddess: This the best wig tutorial I ever seen like fr
Tijuana Skky: Superb ❤️❤️❤️❤️ slayed giving frontal purrrrr
ChardonnaySantana: I love this video
Daijah: whats the brand for concealer??
Ky’aria Mckennon: My fav YouTuber ✨ what do you use to make your skin glow?
J Renee: I like your tutorial however I can see you do have a blurring filter on your video. It’s hard to see what the hair and lace truly look like
MyNamesSabrea: I installed my first wig last night and the lace is really visible lol can I take it off and still bleach the knots? Because all I did was use foundation but it did not work so for now I have on a headband
edgebabyhair: Can I reuse it after removing the glue?
Me_la_nie: New subbie❤️❤️
GanjaKay: Slayed
Kiomi R.: I think I just found my new favourite YouTuber
Honeydip: How do you keep it on do you use elastic band
Russell Harris: Your good with this
Brianna Anderson: Where did you get your closure
sirocks febuary: Where did you buy your canvas head ?
MYII LIFE: new subbie
Ari Santana: You really ate on this install
baddii3 lee: those tweezers are everything lol
femia clayton: new subscriber here!!!
Melanie Santana-Sanchez: Do you know how to do it without baby hair? Is there more plucking involved if I want to do this with no baby hairs?
Jàyy Shàlese: it's the skinn for me
Hazel Colemen: I’ve noticed that closure wigs that are made by these companies don’t align with my ears. The wig sits on my ears. Does that happen to you ?
It'sDriaWorld:
saviex: She said “eh heeeen dassit” in that accent
Venus Tutu: Not only are you good at what you do but you’re african also?!!! Subscribe !!!! Definitely supporting my own !!!
ItsAyola: I tried bleaching my knots with 40 volume developer, but my knots didn't bleach, what could I possibly be doing wrong? if anyone could help
Jesika Anthony M.: A nice hair scenery here. Great. It's a song 'n flower for you.
nayalee: How long did it take to come ??? someone pls answer me !
Shanye West: Bxtch that closure is givingggggg !!!!
EnVisage Style&Beauty: New subbie fab tutorial the Ehen thaz it made me subscribe
I'm keyya: So much for a closure but it is pretty
BMI: Skinnnnn
Joelle Banim: Bought the wig from the direct link and it’s far from the same thing. A lot less full and a complete different curl pattern
stasia PRODUX: Pls if u use fo developer bleach do use it more then 20 mins the wig hair will fall out it’s ok if the hair isn’t BLONDE as long as it’s lighter
Trynitij98: Girrrrrl no you didn’t filter this video out like we wouldn’t notice I trusted your workkkk
KatexNwo: It’s 3:30 for me
Topgirl: Very laid sis
Destiny: Skin care routine ?
Nikkibaby Lang: ❤️❤️❤️
D H: Is this sponsored
Zara: Nah can you do my hair
marlyne L: Can anyone come please help me My head is big, and my wig does not fit, what kind of wig should I buy 13x6? I’m new to this so please help a sis out
Judi Cheeks: What’s the tweezers sis