Start To Finish *Flawless* 5*5 Closure Wig Install | Alipearl Hair
- Posted on 29 October, 2021
- Closure Wig
- By Anonymous
Kasiamaebeauty.com
IG: https://www.instagram.com/hairbykasia/...
Twitter: https://twitter.com/KasiaMae_Beauty
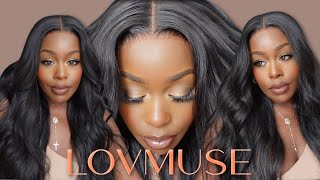
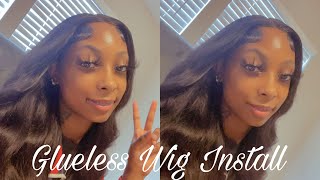
Hair I’m wearing: 22inch body wave 5*5 HD lace closure wig 180%density
Shop Now➤https://bit.ly/3mFXf8Y
AlipearlHair Official Store:➤https://bit.ly/3kvY41v
Lace Front Wigs for Sale!➤https://bit.ly/3mGzopU
Invisible HD Swiss Lace Wigs:➤https://bit.ly/3Djn6JX
Use code “alipearlyoutb”to save $10!
#alipearlhairwig #alipearlbodywavehair #alipearlhdlacewig
Instagram @alipearl_hair: https://bit.ly/34I3Oyd
Youtube @Ali Pearl Hair: http://bit.ly/2H0Gmmc
Facebook @Ali Pearl Hair: https://bit.ly/3aKwxX3
WhatsApp: +86 15890076489 E-mail: [email protected]
Hey y'all, it's keisha and today i'm going to be showing y'all. How i did this close. Your wig install using hair from ally pearl i'm going to link everything about this hair in the description bar below this is the hd closure and let's get into this video. Okay guys, so this is a true hd lace closure. The wig is a 5x5 hd closure wig, it was already pre-made, they say it comes pre-plugged in or whatever, but i did pluck it myself. They did send me over some goodies, um satin band, scarf edge, brush elastic band eyelashes and then obviously the wig itself. The wig comes with three combs on the inside and adjustable straps on the inside as well um. I usually take the combs out, but i didn't take them out this time. I don't know why i didn't i normally do, but the hair was absolutely beautiful. I did have a little bit of tangling, but i think it's from me using so much product when i did the crimps so yeah, but i'm just going to go ahead and do a light plucking. Looking back, i was thinking like. Maybe i should have plucked a little bit more, but i think that it looked really good so and also when i wear it again. I don't have to worry about any balding because i didn't over pluck my first time wearing it so yeah. But i just did a light plucking and then i hot combed it and then i went in with the middle part and plucked out a precise middle part. Okay, so i'm going to be starting off with cleansing my skin, my edges, my forehead and then i'm going to be putting on a cap. I did this is freshly washed hair. I didn't blow dry it. I just braided it down into four braids. I normally would do more braids, but i was being lazy to be honest and i knew that the wig would still lay flat. So so i'm going to be using some got to be glue spray to lay down my cap. I have not done this method in a long time because i usually use lace glue, but i have switched up my lace glue, so i decided to do this method this time, because i i am new to that glue so um you know i just didn't want To overdo myself and overwhelm myself, because i am using clear glue and i heard that it could be really sticky, so i didn't want to mess up basically, so i knew that this method would work. I used some makeup and then i went back over it with the got to be glue spray, and then i let it dry before i cut it off so once it dries, i'm going to come back and then cut it off, which is now so i'm going To be cutting the excess um cap off, my initial cut was really low on my forehead, so i did end up pulling the cap up a little bit more and cutting some more and you'll see that here soon, but after i do that, i'm gon na put The protective shield on there and i'm going to begin to do my glue meltdown so i'll, just let you know a little bit about that once i get to that part. So this is the new product that i am using. This is the primer protection pro by denying define um. I also am using her glue as well. I will link the glue this video isn't about that, but i will link the glue or whatever and the protection shield down in the description bar below. If y'all are interested in trying a new glue, um so yeah, i actually did like it. It lasted a pretty decent amount of time, i'm about two weeks. I guess i'll, probably if i would have kept it up. I was sleeping with no scarf and stuff, so i'm sure if i would have kept it up, i could have done. You know a better job also. I didn't realize that me using that protective shield was gon na loosen up my cap, so i did have to blow dry that back down, as you see right here, which ended up turning white, but it was so sticky. I couldn't put any more makeup on top of that, so please don't make the same mistake as me. Luckily you couldn't see it underneath my wig, but that was a close call so yeah after i did two layers of the protective shield. I did two layers of the glue as well. Also the glue is really sticky. Oh, and at this point i am putting my wig on to mark out where i'm gon na put my glue, so i'm gon na be using um some black um eye shadow. I mean eye shadow black eyeliner. You can use whatever you have handy, that you'll be able to see to mark out the spot. So this is the gold glue um it's supposed to be waterproof or whatever i haven't tested that out. I don't know if it's waterproof, but it's supposed to be a lot of other people have said that it is um, so i'm just putting a layer on and then once that gets tacky, because it's already clear. So you don't wait on it. To turn clear, you wait on it to turn tacky once that turns tacky you put on another layer of the glue, so it was pretty simple um. I did like that. I didn't have to use three or four layers like i have to do with the white glues from like bohold or erica j. Like all those you have to use like three or four layers, and you have to wait for them to dry clear before you can put on another layer, so i did like that this one um was only two layers. Okay, so now i'm putting my wig on. I'M just making sure to match up the little markings that i had made and also making sure that my part is in the middle. If you notice a little white patch, just yeah, not white light patches, don't pay no attention today, it's all going to come together at the end, guys trust the process, okay, trust the process. One thing i can say, though, about this glue, is that it's very strong, like it's super sticky. So when you have like a really thin lace, the glue will kind of seep through the lace and make the hair stick to the lace. So when you are maneuvering the hair, i recommend using a wet product like a moose. I ended up figuring this out after i had already recorded the video and i'm like dang. You know i can't really show them in the video, because i kind of figured it out afterward, but i just wanted to let y'all know that. So i did slice the lace up into three parts, and i mean i did slice them sliced it three times up until four parts, so i'm just going to be cutting off that lace in little sections. Okay, so now that i'm done cutting off my lace, i'm going to take some alcohol and wipe off that excess um protective shield that i had on my forehead, because i did a big section of it and didn't cover my head, like didn't cover that much of My head and glue - i don't know why i did that much protective shield on there, but anyway yeah i'm just wiping off the access protective shield and the little black marks that i made with my eyeliner and now i'm going to part out my baby hair and As you can see what i mentioned before, with the baby hair, like sticking to the glue, i was having a really hard time and i realized, after working with the glue a little bit more, that all you need is a wet product and that alleviates that completely So yeah i wish that i would have known. I was scared to use mousse because i didn't know you know what products i could or could not use with the lace i mean with the glue, so it ended up being a learning process, but now that i know i'm definitely letting y'all know before you know. Y'All try to glue and then yes, so i would recommend um using nairobi, foaming, mousse or afro g foamy, mousse, okay. So now that i'm pretty much done um pulling out my baby hair, i'm gon na put and elastic band on my edges and then i'm going to use my hot comb to lay down my closure and after that, i'm going to go ahead and do my crimps. Okay, now i'm taking off the elastic band, as you can see, the elastic did stick to the glue. So i noticed like for the clear glue that you really don't need to use an elastic band if you don't want to, but it didn't really make a difference because after um i took it off and got to really doing my hair and stuff it just yeah. It went away and plus i put a little makeup on it, so yeah, i'm just going to be flattening my hair down with the hot comb and then curling my baby hair with the half inch um flat irons. Please do not use a big old flat iron because you will burn your forehead okay. So after you finish curling them, you can either just swoop them and have them like fluffy and wispy, or you can use a little bit of product. I use some holding spray on my edge brush and use that to basically smooth the baby hair down and also, if you feel the need, you can still trim your baby hair a little bit more at this point as well. If you feel like maybe they're too long, okay, so now, i'm just finishing up my baby hair um, i did actually end up changing my baby hair. I don't know if it was the next day or a few days after, but i did end up changing up. My baby hair, but the last little touch that i'm gon na do is adding in some concealer into my part and then that's pretty much it i'm ready to go. The wig came out super bomb. I got a lot of compliments on it, so definitely hit them up. I'M gon na leave all of the information in the description bar below thanks for watching bye. You

Comments
Mesha Rae: I love this install! It came out amazing❤️
Galani: Wow I needed this video from you two weeks ago … I bought my first closure wig & didn’t know where to start .. I also was hesitant to buy from ali pearl but the wig turned out fine. Atleast I can come back to this video for reference next time! xoxo
Keishae Ayanna: New sub you did so good !
Ali Pearl Hair: Thanks for choosing Alipearl hair! ❤❤❤
Bumblebee: Awesome install do you have a link for the glue
Kersha Beaver: Larger closures are everything
Latoya Andrews:
Chudni Sheree: bomb