4X4 Lace Front Wig Installation | Ft Ishowbeauty Hair
- Posted on 01 January, 2022
- Closure Wig
- By Anonymous
My 10$ off discount code: "IshowTH10"
Ishowbeauty hair official store: https://bit.ly/3JnhZeN
I'm wearing highlight straight 4x4 closure 24in wig: https://bit.ly/3sHCbCb
All wig types from Ishowbeauty.com: https://bit.ly/3FHNKgn
13x4 lace frontal wig: https://bit.ly/3qtJJ8E
Cheap 4x4 lace closure wig: https://bit.ly/3z9F8wt
Highly compliment highlights hair: https://bit.ly/3eBHWJk
New transparent lace wig: https://bit.ly/3pCG7C6
[ Daily human hair units ]
3 human hair bundles with 4x4 closure: https://bit.ly/3mI11xX
3 human hair bundles with 13x4 frontal: https://bit.ly/3z8BL9b
**** Contact #Ishowhair *****
Email: [email protected]
Whatsapp: +86 182 3684 8017
Follow #Ishowbeauty on social media:
YouTube (@ishowhair): http://bit.ly/2PTT7Bb
Instagram (@officialishowhair): https://bit.ly/3zdlxLH
Facebook (@ishowbeauty): https://bit.ly/3EEMJ7p
Tiktok (@ishowhair): https://bit.ly/3pCWVZK
#highlightswig #lacewig #closurewig #cheaplacewig #naturalhair #ishowbeautywig #frontalwig #wigfactory #trendywigs #wigsforblackwomen #deepwavewig
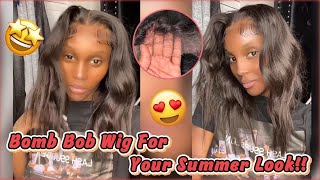
She took the whole thing slow down baby. We took a trip now we on your block and it's like a ghost, hey guys, welcome back to my channel and if it's your first time joining me, then welcome. Welcome to my channel, i'm yolanda kamala, also known as tushy on twitter instagram and on the streets anyway, so today i'll be doing a hair review for you guys. This is my favorite color and it looks good on me. I know um but yeah i'll be doing over here review. I'Ve actually worn this hair before, and this will be my second time actually wearing it, but my very first time installing it on camera. So i've already washed it and i've straightened it already, as you guys can all see, it's looking all slick, so this hair was sent to me by show hair. I will put down the information down in the description box, so, if you're interested, you can just check down the description box and you will find literally everything that you want and also the link to the specific unit. So this is a 4x4 lace front, meaning it goes here to here and it is a 20 inch 20 inch long. I love 4x4 hair wigs only because it's very easy to install for me. However, i would much rather prefer a 13x4 but yeah. So this is the hair. The color is honey blonde with highlights as well. I love love this hair color on me. I i have, i think, about three wigs of this hair color and they always come out literally looking stunning. So what i'm going to do in this video? I'M just going to be showing you guys how to install this unit. My quick and easy way - and it's very also it's very beginner friendly as well, because i do also consider myself as a beginner. So the week came out with this: you guys more information on eyeshadow hair. We can find them. You know the instagram handles and also just a little bit about how to take care of the hair, and then it also came with two wii cabs um, which you can use when you're installing your hair. I love these because it really like works for you know you know, especially if you have like an afro and you want to put it down and you wear your wig cap. It works wonders so really really thankful for this um yeah anyways. Let'S get into the video you guys, please just pay attention to how sleek that hair is look at that anyway. So this is my wig and it comes in a four by four lace front and three combs to help you secure the wig and it also has an adjustable band just in case if the wig is a little bit big on your head, so you can make It fit your head um right here. We can all see that this week has already been pre-plugged and also bleached. I did that off-camera. I did not see the need to record that so right now, i'm just combing the hair trying to show you guys that this hair is probably pop. So now, let's get into the insulation. So, first of all, i'm just gon na throw on my wig on my head. This is just how i always install my wigs and then next i'm going to go in with my god tb glue, i'm sure everyone uses squats with glue and if you've been watching. My videos you'll know by now that this is the only glue that i use to use all my wigs. So i'm just going to put a little bit of got to be glue right on my forehead. I'M only going to put it where i will actually be layering the wig, basically, where the lace front is so because my lace front is a 4x4. I'M only going to put it right at the beginning and at the end of my forehead right now, i'm just combing the hair just to make sure that everything is on the side, because we don't want any hair to be stuck while we're layering a wig. So up next um you're just going to feel if your glue has dried out and it feels a little bit tacky, then you can actually start pulling down your hair and position it exactly where you'd want it to be. On your forehead and i like to put mine there, but this is honestly up to you - you can push it a little bit further down or backwards, but this is where i like to put mine and right now, i'm just you know putting in the combs inside My natural hair, so that my wig is secured and i'm just starting my band just to make sure that the wig cap fits my head perfectly, as you guys can all see. I'M all done with that. I'M just making sure that my hair is properly positioned before i start to you know finalize the layering once you've done that and you actually like certain that that's where you want to put your wig. You just want to come over here at the back and now you're, basically preparing to put on your band. This band basically helps with melting the wig so that it looks like it's on you like it's your own hair, so it basically helps with melting the lace front into your skin sort of um. To give it a more natural. Look like a very like really nice natural look kind of gives it that looking at you, the haze growing out of your skin, you know what i mean um. So that's what i'm doing here. I normally put this band as long as i can so normally. Sometimes i'll put this pan, while i'm doing my makeup or i'll put this bad literally for as long as i can, it really has no time to actually put it for as long as you can and the longer you put it on the better, even the better. So right now i'm just curling my hair, i'm just preparing to you, know re-eye and do a little bit of touch-ups um. So i'm just going in with my eye and straightening the sides, because remember i played a lot with this hair. While i was putting it in so i'm just making sure that it is bone straight by just going over with my eye one last time and i'm gon na do that on the other side as well. Here we were trying to achieve a bone straight. Look okay and then now i'm going to use this wax glue that i got from ap fantasy. So this wax glue just basically helps with you know, getting rid of the flyaways and just making sure that your hair right, where you have opened your line, it looks straight slick and it also adds on to achieving that bone straight. Look. So if you don't have that glue outs, sorry, if you don't have that wax, i mean i'll suggest that you get yourself one. You need to get yourself. One also just gets rid of. You know flyaways, you know after you find your hair. It always has like those flyaways right on top, so you put that glue. It looks slick proper and bone straight. Basically, look at that. Look at that. Look at that! Oh, my god, love it love this quality. This is good here so right now, i'm just taking off my band because i feel like i've done justice to the you know. Layering look at that! It really looks good holy, easy, okay. So up next, i am using my essence: mousse foundation in the color marker. This is a very cheap foundation that i always use just to make sure i achieve that natural look. So what i do is i take my very straight um makeup brush and i put a little bit right on the line we have actually opened um. This is just to make my face. Look the same as that pathway there, because that pathway is always a little bit light. So you just want to go over with your color foundation, just to give it that natural look, and i also do that right there in front and blend it in with my foundation, the one that's on my face. This is just for completion. Obviously, like you know, you just want to achieve that natural look remember. The aim here is to make it look like this is goddamn hair, okay, so yeah go over it with your color foundation and you're good to go, and after that there you have it. My egg is ready to slay the street okay, i'm so happy. So this is the final look and yeah. I just literally finished installing this hair and i think i did a great job if you're interested in purchasing this. You know please do check down in the description box and if you enjoyed this video, don't forget to like comment and also don't forget to subscribe the most important thing you can also stay tuned into my instagram account because i will be posting pictures and also tag. I show here so you guys can also check out the instagram page. Otherwise that is it from me today. Bye

Comments
Dee N: Love the hair the hair colour was dedinately made for you
Dee N: Omg the hair quality is bomb...will definitely check it out
ayanda mtyebi: This hair was made for you Thushey❤
Ishow Hair: SO PRETTY
Dee N: Where did you buy your hair straightner?
Silindokuhle Khubone’s Moments: I love love this Hair on you Happy new year ❤️
Tania Feni: Ndyakubona izolo but you were sitting so far Here's to that beautiful lace unit❤️
ZIZIPHO STUURMAN: The hair suits you Thushey hey haybo❤️❤️❤️❤️
Ziyanda Tsholoba: Damn girl, I love me some rich blonds.
Wexy Thwala: I don't know if my eyes are lying to me but Thushey u kinda look like Lalela Mswane....or maybe I'm babbling?