Beginner Friendly! 36 Inch 5X5 Closure Wig Install + 5 Different Hairstyles Ft Asteria Hair
- Posted on 29 April, 2022
- Closure Wig
- By Anonymous
Ebin lace spray: https://amzn.to/38yFQtW
Link To Hair➤https://bit.ly/3EQPTGY
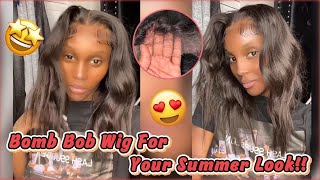
Hair Info: 36inch curly HD 5*5 lace closure wig 250%density
Buy One Get One Free Wig➤https://bit.ly/3EQQ5WI
❤#AsteriaHair Official Website➤https://bit.ly/38jZdab
Asteria Hot Selling Hair★ ★ ★ ★ ★
Top1 #asteriawaterwave Lace Wig➤https://bit.ly/38lDsGH
*Invisible Skin Melt HD Lace Wigs➤https://bit.ly/3MoD8WA
Glueless 5*5 Closure Wigs➤https://bit.ly/3EHfnGB
✨Win Free Wig In Facebook Group!Join Now➤https://bit.ly/3pcfZOo
#asteriahair30inches #asteriawig30inches
Wholesale or promotion? Contact Asteria Hair:
WhatsApp: +86 15238065852 Email: [email protected]
Instagram @Asteria__hair https://bit.ly/3Lobbxq
YouTube @Asteria Hair https://bit.ly/3m5EBoA
So in today's video we're going to be installing this closure wig and trying out five different hairstyles. So if you want to see how i achieve this, then stay tuned. So the very first thing obviously is the wig cap and i never do the ball cap method because i just don't have time. Okay, i just i don't know like it's just a lot and i just don't be having time and plus i don't wear the wigs for that long. So it's kind of pointless to do all that work just to take it off the next day or even the same day. So this wig is from asteria hair and it is a 5x5 closure wig and she is 36 inches long and i love a serious curly hair. They have some of the best curly hair period, so here i'm just putting some powder on the closure to kind of like tone it down a bit, because i'm still trying to perfect my bleaching. It still comes out very brassy and i never know what to tone it with. So i'm trying to figure that out still so, if you have any recommendations, definitely leave it below, but here i'm just putting the wig on and, as you can see, it looks pretty good. I didn't go too crazy with the plucking, because it's also something that i'm working on and i am a big overplucker. So i have to stop myself before i lose like 80 of the closure or the frontal hair. So here i'm just doing my little sideburns to make it kind of look like a frontal, even though it's not and then you just want to cut off these little tabs so that your closure lays nice and flat. I have made the mistake in the past leaving those on, and i regretted it so i'm going in with the even wonder, lace bond and i really want to try out one of the other colors either the black one or the yellow one. I think this one holds really really well, but i can only imagine how those would hold. So let me know if you've tried out any of the other, even lace, bond sprays and how it held - and let me know down below here - i'm just pressing that in because i typically just throw on my elastic band. But recently i've just been blow drying it. Because it goes by a lot quicker, so i'm blow drying it and combing it at the same time, so that it doesn't get super crunchy from the hairspray, because if you don't comb it, it will just be nice and hard and stiff. So here i am just combing through it again, because i did go in and add some more hairspray and as you can see, it is a little difficult. Okay, sometimes to be a little difficult. But here i'm just gon na pull back the extra lace so that it doesn't stick to my forehead and then i'm gon na go in with this elastic band to lay it down further and then we're gon na go on and move on to the styling portion Of this video, so i really wanted to try out multiple different styles with the closure wig because it is getting hot and i typically start to wear closure wigs a lot more during the spring and summer, because i don't have time to be sweating off my frontal. So i want to try out different styles in this video to see you know what it's hitting for they're, not going to be super polished or anything of course, but you guys will get the gist. So here i'm just cutting off the lace and i'm cutting in a jagged motion, because i'm trying to just i'm just trying to do better, i usually cut straight across and then it looks really blunt. So i'm trying i'm trying, but obviously there's that little bit of leftover, so i go ahead and add some powder which just kind of disappeared, but i'm also going to go ahead and grab my edges that i'm going to use as baby hairs and this time around. I did kind of go in on the baby hairs. I definitely cut them after the video and i was like dang. I wish i would have did that on camera, but i cut them and plucked them because they were a little too thick and dense for me, but you guys get the gist. You know. Do the baby hairs. However, you like them, if you don't like them, just don't even do them. Hair is in the eye of the beholder. That makes no sense, but you get the point so here i am just going to make sure that everything is nice and flat and going forward to make it easier to lay. And then i'm just going to go on with a razor comb and just kind of like make a jagged cut. So it's not super blunt and then you just want to cut them a little bit longer than you're actually going to have them, because you want to have room to cut away if you need to, but i'm just going to cut those and they're still a little Bit too long, but i'm just going to go in with my flat iron and just kind of mold them into the direction that i want them to go in. And then i'm going to take my erica j, styling foam and just kind of like swoop it. And i don't think i cut them at this point which i should have. I don't know why i left that big ass swoop, but you get the point. You definitely want to go in and just kind of like chop off the bottom, a little bit so that it's not so bangy like if that makes sense, but yeah i'm just going in swooping it. You know, and then i'm gon na take my elastic band once again, so that everything lays nice and flat and the baby hairs can just mold into position. So now we're moving on to the styling portion of the video, and this is where we're just going to do the basic middle part, so we're starting off with the middle part. So you just want to go in and just kind of carve out. Your middle part use the hot comb to make it nice and flat and make sure that it is very, very, very, very pressed okay. I like for my middle parts, to be super crispy for the sake of this video, because i'm doing other styles, i'm not going too in, but i like for them to be super crispy. So here i'm just taking a spray bottle of warm water, because i hate cold water all over me and i'm just drenching the hair with the water and then i'm going to go in afterward with my denman brush and some mousse a little bit of mousse. Not too much it's really just to hold the curls in place so that the hair doesn't get super frizzy, because obviously i'm going to be manipulating this hair a lot in this video to get these different hairstyles. So you want to use a little bit of mousse to kind of tame it a little bit, but the key to keeping the curls nice and clumped together is to not touch it, but since i'm doing other styles, that's obviously not possible. So here is what it looks like after i've added the mousse and the water, and then this side is obviously the side that is just air dried, its natural texture, with a little bit of manipulation at the top. So yeah - and here we are with the first style, which is just a basic middle part. I didn't go too crazy, trying to perfect it or anything, because obviously i'm about to change it in like 10 seconds. So this is just a simple middle part. Love a good middle part, especially on a closure wig for the spring and summer. It'S super easy and effortless, and you don't even have to do that. Much work. To achieve this. Look honestly! Next up on the agenda, i decided to try out a side part. So a side part is always iffy for me because i'm not a side, part girl. I do like to try side parts sometimes, but i feel like i haven't, found that really good side part install that i've ever done that just really flatters my face. I don't know what it is, but i just do not like side parts on me, but i wanted to obviously do a side part as one of the styles, because it's very easy to do with a closure. So i'm just molding it into the direction that i want it to go in and then of course you want to go back in and fix up the hair that you kind of jacked up a little bit and you want to go through with the brush and Some water and you can add some more mousse, but you don't have to do that because obviously we're going and doing another hairstyle. So i really shouldn't even be going in like this, but this is hairstyle number two, a side part super easy. I, like it y'all know, i don't really do side parts that often, but i actually really like this. Who knows maybe i'll do a side. Part look really really soon. So now we're moving on to the third style and at first i was going to do something else, but i decided to try a swoop, so i've never done a swoop on a closure wig before, because obviously a swoop is usually like a deep side. Part type of style, but i was like, let me just try out a cute little swoop and see how it goes so. I just parted some of the hair from the closure. Obviously, you can't use all of the hair, because then you wouldn't have any scalp in air quotes, so you want to just part a little bit of it. You could go a little bit further back to give it more of a illusion that it's not a closure, but i was just showing you. You know to get the gist of the swoop, but here i'm just parting out that section and then i'm gon na grab a piece from the opposite side in the back and that's what i'm going to be attaching this hair to, so that it can stay nice And tight so here i'm just smoothing it out and you can swoop it as much or as little as you want on your forehead. I didn't do it like all over my eye or anything, because i really hate stuff touching my eyes, so you can do the swoop. However, you want, but here i'm just taking a hair, tie tying those two pieces together, and that is how you're going to keep your swoop nice and swoopy. Okay. So after doing all that, you want to go back in again and fix up your mess. Okay, so i'm just going in with this water and just spraying it through to get the hair nice and juicy again and like i said you can definitely do the swoop a little bit deeper. But this is just for the sake of the video. So i'm just making sure that i mold the piece that i left to cover the closure in the tracks and you're good to go. So this is the final look. Obviously this isn't like a swoop swoop, but i didn't want it to go over my eye. Just for the sake of this video, so yeah, you can definitely swoop it more or less, depending on your preference. So now we're going to move on to the next hairstyle next up we're going to do a half up half down but with two little bangs. So obviously, you guys know with a half a path down and a closure. You have to cover the tracks, so you got to part off the sides and make sure that that's good to go and then just take all of the hair that you want to put up in the ponytail. And here i'm just hot combing. The hair upward and also hot combing, the hair over the track so that you can't see it and also just making sure it's nice and sleek. So here i'm just taking my brush and molding my ponytail to my liking and then i'm just gon na take out the front pieces like i said i don't really like hair in my face, but i thought that this would be a really cute hairstyle. If you wanted to do it like this, and you guys will see the next hairstyle just kind of transitions from this hairstyle to a very simple one, very similar to this one. So i'm going ahead and putting the ponytail in - and you just want to wrap that around and you can also go in if you have like an extra curly bundle and put the bundle around the ponytail to make it a lot more full and thick. But i don't have that so we're doing that, but i'm just going to part the little bangs off and then just hot comb them down and then because they kind of lost their curl. You want to go in with some mousse or water and just kind of like play around with it until the actual little curl starts to form back and then you want to go ahead and fix up your ponytail, so you want to grab some hair from the Back you don't want to really take away from the ponytail, because it's already kind of thin and wrap it around the ponytail to give it some height and also to cover up the elastic band, fix up your curls, and this is hairstyle number four. So you could just kind of play around with the ponytail tease it make it a little bit higher or lower or whatever - and i really like this - i'm not a huge fan of these pieces over my eyelashes. I ain't gon na lie, but this hairstyle is really really cute, so the very last hairstyle literally all i did - was take the two bangs and wrap it around the ponytail. And now you just have a basic half up half down so super easy to transition. From that style to this one, so i didn't even show it. I just you guys, get the point, and this is the very last hairstyle in today's video, so comment down below your favorite hairstyle with the closure wig and if you're going to be trying out any of these styles with your closure. Wigs and be sure to give this video a huge thumbs up, let me know if you want more styling type of videos with hair, i'm trying to get better and better and better. That'S why i'm doing hair installs every so often, because i'm trying to perfect my skill and get better at it so yeah definitely leave this video with a thumbs up in a comment of your favorite hairstyle, be sure to follow me over on instagram and also check Out asteria hair: i will have everything linked down below as far as the details and the direct link to this wig down below. Thank you guys so so much for watching, and i will see you all in my next one bye. You

Comments
asiuol14: I have to try this hair out ,love the versatility and quality Thank you for this review!!
Kristen Thomas: Omg it’s like you’re reading my mind I’m over here debating on a closure hairstyles now!!! ❤️
Tatiana Nickle: Love the 4th look Thanks for the ideas!
asiuol14: Love it!!!
Lateisha Edouard: I love the half up half down hairstyle on you❤
Janay Chérie: bronnie i swear i was about to come on youtube to see what style i can do on a closure because i had wanted a frontal! you changed MY LIFE with that swoop hack i literally never heard of that and i used to cry trying to get my swoop to stay.
India Donielle: I have the black Ebin spray. It has strong hold for sure!
Christine Alexandre: You can use blue shampoo after you bleach the knots, that’ll have it less brassy
Miss Ladiibby: I love the black spray by them! I love this
Cynthia Auma: I just love your wig I even follow you on ig because of your wigs.
Lisa Jenkins: Long hair fits you well. All your units are bomb on you. Go girl..
T Henderson: Try the EBIN in the black can it is the best one
HennessyBrownn: Use blue shampoo / conditioner to get rid of the brass
FoundFourteen: Flawless
justsaraaah: Aaah perfect so needed
Sammy Da Goat: Glorious Hair
Oriane: I LOVE YOUUU
NiyahMarie: tone with purple shampoo
Diamond Gilliam: Happy Friday!!!
Daybe Baby: Inches!!!!
Oriane: FIRST