Messy Updo Frontal Wig Tutorial | Ishow Beauty Hair
- Posted on 09 June, 2022
- Closure Wig
- By Anonymous
My $15 discount code: "ISCM15"
Ishowbeauty hair official store: https://bit.ly/3rg4o1v
I'm wearing 613 straight frontal 24in wig: https://bit.ly/3KxGsht
All wig types from Ishowbeauty.com: https://bit.ly/37CWqrZ
13x4 lace frontal wig: https://bit.ly/3O1wBCQ
Cheap 4x4 lace closure wig: https://bit.ly/3jlPaDL
Long length(30in-40in) wig: https://bit.ly/3DX4ZKx
New HD transparent lace wig: https://bit.ly/35YEUxZ
[ Daily human hair units ]
3 human hair bundles with 4x4 closure: https://bit.ly/3JrnvM7
3 human hair bundles with 13x4 frontal: https://bit.ly/362lVCS
**** Contact #Ishowhair *****
Email: [email protected]
Whatsapp: +86 182 3684 8017
Follow #Ishowbeauty on social media:
YouTube (@ishowhair): http://bit.ly/2PTT7Bb
Instagram (@officialishowhair): https://bit.ly/3rh80jv
Facebook (@ishowbeauty): https://bit.ly/3DYurzl
Tiktok (@ishowhair): https://bit.ly/3vaBC3c
#613wig #straightwig #lacefrontalwig #humanhair #613straighthair
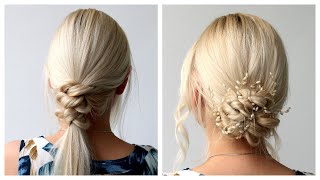
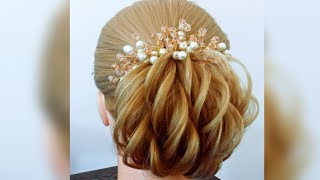
Hey guys welcome back to my channel in today's video, i will be showing y'all how i got this blonde updo hairstyle. So if you guys are interested in learning how i did it then keep on watching um before we get into it, though, please hit the subscribe button if you're not already subscribed and give this video a thumbs up. If you found it helpful, okay, so boom, the hair that i am using in this video is from i show i will put the exact link to this wig down below in the description box, for you to go and check out so yeah check them out. If you want the exact wig that i'm using in in this video, then you can go and get it in the description box, but yeah. So basically, all i'm going to be doing um in the beginning is just installing the wig. How i normally do - and that is just your basic - cutting off the lace you know gluing it down, but before we did that before i got into that, i actually did some prepping to this wig, like i do all of my other wigs and for 6 13. Wigs this wig came blonde, so for 6 13 you don't have to bleach the knots all you do is tone them down and i also tone down the wig a little bit and you can use toner or purple shampoo for that so yeah, that's what i did Off camera, so what i'm doing here is just installing the wig as normal, i'm just cutting off the lace and adding my glue and boom that make you wan na change. This ring here represents my heart. So after i'm done gluing the wig down, i'm going to go in with an elastic band and i'm just going to wrap that around my head to secure. You know the lace and make it melt and look seamless so boom and i'll lay that down. For about 30 minutes leave it on there for as long as you can, but 30 minutes at least and while that's like melting and doing its job. I went ahead and curled my hair off camera because i wanted my hair curly for this hairstyle. So that's what i did and then after i was done with that, i'm just going to go ahead and start working on like the front part of my hair, just making sure that lace looks good and basically just styling the do hair a woman that can take So, as you can see, when i took the elastic band off, the lace was melted like you could not really see the lace, but the hairline was super super thick. I don't know what i thought i was doing. I did do some plucking before, but obviously that wasn't enough, so i just went ahead and plucked somewhere. Whenever that happens, you just got ta plug girl and then eventually it'll turn out bomb, but don't just leave it like that, because your hair lounges just like a hot bahamas, so yeah i went ahead and i plucked it and it came out looking nice. So after that's done, i'm gon na go ahead and style. The hair, like i said early on in the video i wanted like an updo hairstyle. So i just looked at a bunch of pictures and just did what i wanted to do so. Basically, i'm sectioning off the pieces that i wanted to be out of the updo and and then i'm going in with my hot comb and making sure that the hair is nice and pressed out and flat so that it's nice and seamless for the updo. And then, after that's all, you know cute and looking right, i'm gon na go ahead and work on the pieces that is supposed to be out. This ring here represents my heart and everything that you've been waiting for. You can be. My baby is another woman that could take crazy woman that can take. If i wrote you a symphony just to say how much you mean to me. If i told you you were beautiful, would you date me on the regular baby i've been around the world and for the pieces that's outside of the updo, i'm just going in with my flat iron as you can see, and i'm curling them and then, after all Of that is done, i'm just going to go ahead and work on the actual updo now. For this part, i did not know what i was doing. I tried to watch other tutorials and nobody on youtube was clear enough, so i just went ahead and took a butterfly claw clip and just clamped it up. I did not know how to pin it at all. So if y'all know how comment down below - and let me know - but all i did was use a claw clip and it didn't look that bad um in the back of my head. Would you cause so yeah? That'S basically how i achieved this. Look i'm just playing with it, seeing how i want it to fall and look and that's pretty much it if you guys found this tutorial helpful again, please hit the thumbs up button and don't forget to check out this wig. All of the links will be down below again, thanks for watching bye,


Comments
Makayla Washington: Thank you for this cause everybody tries to gatekeep this hairstyle
Sonèt: I wish I saw this last month I did an updo like this (in my pfp) but i couldn’t figure out how to make the back look realistic
Its Aniya: definitely trying this
Bre Carter:
IAmRachelBT: Ouuu yesss heree
xxRebornLover xx: first